Double Exposure
After buying the Instax Mini 9 Camera, You have taken so many picture with it. Now you want to do some crazy photoshoot with Instax film. Suddenly you have come off a idea off double exposure shooting. But how to do that ? Yeh ! Now you are at the right place to shooting double exposure with Instax mini 9 instant camera.
In short YES or NO. Because you need to use some trick to do double exposure with instax Mini 9. But it’s very easy and tricky also. You have to try several time to expert on it. When you could make it It would be more fun. But I recommended to not do immediately after buying the camera. Just use the camera built-in feature that is really awesome. After having lot of shot with it, Try Double Exposure funny shot.
OK Before I dive into more details of Double Exposure shot. Let’s have a brief answer of how to do it. You have to do the following steps:-
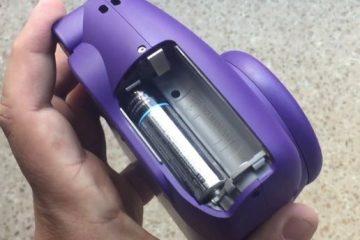
- Open up the back latch.
- Take the photo and quickly and gently lean back the cartridge.
- Wait for the noises to subside or stop.
- Close back the latch.
- Take your Second Photo.
It takes a bit of practice to get it right, It might possible you get bunch of overexposed photos for the first time. But If you do it right, you always get right output. So If you don’t want to get too upset doing it wrong, then read the full guide to be expert on Double Exposure shot in mini 9. I collected most of the picture example from mini 90 camera so that I can show you the best result of Double Exposure shot.
What is a Double Exposure Shot in Mini 9?
Before you take double exposure shot, you should know what is a double exposure shot ? One of the creative shooting among the Instax shooting is Double Exposure. The Instax mini 90 and Instax square sq6 has the Double exposure mode to capture double shot in one print. You can do it Instax mini 9 though and that is awesome.
Basically a double exposure shot do is that it allow you to take two photos in one film. So when you take your first shot it won’t come until you take the second shot. But instax mini 9 doesn’t have double exposure mode, so you have to use some trick. That’s mean You can come up thousand of creative ideas with using double exposure shot like half double exposure, silhouette (Shadow), Shadow and more. I really love this and now this is one of my favorite trick to get creativity.
How to do Double Exposure Shot with Instax Mini 9 ?
I am also new to Instax Photography and trying to figure out many think like double exposure and night photography. After surfing the internet I found this is by far the easiest way I’ve seen for double exposure!. So As I said before, don’t try it immediately after buying the camera. It’s very simple and easy steps.
- Open up the back latch. On the back of the camera, you will find a cover on there. You just have to put off it and there you go for the second step.
- Take your very first photo quickly. Because if you take too much time the surrounding light may hurt your film. So before doing it make sure the place of your first and second shot would be. After taking first shot, Immediately lean back the cartridge so that light can’t ruin your films.
- Wait for the noises to subside. Don’t clase back the latch before finishing the processing sound of the camera. It would be more better to lean back the cartridge saving from the light hitting on it.
- Close back the latch. When the noises stop, then close the latch quickly. Now ready for the another shot- I mean second shot.
- Take you second photo. Now you take your second shot however you want as output in a one film. Then you will see two photos come with on film as one photo that is amazing. You can do side-by-side or silhouette or upside down and many creative tricky shot after you learn it.
If u open the latch won’t the film get exposed to light and end up screwing all the films remaining? because its written in the manual not to open the latch after installing film. It is only if the cartridge itself opens up, but if you’re careful enough, it shouldn’t ruin it! Remember it’s a trick not the manual so you should aware of that.
Now let’s get into some example of double exposure shot-

This is one of basic example of double exposure shot.
You can see there are two photos taken from the camera into one film. The trick is that first half shot was taken of a man and then the second half shot of a woman. Now you can see the combination of result.
For doing this:-
- Use flat surface or tripod to proper measurement.
- Use Normal Background so the picture get focus only on the subject.
OK don’t try this before learning all of double exposure basic.Try the basic first.
Most easy and interesting example is that you can take your full shot left of the film and keep gape for right site. Then take another shot keeping the subject on the right side. It is very fun example of double exposure shot. Most of the people try to do it first and every body enjoyed it. I think you would also enjoy the shot. let’s look at a example-
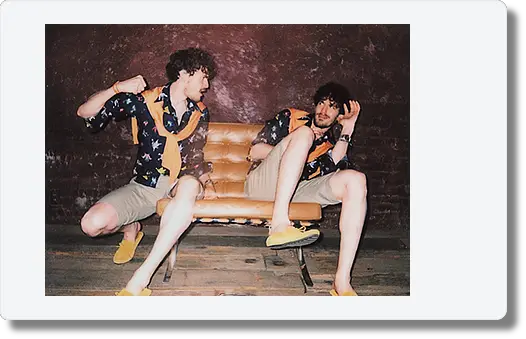
Double Exposure
here in the photo used double exposure shot. You can see there is a same person on the one film. Without any Photoshop you can do it on your hand.
- At first you have to manage a place like this or better from this. It would be much better if you can use it on a low light situation. I will explain the reason later.
- On the photo same person sitting on left on the bench. Then the shot was taken following the rule of taking double exposure shot which I have explained on this article.
- After closing the latch, second shot ready to shot. But this time same person was on the right side of the bench. Now you can see the film had come out two photos with same person in one film. You can do whatever you want. You can even use your creativity for double exposure shot.
Now use your own idea and make fun and creative shot using double exposure trick. But you might face several issue that is not major although. But you should know it before taking double exposure shot. Why ? Because you must face this normal issue. If you don’t know what is this then it cause your tension nothing else. So read more to learn more amazing hack of double exposure.
What happen when you open and close back the latch ?
Remember when you take a double exposure shot, you might face several situation. It is not worse thing. There are many things happen after opening and closing the latch. Basically when you close after opening the latch, the camera reset from the beginning. It could not recognize how much film is in the cartridge.
Why ?
It’s function that’s way. When you take a shot using a shutter button, the counter reduce one number from it. That’s is the reason when you load one film, counter number start from the 10 and start to minimize one after one shot.
The Instax mini 9 is not fully digital so that it count the current situation. As it works on analog way whenever you load or reload the film the counter will start from 10. You are not ruining extra film and you are not going extra film also. It’s just a number that’s it. So you can overlook that when you take your shot.
In short, if you do this method, the number on the dial may not match up, but don’t worry. It will go back to normal once you put in a new film cartridge.
Why Should you learn Double Exposure shot ?
Double exposure shot is one of the best shooting experience of my life. If you are curious of variation of Instax shooting, you must try this. If you learn double exposure shot properly, you will be better of any kind of camera shooting. Because when you do double exposure shot, it always helps to learn about light condition which is major topic of any kind of photography, place selection, camera settings and more. I always recommended to learn double exposure as well as bulb mode. Both shooting mode is awesome.
Tips before taking Double Exposure shot using Instax mini 9
Now you know almost all about basic shooting of double exposure shot using instax mini 9. If you are ready to do this, then try to follow some steps while doing this. If you aware of double exposure shooting, then you will always get better shot every time.
- Always try to use the last print of your film cartridge so that you can be always on safety side.
- Avoid UV light or Bright light or any kind of over exposed when opening the latch, because the light can ruin all of your film. As a result the film result come out blank or white or fade.
Before doing double exposure learn about the camera light settings first. If you want to know more about light settings of instax mini 9, then Click here for more tips about light and hi-key.
You can see the video as a help who would like to follow through content. This video has used Instax mini 8 to take double exposure. Don’t worry it’s the same theory as Mini 9. Both camera use mini film and has almost same feature.
Click here………… Top tips and Tricks Instax mini 9 for Best Shot.
Click here…… 15 best instax films you must try and Guide to use them.
click here……….. to read 8 Steps to be Expert in mini 9 like professional photographer.
click here……….. to Know the Major Difference Between mini 9 vs 8
CLICK HERE…..How to choose Best Instax Camera ?
click here……….. How much does a Mini 9 Cost ?


1 Comment
Isabelle · May 20, 2019 at 6:23 pm
Hi,
I don’t understand the first few steps of opening the back and leaning the film? In which direction? Leaning the film out of the camera? Or take the film out then lean it back in? Do you mean fully open the back or unlatch? More information is required otherwise it is unclear what you mean.