Hey, guys Today we are going to be looking at one of the funniest cameras the Fujifilm Instax Mini 9.
So in this Article, I am going to tell you all about the Instax mini 9 film camera. We’re going to look at what’s included, the prices the colors and we’re going to talk about really really important shooting tips that you need to know if you’re going to use this instant camera.
because if you don’t know these things you’re going to waste a lot of time and money and film trying to figure it out and wondering why your pictures aren’t coming up. So make sure you stick around for that stuff and let’s get going.
Okay, so from the beginning the Fujifilm Instax Mini 9 is an instant film camera. It shoots instant film. This is all you will get there is no digital picture when you take a photo with this camera, It will pop the film So you’ve got to keep that safe.
Now, this is the entry-level model for the Fujifilm Instax 9. There are the ton of other option of the Instant camera. If you want to check out all of those, We have a comparison Post that tells all the difference between Instax Camera.
READ MORE…. HOW TO CHOOSE BEST INSTAX CAMERA ?

The mini 9 goes for the reasonable price right now on Amazon but the price actually varies depending on the color you pick. You can find the link to the description.
So the instanx Mini 9 Camera comes in five different colors. There’s cobalt blue, There’s ice blue which is the lighter blue, flamingo pink lime green, and smoky white. If you want to see what all those look like the link will be below and you can let me know which one you would pick because I found it really hard to choose they’re all really cool.
| Colors | Visit Details On Amazon |
|---|---|
| ice blue | |
| Smoky White | |
| Lime Green | |
| Cobalt blue | |
| Flamingo Pink | |
| Note | Don't forget to Buy Film Along with the Camera |
Now, this is really really important when you buy Instanx mini 9 camera the film is not included. So you’ll get at home you’ll be all excited and then you won’t have anything to shoot with instant camera. So make sure you also, pick up a pack of Instax Mini film. You can buy really big boxes out of it too and you save money when you do so if you know you’re going to be shooting a lot with the camera which who isn’t. You can buy in bulk and save some money.
Ok, let’s take a really quick look at what’s included in the box when you buy the Mini 9. You get the camera.
- you get a nice wrist strap for the camera
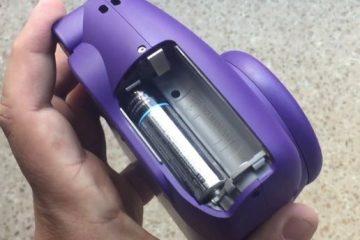
- you get two batteries
- A close-up lens attachment we’re going to talk a lot more about how to use this really soon so stay just be here.
- A super cool sticker then instruction manuals depending your living place which are boring and I’m not going to discuss them.
instax mini 9 instructions – How to set up
If you are new with mini 9 and want to set the camera perfectly, then click here to get the full step-by-step Guide of mini 9.
Now I’m going to show you how to set up the camera.
- Step 1 basic stuff Open the battery door. Top it down and put in the batteries that you know how. Close the door your camera is now set up.Ok now turning it on this actually kind of trips me up sometimes. The little button that you will find out on the camera. Just push it and the lens pops out. Now it’s on.You can look at the top. When you see that orange-red light. That’s mean you know that it’s ready to go.
Ok so that’s how you turn the camera on but the important part is loading it with the film. So I am going to show you how to do that and I don’t want you to panic. Because I know it might seem intimidating that is actually super duper easy.
For starters turn the camera off. Ok, So the film comes in a box like Instax Camera once you open it up. You will find nice little packet and just a quick note about the film this stuff is kind of delicate. Ok, you want to treat it nicely you want to treat it really nice.
So don’t leave it in a hot car don’t let it get super cold that can totally ruin it you want to kind of leave it around the room temperature nice and cool don’t get it wet. yeah, it’s kind of special stuff.
- Step 2 film setup So around on the back Instant camera mini 9. First, open the back door. Here’s the tricky part see there is a little yellow dot on the back after you open the door. You will get yellow dot on the film box and also on camera. Match it with the film little yellow to yellow dot… not so tricky right…………….. line up the yellow dots and drop it in. Close the door and this is so handy.
There’s this little tiny window on the back door that will let you be able to tell whether or not there’s some film in there. If it’s yellow from the little yellow dot you know there’s film inside the camera if there are no yellow dots that’s mean it’s empty so.
- Step 3 First Shoot … Okay now, this is really important in your pack of the film there is something called a dark slide. It’s like a cardboard cover that doesn’t let the light damage the film which means the first image you take here is not

INSTAX mini 9 dark slide
going to be a photo.So don’t get everything all set up ready to take the shot you have to take that dark slide off first. So turn on the camera nice and easy and press the shutter and the dark slide will come out just like that and it’s even really handy it says right on it, this is not a film. Just so you don’t get confused.

Alright, now you’re ready to take a photo. Just kidding you’re totally not ready to take a photo yet. Here is where the really important tips are, do not miss this part this is what’s going to help you make sure you actually get photos.
instax mini 9 instructions – How to set use
- Step 4 Flash & light So before you take a photo you need to know that this camera has what’s known as a light meter that is a device inside of it that is reading the amount of light that’s coming into the camera and it is two little dots on the front that’s where the lights coming in. These are sensors to measure the light. So when you’re taking photos do not cover these up in any way because it’s going to mess everything up.

INSTAX mini 9-flash

Now the way this is all working is that the camera is looking at the amount of light and deciding what sort of settings it should give you to get the right brightness of your photo That sounds confusing don’t worry it’s not. All it’s doing here is putting a little red light on one of these settings and that’s what the camera thinks that the settings should be.
You are the one who has to change it, okay you’re the one who has to manually adjust the settings but the camera is going to help you.
- Step 5-three important tips Tip number one. Basically what you need to do is you look to where that little red light is and you turn this dial until this dot lines up with the red light. It’s really really easy but you have to remember to do that otherwise, your photos won’t turn out properly okay.
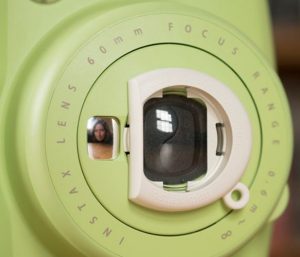
- Tip number two is that this camera has what’s known as a minimum focusing distance that means a minimum amount of space between the camera and the subject where it can actually get a sharp picture. If you go closer it’s not going to work. That distance is 60 centimeters or 24 inches. So don’t get closer than that. Make sure you’re back little ways and then you’ll get sharp photos.
- An important tip on Instant mini camera is that when you are at that minimum focusing distance when you’re that close the framing won’t be exactly what you see in the viewfinder so make sure to give your subject a bit of extra space so you don’t cut off anything important.
instax mini 9 settings – How to use
- Step 6 Closle-Up lens So let’s take a look at close-up attachment lens now. Okay here it is the settings and I will tell you how to use. The close-up attachment lens that comes with the instant mini 9. This is going to let you shoot at a distance between 35 centimeters and 50 centimeters so closer than the default 60 centimeters. Okay so putting it on the camera is very easy for use. The Inxtax mini 9 settings says to do it with the camera turned off. Take it and just pop it on the camera and now it’s on okay really really easy. Again before doing it turn the instant camera off.
INSTAX mini 9-close up lens
Now the thing about using this close of attachment lens is that when you look through the viewfinder you are not going to compose with the whole viewfinder screen. The circle in the center that will now become the top right corner of your frame and you’re just going to use that bottom left quadrant to compose the photo.
Just take a look through it when you’re doing that it will make sense but it’s just that you’re getting closer than normal. So you have to use less of the viewfinder. But practice with it and you’ll get the hang of it don’t worry about it.
instax mini 9 instruction – How to use – SELFIE MIRROR
So Instant mini 9 polaroid camera has a selfie mirror built in this little shiny mirror right on the front of the camera so that you can take a nice selfie and actually see what’s going on. I am going to show you the easy instruction of how to use it.
Generally speaking, I think you’re going to want to use this close-up attachment lens when you’re taking your selfie. Because otherwise, you have to hold it like so as far away as you can I’m not going to look flattering for anyone. So use the selfie mirror with the close-up attachment and I think you will have good results. Click here to read more about selfie, selfie mirror and close-up-lens.
- Step 7 The Flash with Exposure Alright let’s take a picture now, shall we? The first step turn it on the second step make sure that our dot is lined up with the light so we have the red exposure.Now you can hold for a vertical photo or for a horizontal photo. When you’re doing a horizontal photo this makes sure the flash that’s on the top. You are ready to take a vertical photo here. So get set go smile and the photo is coming up magically. Now you’ll notice that the flash went off this camera has an automatic flash. You can’t turn it off indoors that’s going to be really helpful. Because it’s going to help you see the subject the flash has a range of up perfectly if something is further away from that flash isn’t going to be able to light them up.
Now let’s take a look at our photos. When you take a shot from instant mini 9, it’s coming up and it takes about 90 seconds for the film to develop which is the funniest part of instant photography. Right you get to see it coming up there what was a good shot?
- Step 8 Don’t shake the film Now when you take the photo out. This is very very important. Don’t shake it no matter what they tell you don’t shake it. Do not squish it, don’t touch the photo at all hold it by the edges or by the bottom.Again these are like really crazy complex chemicals stuff’s going on here. If you are touching it or bending it ‘s going to mess it up. You can get really weird results where you get like a thumbprint on someone’s face or the colors go all really really weird. Especially if you’re using these with kids which is super fun. But don’t let them get their little paws on the photos right away or they totally get messed up. Just take the photo out real gentle set it down carefully let it develop and then you can look at it a little more aggressively if you want.
Battery life – instax mini 9 instruction – How to use
Speaking of flashes and battery life and all that with a set of batteries you can go through 10 packs or 100 pictures. Now as you go on it might take longer for the flash to recycle and have enough power to fire it up.
light meter- instax mini 9 settings – How to use
Alright let’s take a look at a few more tips for getting great results out of this camera.
First starters I was telling you about the light meter. You might be looking at these pictures wondering what it’s all about. There is a house for indoors there’s a cloud for like cloudish setting situations outside, there is one Sun for kind of bright and there’s a full Sun for really bright out there.
okay, so you don’t you know make your decision based on the weather around you again use the light meter use that dots and that will help you get the right exposure.
High key- instax mini 9 instruction – How to use
There’s one more at the end here that’s called high key .This is just going to make the photo brighter than the camera thinks it should be which can be a nice like effect kind of really bright images. But the manual will tell you don’t use this outdoors. Because it’s going to make things way too bright. So you probably want to experiment with that more indoors but it’s a fun look. So give it a try.
Click here to read more details use of High-Key
The Fun Part – instax mini 9 instruction
Now obviously one of the really fun things about these kinds of photos is that you can label the bottom with a pen to remember what was going on in the photo or write a little nice note for someone or something like that. So make sure you do that every once in a while just for funniest.
Why You Should Consider it
- We’ve talked a lot about keeping these photos safe. A really great way to do that is by getting one of them really really cool albums. I love these things. there’s a link to them in the post of this article. they’re super cheap lots of colors like you have to get these.
- They’re just the best and it’s just a really great way to kind of keep all the photos safe it’s way more fun to look at the photos like this and like a big giant pile on a desk or in a box so albums are a must-have accessory in my opinion.
- You can also get cool lenses that snap onto the front that will like put different color filters on the camera so that could be fun to experiment with. You can get you know straps neck straps different kinds of wrist straps you can get cases we never really use them. Because these cameras are pretty.
- They’re pretty robust and we haven’t really ever had problems but the cases look cute if you want to get one of those.
Instant mini Film factor- instax mini 9 instruction – How to use
A really fun thing to do is that they’re actually different types of Instax Mini film. So we’ve been looking at the color ones. But there is actually black and white film as you can see and that’s pretty fun. Its called Instax Mini monochrome which black and white. and we have a full review of that as well if you want to check that out that’s if I’m one to play with.
And then there are also totally like subspecialty films. So one is shiny stars and then other are rainbow. I really like this one it kind of the colors on each piece of the film slowly change till you get like a whole rainbow. So it’s just that it’s a ton of fun you don’t know what’s coming out each time the photos the frames are kind of different. So lots and lots of fun stuff to play with when it comes to the mini 9.
FILM REVIEW
There are lot of questions about film like-
Can I take the film at airport ? Can I cut the film or Can I use Expired film ? etc. I have written a full review of all film- mini, square and wide. You can read my review and choose whatever you want and this is also my recommendation for buying. CLICK HERE TO REVEAL THE FILM HISTORY, THEN BUY.
CAMERA REVIEW
There are lot of features in Instax Camera. Every camera has their own unique quality and settings. But what suits you best and what feature do you like most or do you like mini , square or wide format. There are lot of confusion might come to before buying the camera.
After buying the Instax camera, you always look for another feature that might not have that particular camera. Then you regret for that.
So I have researched all of the Instax camera and discussed all the camera individually so that you can understand better which one is better for you to buy.
So buy the camera after learning a bit more about Instax Camera. CLICK HERE…..TO READ CAMERA REVIEW.
So at The End…
Alright,
so that is the full guide to the Fujifilm Instax Mini 9. So let me know in the comments whether you have one going to get one and what color you’re going to pick cause again like there are so many fun colors to choose from and as well if you have any tips on getting great shots out of it.
It’s a pretty easy camera once you get the hang of it and then it’s just so much fun one of the most fun cameras that we own.
So if you don’t have one definitely check it out I think you will have a blast with it. If you enjoyed this Review, Don’t forget to share the knowledge. We do a ton of great photography stuff and a lot of instant film stuff as well so I think you would enjoy more of our reviews have an awesome day and happy photographing. source : photography Concentrate
Click here………… Top tips and Tricks Instax mini 9 for Best Shot.
click here………… to get the full step-by-step Guide of mini 9.
click here……….. to Know the Major Difference Between mini 9 vs 8
click here……….. How much does a Mini 9 Cost ?
Click here……….Can Instax mini 9 do double exposure ?
Click here…… 15 best instax films you must try and Guide to use them.


0 Comments