IF you want great shot of your Instax mini 9 camera, then you just need to learn a little bit more about the settings, feature and Brightness adjustment dial. If you follow this that I am going to explain on this article, then with a little bit practice or trial you will get every shot as much you like. If you are new with mini 9 and want to set the camera perfectly, then click here to get the full step-by-step Guide of mini 9.
Instax mini 9 settings
Brightness adjustment dial is the main feature of mini 9 camera. The High Key feature is amazing if you want softer images output like fashion or model. Another awesome feature is different kind of dial mode with automatic light setting. You only need to know how to do that. I am going to talk about the Selfie Mode also with close-up lens attachment. So you can get best picture with Instax mini 9 instant camera or Polaroid camera. Always Remember that The output of your shots never will be better if you don’t choose the right setting and light adjustment. And If there is no Enough light for capturing the shot, then also even perfect setting is not going to work.
If you want to safe your film by following the right instruction. You can also learn more about film history, best price and guide to use them by clicking the link. Click here…… 15 best instax films you must try and Guide to use them.
How to use Brightness adjustment dial ?
Before you move to the settings, you should know how to use Brightness dial for Instax mini 9 camera. Here is the picture shown you how to do the basic move. Collected from fujifilm official website.
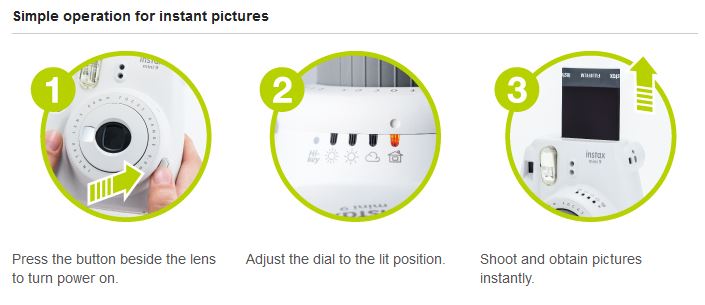
How to use Brighness adjustment dial
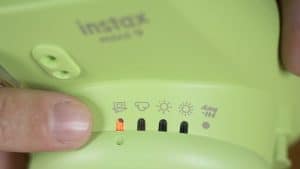
Brightness adjustment dial and Dots
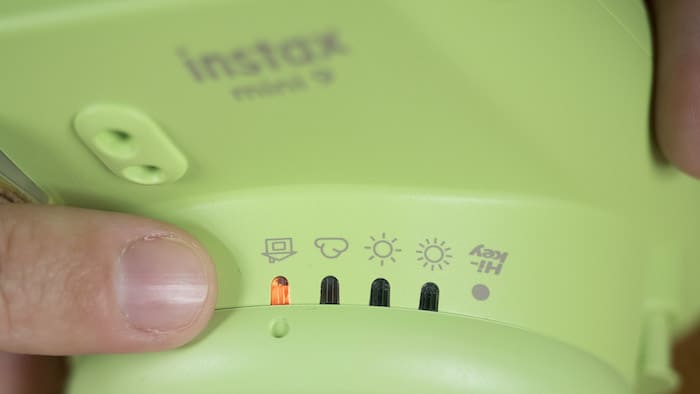
It is the best part of function of Instax mini 9. Just follow the Red light, Adjust the dial dots to the light and you are ready to take shot instantly. You can get best photos by understanding this. It is very simple to use. Instax mini 9 has automatic brightness exposure control so that as a beginner you don’t have to worry so much in instant photography. The camera determines the best brightness for you taking a picture, and informs you which setting you should use then. Because as the camera can help you to get best suitable setting by lighting the lamp, you just follow the instruction.
Brightness adjustment dial
Red sign of Brightness adjustment dial- This is the main part of signal for choosing the right light meter setting for your capturing. The light is going to tell you where the dial you have to move on. Light sign will move on in according to your surrounding environment to help you deciding what best adjustment you need
Mini 9 settings
. By matching the dial to the dot, you are ready to take action to capture pictures. Just remember, If you want best picture for your instax mini film then just follow this. If you do this and understand it, You will never going to ruin any of your Instant film and get best photo.
Sometimes the light show different place in short time. It is only because the camera is getting different light exposure. It might happen like when you are focusing the camera on the Bulb of home and you are movie the camera or you are at the party and the camera are getting different kind of light situation from this. Don’t worry it’s not going to ruin your shot. You have to be just aware of the situation. What to know if you don’t want to ruin your film ? Just start…..
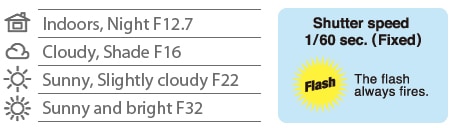
Indoors or Night- Are you at home, club, restaurant or event ? then the settings right for this moment ( Although Hi Key is the best for this situation ). Just adjust the dot of the dial to the indoors sign or home sign and shoot instantly. Don’t worry if you are at the right place, the camera will show you automatically. But sometimes you want more softer expression or glossy picture then you can use hi key. I will tell you with more detail of hi key and what is it.
What it does it open the hole or aperture more. As a result, The camera gets more light for the subject. Then it gets best photo for your picture. Easy and beautiful hah….
Cloudy and Shade- The cloud sign are situated after the home sign is another feature setting for your camera. What it is going to do is that if the weather is too cloudy, red light will move automatically to the cloudy aperture. Just move the dial dot to the cloudy and take the shot instantly for your camera.
Remember overexposure occurs when you cloudy setting in sunny day. And you can ruin you film. So just follow the light as I said.
Sunny and Slightly cloudy- There are two sunny sign in the instax mini 9 little sunny and very sunny. I am talking here about little sunny or only sunny. This settings only use on the overcast of the day. I mean there can be sun but with cloudy. And the Red light will show you the sight to sunny and you move the dial dot to it. Just go for shot. The shots output will be amazed by the result.
Sunny and Bright- Very important settings to remember while taking photos. Why ? This is the place where most people had ruined their film. Because they don’t aware of the Brightness. What actually happens that the camera tells you the Very Sunny settings but you don’t care of it. Because there is more light already. Suppose your dial to is set to cloudy or indoors mode that’s mean you allow the camera to get more light into the picture. As a result, Overexposure happens.
High Key
What is high key?
High key in photography normally uses bright lighting to blow out the maximum harsh shadows for your shooting images. Unlike the flash, it use light or bright or flash whatever you say, High Key is only use to get perfect instant photo to get best funny, lighthearted or beautiful Output for your Instax mini 9 Cameras.
When you look at the High Key picture, You will probably notice three major things right away. First, The picture is too bright. Second, lack of contrast in picture (actually this function uses for better shot). Third, Lack of Shadow in the picture.
On digital Camera like DSLR, Nikon you can see High Key function used for model photography, Beautiful flower picture and other subjects that are relatively feminine in nature because of high quality images. You can say it two different way to explain, One is better Contrast and Two is Quality as like as nature.
Why you should use High key Mode ?
Softer impression- This is the first Priority comes with the High Key mode. When you are in indoor place, then it is the best time to shot on High Key Mode. Just adjust the dial to the High-Key mode and start taking photos. But before you take photos with High-Key-Mode, Read the post carefully so that you can save the Instant-film to ruin it. High Key is very easy function to use just follow the instruction while capturing the pictures.
Indoors shooting- High-key-mode function comes for bright and shadow adjustment while taking the shots in Mini 9 Cameras.Sometimes you wonder it would be best output if the light is more brighter or little less shadow comes with. It will happen many time while taking shots with Instax mini 9. It is not the regular bright mode like you think. This feature helps to prevent the shadow of your pictures by reproducing high contrast.
Stylish Image- In the high key mode the extra bright makes the picture more stylish as you expect. It brighten skin tones, Making it a good choice for mode or fashion style shots. By creating more light and airy mode you can get best images although there is more shadow surrounding you and makes the photo more Stylish.
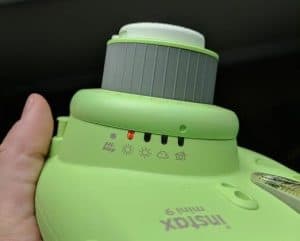
How to use High Key Mode ?
After turning the camera on, just rotate the Brightness adjustment dial to high key option which is far left with Hi-key logo. Pick your camera to subject and shoot. It is very easy to use hi key mode in instax mini 9 camera. just be careful when to use it or it might ruin your couple of dollar with bad output.
Note:- Remember Only use the Hi-key-Mode if the Camera suggests Indoors at the Brightness adjustment dial. It is the Ideal setting to use hi key mode. You will get 100% best pictures using Hi-Key mode then.
Instax mini 9 Indoors Mode
Where to use High Key Mode ?
Indoors- Hi Key is best for indoors capturing. It might be possible you are at friend’s party or go to club or most of time in house, then it is perfect time to shoot Hi key Mode. It is especially design for Indoors Softer Impression. Indoors like Club, Birthday party, Restaurant, Home or any kind of party is suitable for High Key feature.
Shadow- It could be at dawn or afternoon or little dusk, Then you can shoot with the high key. When you are out in the afternoon or near at evening time use hi key mode. Tree or Wall or Building shadow would be better for this too. Just don’t do it on over dusk.
Dark Night- Is it possible to take photo in dark ? Yes but then be careful of the flash. You can get better picture in the range of flashlight otherwise the film would be ruined. And also the subject must be clearly shown in the range of flash. The range of the flash Maximum is 2.7 meters away. So if the flash can’t reach the subject within the range, the Image will turn out underexposure.
Want to Expert like a Pro ??? then click here to get 8 steps to be Expert like a professional Photographer.
What should not do with mini 9 Shots ?
Do not take picture when the subject is too bright or brighter day or light. As the camera do not have the bulb mode like Instax Mini 90, you should not take picture of too bright situation. Because It’s going to ruin your picture quality. Just find some right situation for capturing the pictures.
Do not take picture direction to light or sun. It is also going to damage your picture quality. If you can avoid too much light, You will get better photos.
Close-up lens attachment
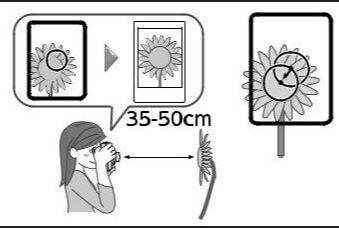
Closer picture- Close-up lens comes for take closer shot distance like 35-50 centimeters or Selfie distance. This is another features to take not only selfie photos but also closer picture. Sometimes you want to take photo of subject closer. Then you need the Close-up lens.
Close-up lens instax mini 9
How to set it up the close-up lens ?
Switch off the camera before attach or detach the close-up lens. Attach the left tab on the back to the left of the lens then attach the right tab so that it clicks into place. Then on the camera and take your shots.
Selfie
Selfie is the best option with the close up lens. You can get right focus for capturing pictures. Like the picture or you know how to take selfie with other device. You can check your framing with the mirror next to the lens.

Selfie instax mini 9
Hold the camera securely keeping 35 cm to 50 cm between you and the edge of the lens. Confirm the composition using the self-portrait mirror, then take a photo.
FILM REVIEW
There are lot of questions about film like-
Can I take the film at airport ? Can I cut the film or Can I use Expired film ? etc. I have written a full review of all film- mini, square and wide. You can read my review and choose whatever you want and this is also my recommendation for buying. CLICK HERE TO REVEAL THE FILM HISTORY, THEN BUY.
CAMERA REVIEW
There are lot of features in Instax Camera. Every camera has their own unique quality and settings. But what suits you best and what feature do you like most or do you like mini , square or wide format. There are lot of confusion might come to before buying the camera.
After buying the Instax camera, you always look for another feature that might not have that particular camera. Then you regret for that.
So I have researched all of the Instax camera and discussed all the camera individually so that you can understand better which one is better for you to buy.
So buy the camera after learning a bit more about Instax Camera. CLICK HERE…..TO READ CAMERA REVIEW.
click here………… to get the full step-by-step Guide of mini 9.
click here……….. to read 8 Magic Tips and Tricks of mini 9 like professional photographer
Want to know the Major difference of mini 8 and mini 9 ??? then click here……… to read mini 9 vs 8
click here……….. How much does a Mini 9 Cost ?
Click here……….Can Instax mini 9 do double exposure ?
Click here…… 15 best instax films you must try and Guide to use them.
Click here……….Does Instax Mini 9 Come with film ?
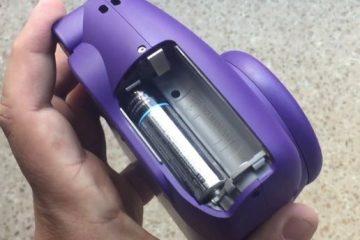
Click here……….What batteries does Instax Mini 9 Use?


10 Comments
Barbara Schramm · October 12, 2018 at 7:15 am
Hi – I lost my Close up lense of my mini 9 – where can I by a new one??
admin · October 12, 2018 at 12:30 pm
You will easily get it on amazon. You hardly can find same close up lens like mini 9. By surfing internet, I have found a close up lens for you.. Just click her to get amazon.
Mary Anne · April 3, 2019 at 9:12 pm
I was wondering because i had put in colorful borders and than i decided that i wanted to use a white one so i took out the colorful one and than when i put the colorful ones back in it came out white is there a way that i could fix that?
admin · April 4, 2019 at 3:48 am
No, You should not do that again.
What happens when you take the film cartridge taken out of the Instax camera when there is still have some film left in it ?
It will ruin your two or three film in the cartridge. First, when you put the cartridge back to your camera, the first shot will blank. Second, One or Two film could be ruined after that.
Good news is that you can save by learning some tactics like take out film in dark place or in the lower light. Read this Post about Film Guideline.
Instax film Complete Guide to use.
Gaby · April 16, 2019 at 12:57 pm
Hi. I want to take a photo of the sky, I’m going on a trip toa place where I can see the sky pretty starry and I would like to take an instax photo with my mini 9. How can I do that? Or at least try to get the best I could shoot there. Thank you! Great post!
admin · December 2, 2019 at 3:37 am
I think this Guide will help. Silhouette Double Exposure
Ava chavez · June 7, 2019 at 4:50 am
What happens if the dials start acting weird and when you try to put it on non flash it still flashes and then your picture doesn’t even develop right, does it mean that the camera is broken ?
admin · December 2, 2019 at 3:31 am
May be this is internal problem. You can ask this question to ifixit.com . They have very good support system.
Jay · June 23, 2019 at 10:02 pm
We just got the mini 9. All photos come out initially showing a repeating pattern of 3 lighter spots and then when finished developing is completely black. We’ve watched and read tons of tips and tricks. Does this sound like the Fuji film shipped with the camera is bad or a shutter problem?
admin · December 2, 2019 at 3:30 am
Please read this complete article. I think it might help.
https://instaxworld.com/15-best-instax-films-you-must-try-and-guide-to-use-them/
You should know use of Instax.