Hi Instax or Polaroid lovers, I am back with another Digital Instax Camera that shoot Instant film. Today I am going to talk about a Square Instax Camera named Instax sq20. This is the second version of hybrid digital instax camera and updated from the previous Instax sq10. The new feature like motion shot or frame shot will amazed you. People who are embarrassed of ruining Instax film and want digital feature with instax or Polaroid camera, Then you are at the right place.
So, as the Instax SQ20 is a Hybrid Digital Camera come along with analog feature, there are so many things to talk about. I am going to start from the basic to advance feature like effect, filter, mode, flash, internal settings and how to use everything so that you and the beginner also can enjoy this article about instax sq20. I will try to pour all my research to this article so that you can get almost all the information to one place. There are many tips and tricks you should know about this Hybrid Digital Instax square sq20 Camera. I love the creativity of this sq20 camera. So let’s dive into it.
Instax Square sq20 – unboxing and accessories
So start with the Hybrid instax Square sq20 camera unboxing. I am going to show you what you will get after buying this camera. The camera comes with two colors – matte black and beige. Obviously if you order black, you will get black or if you order beige, then you will get beige color. Which one you will order it’s your choice.
I have research on the internet and found the reliable source to buy this Sq20 Camera. Here is my recommended source to buy Instax sq20 camera.
| Colors | Visit Details On Amazon |
|---|---|
| beige | |
| matte black | |
| Note | [ Don't forget to buy Instax square film along with the Instax sq6 Camera ] |
Now when you ordered this camera, you get some stuff along with it. Make sure you get these item along with the camera when unboxing it.
- USB cables for charging. Yes you will get a USB cable to charge the camera. Unlike from sq10, you don’t need separate battery for it. Sq20 comes with built in camera so you can charge them like smartphone. You can also transfer the image or photo through this usb port. So that is very helpful or handy.
- Hand strap. Not the Neck strap, you probably would be confused with it. You will get Hand strap with it. If you think you need a neck strap, then you need to buy it separately.
- User’s Guide. The user guide is very helpful and you should read it before shooting or camera setting. If you don’t want to read that, don’t worry I am going to talk almost all of the important topic of it. So if you read this article, then you don’t need anything more.
INSTAX SQUARE SQ20 – Camera FEATURES and SETTINGS
If you recently have bought the sq20 camera or if you are curious to learn a little bit more of the feature of settings of the sq20 camera, then let’s start off with the feature of this camera. You can also say it Instax square sq20 manual guide or solution. This kind of little knowledge can help you better shooting. So you should follow the manual to be expert of this camera.
So why you should follow the manual ? The Instax square sq20 Hybrid Digital Instant camera comes with more interesting feature and settings. If you know how to use it properly and smoothly, then you will really enjoy it of every shooting of the camera. The new feature of Instax sq20 can avoid ruining of film. By knowing the features of this camera, you can enjoy every shooting and modes as well as many other tricks. Believe me it would not take so many time to expert in it.
Another benefit of knowing of basic manual and feature of sq20, you will hardly face problem with your instax camera. Like you know sincerity comes with solution.
So let’s start with the parts name of sq20. It’s not necessary to know if you don’t want to. But you should know it for better performance so that you can use it in your own way.
parts name – instax sq20
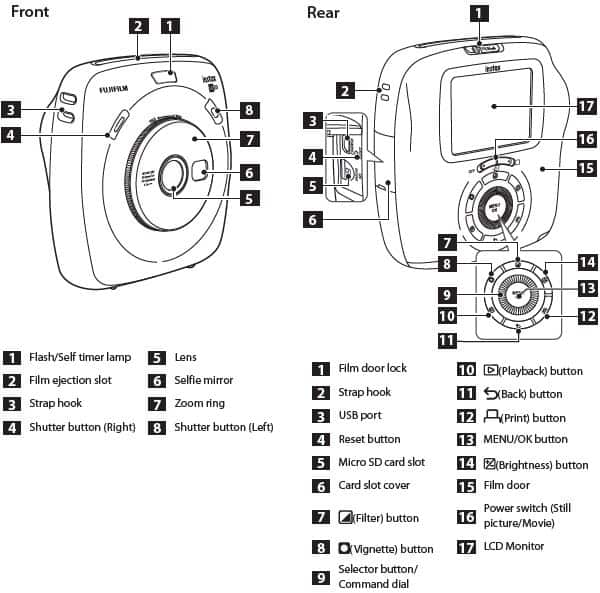
FRONT PART OF INSTAX SQ20
-
- Flash/self timer lamp – On the top front, you will see flash. Unlike the sq10, the sq20 gets both flash and self timer lamp on the flash. So when you use self timer lamp, you should follow the timer lamp on the flash. By the way, the self timer lamp stay up to 10 seconds.
- Film ejection slot – This is the place from where the film will eject after taking action. So you should aware of this not to put hand on it while printing the film.
- Strap hook – You will get a hand strap after buying the Instax sq20 camera. You need to hook this on the strap hook. You can also use neck strap with it. But you need to buy neck strap separately if you want it.
- Shutter Button Right- There are two shutter button on this sq20 camera. You can use both of your hand to shoot photo. It is also helpful for left-hand and right-hand people.
- Lens – You already know of the lens activity. The lens will take the shot and it is on the middle of this camera. Don’t put your hand on the camera while taking picture with it.
- Selfie Mirror – I love the selfie mirror feature of the sq20 camera. You can see your portrait on it while taking a selfie shot. Selfie mirror will help you to adjust the shot and get accurate instant film as you want.
- Zoom Ring – Like the other camera, you might think that the ring or dial would move while taking different shot with different mode but it’s not. When you take shot it won’t move. May be there are lots of internal feature in it that’s I don’t know.
- Shutter Button Left – As a great support for the left helper, the left shutter button is very helpful for them. Both left and right shutter button are really helpful when you shoot or capture your Instax shots.
This was the Front parts of the Instax sq20 Instant camera. I think that really be helpful to know of the camera settings. Now let’s talk about Back or Rear Parts.
BACK OR REAR PART OF INSTAX SQ20
Film Door Lock – Now let’s start with the film door lock. Here you have to put the film buy opening the film door. It’s very important to know more details of use so that you don’t face any problem in future. I have discussed about how to use the film door to load the film pack on this article below.
-
- Strap Hook – As I said, you can use two types of strap on the strap hook. One is hand strap which you would get with the camera and Other is Neck strap that you have to buy. Hand strap will help you to hand the camera by the and on the other hand using the neck strap, you can hand it with your shoulder.
- USB port – You need USB port yo charge the camera. You get a charger cable with the sq20 camera to charge the camera. You can take around 100 picture 100% battery charge. Another use of the USB is that you can transfer the photo to pc or smartphone.
- Reset Button – Don’t underestimate the reset button of the camera. You will get so many function, features, settings, mode with this camera. But you want to reset the settings of the camera to default. Then this reset button would help you to get back all default settings. I am sure you need Instax square sq20 reset button very badly every time you shoots especially as a beginner.
- Micro SD card slot – This is the special feature of sq20. That’s is the reason you can say it Hybrid Digital Instax Camera. You can print from your sd card saved picture using your camera. That’s mean you don’t need the share printing individually. You even can save the picture to it as like as the other digital or dslr camera do. You every shot would be perfect printing. I am going to talk about it in more dept in this article. Just keep reading it.
- Card slot cover – Card slot cover help to avoid dirt to your camera so that your camera don’t get dirty. This cover slot of sq20 hide the internal parts to show on. So you just need to enjoy the capturing the shots.
- Filter Button – There are lot of feature of sq20 instax square camera. Let’s start with the basic of filter button. Using the filter, you can change image to shadows or increase brightness or highlights. Suppose, you want to change the taken picture to monochrome, you can do that also. Variety of color filter comes with this filter settings. I have talked about the fiter in details on this article below.
- Vignette Button – You can adjust the brightness using Vignette Button of sq20 cameras. This button helps you to manipulate the feature of the light settings. You can do lower the light and even can brighten it by adjusting the brightness of four corners on the image.
- Selector Button or Command Dial – Command dial is the main button to me to manipulate the sq20 camera. All the camera features can change the settings by using this. You can move up, down, left or right using the selection buttons. All the feature like filter button, vignette, mode, flash, display settings, can be changed settings using this button. I am going to get more in dept of this feature in this article.
- Playback Button – I am going to discuss about Playback features on this article in details.
- Back Button – Similar to the other features, by pressing Back button, you will get back the previous settings of the current state.
- Print Button – When you are finished with your all the filter and settings with instax photography and you want to print the final version of your shot. Then press it to print the picture.
- Menu or Ok Button – This is the confirmation section to get enter the feature sub category or action.
- Brightness Button – You can darken your picture or photo using the brightness button or if you want to brighten the picture you can also do it by pressing the brightness Button to adjust the image according to your wish.
- Film Door – In the film door, the film pack has replaced to take shot. You can open film door using the film door lock.
- Power Switch – This is the main function of the camera. By pressing this, you can turn the sq20 camera on. There are two function of to take shot- Ones is still picture and Another is Movie. To take the still picture shot take to the power button full right of the camera and to take movie bring the power button to the middle position to pressing it. I am going to talk about all the feature of still picture and Movie of how to use them on this article in details.
- LCD Monitor – This is the display option of your picture and your camera settings. This is another version of viewfinder and the monitor for your shot. Whatever you do with the sq20 camera, you can see Live activity on the LCD monitor that is amazing experienced.
Well that is the all info of the instax square sq20 camera features info on brief. Now let’s talk about them in details.
How To Turn ON or OFF the Instax square sq20 Camera ?
Let’s start with the beginning of the camera. Unlike the sq10, sq20 has come with power switch. That’s mean you don’t find any individual power switch on the sq10. In the sq20 camera, you can switch on the camera and can take it to still picture as well as movie mode. You will really enjoy the flexibility of this turing the power on or off feature.
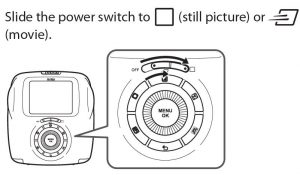
TO TURN THE CAMERA ON-SQ20, you need to use the power switch on the back of the camera. Just slide the power switch and you are ready to go. Anyway you will get two options to shoot with this sq20 camera. One is the still picture and Other is the movie.
turning the camera on of instax square sq20
TO SHOOT STILL PICTURE ON SQ20, you just slide the power switch to the end. You will see there a square icon to recognize the location. If you select the still picture, then you should a picture on the LCD monitor look like this.
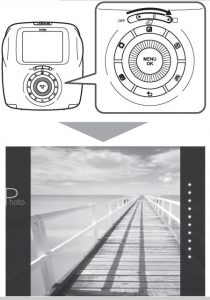
Still picture shooting on instax square sq20
On the middle left screen, you might see that a text that is Photo. That’s mean you are at the right place to get start. I have another discussed all about the still picture shooting tips from the beginning in this article. Now let’s talk about movie shooting.
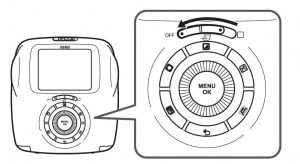
TO SHOOT A MOVIE ON SQ20, you slide the power switch to the middle. You can see that there is a movie icon under the power switch indicated the movie. If you want to shoot a movie with Instax square sq20 instant camera, then you need to select this to shoot that. The movie is the latest and very updated feature of this camera. Anyway when you select the movie the picture of the LCD screen should look like this.

Movie shooting on instax square sq20
You might see Motion written on the LCD screen to confirm this mode.I love the latest movie feature of the movie. You will really enjoy this feature also. For shooting a movie, just read this article to learn more.
TO TURN OFF THE SQ20 CAMERA, Just slide the power switch to left fully. You will see written OFF icon on the left of power switch. When you need to turn off the camera, just slide it to left. Here are the visual of the sq20 turn off option.
turning the camera off – Instax square sq20
Another good feature of the sq20 camera is that the camera will turn off automatically if you don’t use the camera for a certain period of time. You can specify the length of time before the camera turns off.
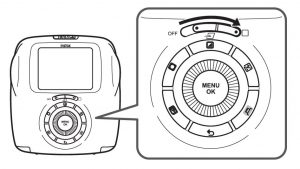
How To use SELECTOR Buttons and COMMAND DIAL ?
So, after having started the camera, You normally do a lot of photoshooting with it. But you want more control on it so that you can use it smoothly. This sq20 comes with awesome button named with selector buttons and command dial. But how to use them. Let’s start with the selector button, command dial and direction to use them.
Different from the other analog feature instax camera, the sq20 has come with some rolling type of button. As first I thought I could not be used to with this cameras button feature. Now I realize it is more fun and flexible.
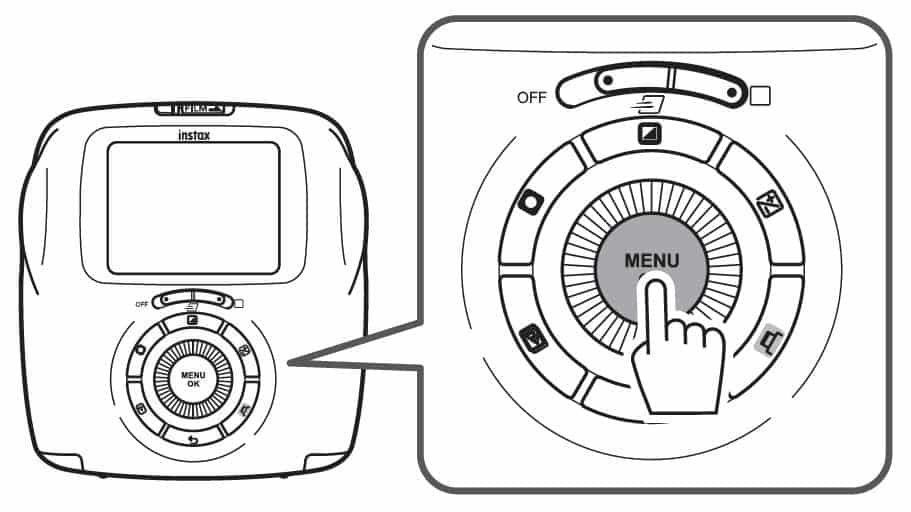
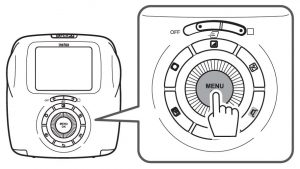
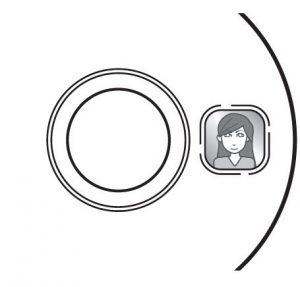
Here in the picture you can see a rounded circle surrounding by individual button like effect, vignette and more is the selector button. You can use it just using your finger touch.
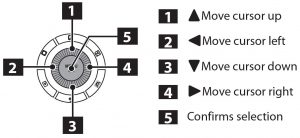
using the selection button or command dial on sq20
But how to use them confidently. If you want to move up to make any action to your LCD screen, then you need to touch the selection buttons to up. In the same case if you want to move left, right or down use your finger to get there and take action.
The middle button of the selection button is the main confirmation button. It basically use to make your final decision. Just pressing it, you can take action immediately to farther on LCD screen in sq20 Instax Camera.
Command Dial is the main section to use this Instax Square SQ20 Hybrid Digital Camera. That is the thing that’s make this camera more digital than other Instax Cameras.
All the action like selecting a menu or item, changing playback display, adjusting the value of image effect, selecting a frame when printing from a movie file and more in dept settings or mode you will use while shooting with this sq20 camera. So let’s get all of the features and settings step by step.
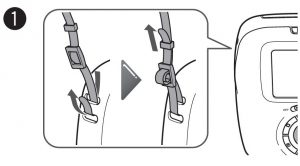
How To Attach HAND STRAP and SHOULDER STRAP on Instax sq20 ?
So let’s start with the easy part which is hand strap. Just put the strap through the achor. You can use left or right whatever you wish. Then hand it like a hook. This is so handy. You can do this only using visualization. Here you can see how to attach the hand strap on the sq20 Instax Camera.

attaching the Hand strap on instax sq20
Now some point you need to follow using the hand strap. When you carry or use the camera, put the hand strap around your wrist so that the camera does not drop. As this is not a shoulder strap or neck strap, do not use it as on your neck or shoulder.
Now let’s get going to attach a Shoulder Strap. I am going to show to how to attach a sq20 shoulder strap the proper way as per the manual. But at first you should know that you don’t get Shoulder strap along with the camera. You have to buy it for your camera separately.
When you buy a brand new shoulder strap, and basically what you need to do is attach these straps exactly the same. Because you have to straps to attach with the camera’s two anchor point.
attaching the Shoulder strap on instax sq20
First put the belt on to the strap through the anchor point of the camera. It’s a little bit tricky. Then pull it through the strap. You will get two and one bar on the belt as like as the picture. Just put the end piece over through the bar and you finished that. After that put the end of the strap through the little slider piece as like you put belt on your pent. Do the other part exactly same way.
As this is not a neck strap, use the strap only as a shoulder strap. Never put the shoulder strap around your neck. Always be careful so that the shoulder strap does not obstruct the film ejection slot.
How To CHARGE THE BATTERY of Instax sq20 ?
Battery charging is another updated feature of sq20. This camera has built-in battery so you just need to charge the battery to use the camera. There is no separate battery to charge like the sq10. You can not remove the battery from the camera. When you buy a brand new camera, the battery is not charged fully at shipment. So make sure to charge it before using the camera.
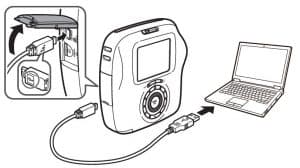
Just get the USB cable with a smartphone power adapter and plug in to a switchboard. First open the cover where located the USB port. Plug in one part to camera and other to the adapter. Follow the instruction according to the picture so that you can be careful of the orientation.

Charging the battery instax sq20
CHARGING THE ADAPTER- So you will get a charger with the camera. You need a power adapter but where to get them. Actually you don’t need individual adapter to use it. Use a power adapter of a smartphone for USB cable. Then connect the camera to a smartphone power adapter using the supplied USB cable to an indoor power outlet.
Now another question can come to your mind. Can you use the sq20 came while charging ? In short, yes you can. You can take a picture or print an image while charging is in progress.
It might possible, you are capturing your favorite shots and your charge of the battery is getting low. Then you can even use power bank to get the moment of your shot. Or suppose you are at the wedding party, birthday party or any important event, you must need to charge the camera that event. The battery default shots with full charge battery is 100 prints. 100 prints picture is not enough for a event. So you need to take more shot, then you can also take picture while charging is progress too.
CHARGING TIME- Another question people ask the battery charging hour. How long does it take to charge a battery. It depends on your adapter. But if you charge it through your smartphone adapter, it might take two or three hours. Charging time is approximately two to three hours of instax sq20.
CHARGING FROM A PC: Another question people ask that – “Can instax sq20 charge from a PC ?”. In short, Yes you can charge your sq20 camera from a PC. In this case, you don’t need the adapter to charge your camera. Just connect the camera and PC directly and you are done.
Don’t connect them via External keyboard or USB hub. If you do, it will take long time to get full charge. If the PC enters the sleep mode while charging is in progress, charging will stop. So to be continued charging, resume the PC and reconnect the USB cable. If the PC enter sleep mode automatically, the charging progress might not stop.
Some PC may not be able to charge the camera depending on your PC specifications settings, or status.
CHARGING STATUS INDICATION: But how do you know the battery condition while charging instax sq20. As a beginner of instax sq20 camera users, you should know the battery condition or situation while charging so that you can save more time. I have got a chart from Instax.com about battery charging status indication. So I thought I should share with you also.
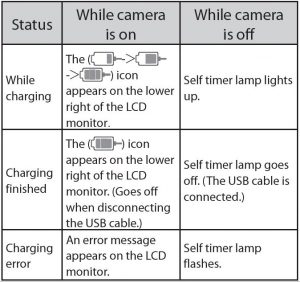
Charging the battery – Status Indication sq20
According to the chart, when you plug in to charge your camera, the battery icon will pop up appears on the lower right of the LCD monitor while your camera is on. But if you want to charge the camera when the camera is off, then the self timer lamp lights will be turn on automatically. Light up indicates that the camera is getting charged.
On the other hand, when the charge is finished, then the icon will show fully charged battery. Then you can disconnect the USB cable and the icon will goes off. But when your camera is off and your battery charged fully, then the self timer lamp goes off automatically.
If the battery charger is not setup properly, an error message appears on the LCD monitor. If the camera is off mode, then the self timer lamp flashes again and again to indicate the charging error.
CHECKING REMAINING BATTERY LIFE- How to check the battery life while shooting film from your camera? Just press the back button on the shooting/playback screen displays remaining battery life on the LCD monitor.
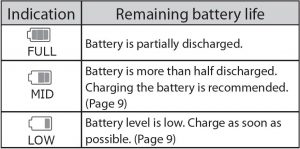
checking remaining battery life instax sq20
It might possible, you want to check the battery life. So you can check easily by pressing back button. When the battery level is low, the low battery icon will appears on the lower right of the LCD monitor indicates that the battery level is low. When no battery capacity remains, the empty sign of battery icon appears enlarged on the LCD monitor and the camera turns off.
BATTERY SAFETY TIPS
There are many ways to use the batteries properly. You can prolong battery life by following tips. Incorrect use can shorten leakage, overheating, fire or explosion. So just be careful of using the battery of instax square sq20.
-
- The battery gradually loses its charge when not in use. Charge the battery one or two days before use. Battery life can be extended by turning the camera off when not in use. Battery capacity decreases at low temperatures; a depleted battery may not function when cold. To extend the battery life, warm the camera before using it.
-
- Charge the battery using the supplied USB cable. Charging times will increase at ambient temperatures below +10 °C or above +35 °C. Do not attempt to charge the battery at temperatures above +40 °C; at temperatures below +5 °C, the battery will not charge. The battery does not however need to be fully discharged before charging.
-
- At normal temperatures, the battery can be recharged about 300 times. A noticeable decrease in the length of time the battery will hold a charge indicates that it has reached the end of its service life.
-
- Performance may be impaired if the battery is left unused for an extended period of time when fully charged. Deplete the battery fully before storing it. Store the camera in a dry place with an ambient temperature of from +15 °C to +25 °C. Do not store in locations exposed to high extremes of temperature.
- The battery and camera body may become warm to the touch after extended use. This is normal.
How To LAOD Instax square FILM PACK in sq20 ?
Now you know the basic stuff of the camera. But now you want to shoot film with your very first camera. Then what to do ? Yes let’s start with that. I have come step by step guide to load the instax square film in sq20. You can do it by reading or following the picture to load and unload your film.
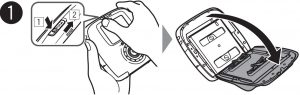
- First you will see a back cover lock on the back of your camera. Just press and hold the button of the film door lock, then slide the lever to the right until the film door opens slightly. So now you’re ready to load the square film. Follow the picture visualization to get more clear instruction.
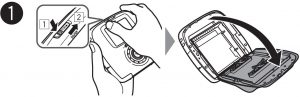
Loading the film pack instax square sq20
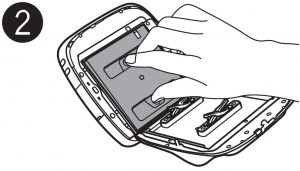
- In the picture two, you can see exactly how to hold the film pack not to ruin the film. Hold both sides of the film pack, align the bottom the film pack on the groove of the chamber, then insert it straight. You can see clear indication on the picture with two steps.
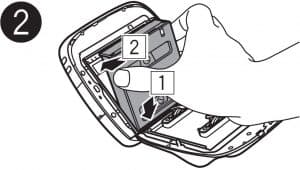
Loading the film pack instax square sq20
- Now when you insert the film, close the film door and make sure the film door lock clicks into place.
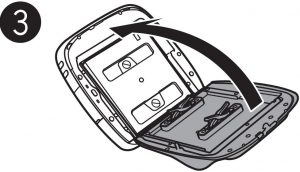
Loading the film pack instax square sq20
- After having locked the film door, the film cover (black) is ejected automatically. It will happen immediate closed of the film door so don’t put on hand on the film ejection slot. It is as like as the share printer of fuji. As the sq20 instax camera is digital, the process will happen automatically.
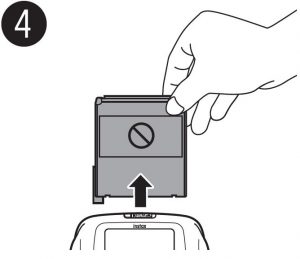
Loading the film pack instax square sq20
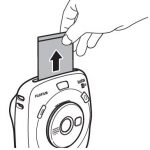
When the film cover has been ejected , the camera stops making a sound, grasp the edge of the film, then take out. Finally your camera is ready to take a photo for you. You will get 10 shot then now. After finishing the film, The film counter will tell you the how many number left in the camera.
Each fujifilm Instant film “Instax SQUARE” pack contains 1 black film protective cover and 10 film sheets.
How To UNLOAD or REMOVE Instax square FILM PACK from sq20 ?
When your 10 shot of prints has finished, all dots on the right of the shooting screen are displayed in gray. So that’s indicates to unload the film. But how to do that ? follow the procedure or instruction below to remove the film pack.
- Press and hold the button of the film door lock, then slide the lever to the right until the film door opens slightly.
- Grasp the rectangular holes on the film pack, then pull it out straight.
Unloading a used film pack from sq20 Instax Camera
Unloading a used film pack from sq20 Instax Camera
HELPFUL TIPS FOR LOADING AND UNLOADING SQUARE FILM
-
- Don’t open the film until you have used up the film. Otherwise, the rest of the film is exposed and turns white and the film can no longer be used.
-
- When you load the film pack, never press the two rectangular holes on the back of the film pack.
-
- Never use a film pack beyond its shelf life; otherwise, it may damage the camera.
-
- Use FUJIFILM Instant Film “Instax SQUARE” only. To get the best film pack click here.
-
- The Instax mini film or Instax WIDE film cannot be used.
-
- Only remove the film pack from its inner bag just before inserting into the camera.
- The film cover is ejected automatically when the film door is closed. The camera works to eject a film even though the film pack is not loaded.
How To TAKE YOUR VERY FIRST PICTURE from instax square sq20 ?
After loading the Instax film, You are ready to take your very first picture with Instax square sq20. So just be careful of settings before taking your shot; otherwise, you might be embraced with your picture settings or output result. Let’s start with first shot.
FIRST, turn the camera on, use the power switch on the back and select still picture or movie. To select the still picture slide the power switch to the end where you can see a square icon. If you select still picture, you will get a picture written photo on the LCD monitor. That’s mean you are at still picture mode.

taking picture with instax sq20
SECOND, Now hold the camera carefully.

taking picture with instax sq20
THIRD, Select the shooting mode or perform the steps to select your image effects. You can take directly to picture shooting. If you want to do it with using effect than I have written details of using effect in this article below.
FOUR, Use the zoom ring to confirm the desired composition of the final image.
FIVE, Press the shutter button halfway to focus.
- If the camera is able to focus: The camera beeps and the green focus frame appears on the monitor.
- If the camera is unable to focus: The red focus frame appears on the monitor. Change the composition or use focus lock.
SIX, Lightly press the shutter button the rest of the way down to take the picture. The picture is taken and it is saved in the camera’s memory.
- Keep reading this article for the procedure to print an image.
- If the print mode is set to auto print mode, the image will be printed.
TIPS BEFORE TAKING PICTURE WITH INSTAX SQUARE SQ20 –
-
- When you take a picture, hold the camera with both hands and brace your elbows against your sides.
-
- Be careful not to touch the lens surface when you press the shutter button.
-
- When you press the shutter button fully, press it lightly.
- Be careful that your fingers or the strap do not cover the flash, lens, or film ejection slot. If a subject is poorly lit, the flash may fire when the picture is taken. You can change the flash setting to disable flashing. Keep reading to learn more about using flash of sq20 Instax Camera.
How To VIEW IMAGES on Instax SQ20 ?
Now you have taken your first picture. You have also taken a lot of picture with sq20 and had more fun. But you want to see all of pictures taken with sq20 and thinking how to view that pictures. The more fun feature I love this Hybrid Digital Instax square sq20 camera is that I can see or view images on the monitor. There are only three steps to do that.
ONE, Slide the Power switch to still picture. If your camera is turn off, then you can do this just sliding to the right end. You don’t have to do it when the camera is on.
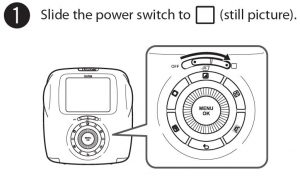
viewing the image on sq20 Instax camera
TWO, After having gone to the still picture mode, Press the Playback button back on the command dial. By doing that you can see or view the recent picture on the monitor that had been taken through the sq20. The picture will show the most recent picture first then the others.
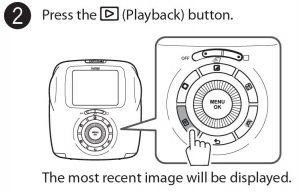
viewing the image on sq20 Instax camera
THREE, Now you want to see the pictures one by one. Use your finger on the command dial to go back or forward picture. If you press left dial, you can view the previews picture and by pressing right dial, you will see the next images.
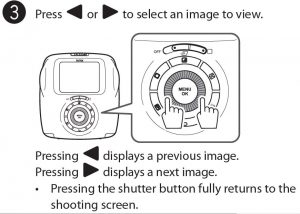
viewing the image on sq20 Instax camera
But If you want to get back directly to the shooting screen, then press shutter button. It will return back you to shooting screen. Then you can do further action with your sq20 Instax Camera.
When The Instax sq20 SHUTTER Doesn’t work ?
The short answer is if your memory becomes full, the shutter won’t work. Instax square sq20 camera can save approximately 50 still images in the internal memory. However, using a memory card enables you to save more images.
So when the memory becomes full, the shutter will not release and you cannot take a picture. Delete the images in the memory or use another memory card.
You should save your picture from your memory to other safety devices or SD card. Images in the memory may be damaged or lost if the camera has any trouble. I recommend you store important image files as backup using other media (e.g. Hard disk, CD-R, CD-RW, or DVD-R, etc.).
If you request a repair for your camera, Then they cannot guarantee the safety of the images stored in memory. So that’s why You should store it anywhere else. That’s why it would be best to use external memory card for your camera.
How To SHOOT A MOVIE on Instax sq20 ?
You can shoot a movie through the Instax sq20 camera and take a frame through this video. I mean after having done a video complete, you can shoot the best part of the movie. By doing this, you can now know why this movie feature is more important to capture your perfect moment.
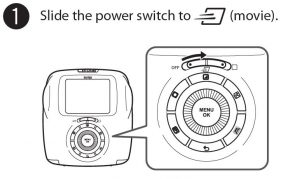
First start with the basic movie shooting. If your camera is turn off, then slide the power switch to turn it on. After that bring the power switch to the middle position by sliding. You can see a Movie logo under the power switch indicated the movie mode.
shooting a movie on instax sq20
When you shoot a movie, You may see Motion written on the LCD screen that confirm that you are at the movie mode.
SHOOTING TIME: You can record a movie up to 15 seconds but you need to have a SD Card or memory card to do that. Then you can capture your perfect shot from recorded movie.
SOUND: There are no sound will be recorded to the sq20 camera while movie shooting. As this camera only for getting perfect picture, this camera allow you to give result as good as it can. This camera only focus on getting instant picture so that the camera has come advanced featured like video frame to fulfilled it.
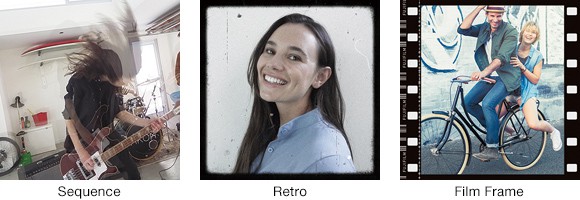
EFFECT FOR MOVIE SHOOTING: You can perform a different kind of effect or filter while shooting video through instax sq20 camera. But how many filters can you use for your instax sq20 camera. The answer is three – 1) Retro, 2) Film Frame and 3) Sequence. To learn more about effect and filter read through the article.
After selecting the effect, use the zoom ring to confirm the desired composition of the final image. Press the shutter button fully. The screen below appears and movie shooting will start.
shooting a movie on instax sq20
Use the zoom ring while shooting is in progress. the elapsed time by the bar will be shown on the left. When you select “Retro” , “Film Frame”, or “Sequence”, the camera applies the filter effect to the movie file while shooting is in progress. Another important factor is that you cannot cancel the applied filter effect or apply another filter after shooting a movie.
To finish the movie shooting, Press the shutter button fully again. By doing this, the sq20 camera stop recording.
How To PLAYBACK MOVIE on Instax sq20 ?
Nice thing about sq20 is that you can watch played back on the monitor. You need this for selecting picture or framing from video. So you can capture your best shot by playing back movie on sq20. Just follow the steps to know how to do that.
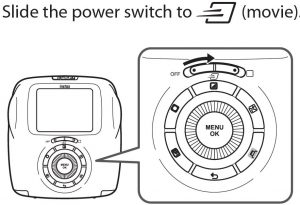
First, you need to be on movie mode to do that. So to do that slide the power switch to movie just like picture below. By doing that you can be at the movie or video section.
playing back movies on Instax sq20
Second, On the left of the command dial or selection button, you will find a playback button. Just press it. By doing that you can see your desire video on the monitor.

playing back movies on Instax sq20
Third, Press left or right as like as picture to move previous or next video.
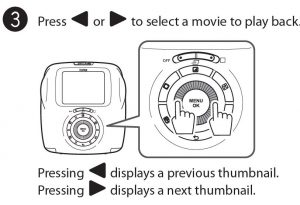
playing back movies on Instax sq20
Four, Press down to start a playback video. Use the same method to pause or resumes video. This is tricky because most of the people would think that the menu or ok button would be the play button. So just be careful and start the video.
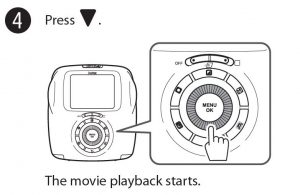
playing back movies on Instax sq20
How To capture a picture from movie playback on Instax sq20 ?
Now you know how to start a movie playback and play with them. Now start with the main part that is taking or capturing picture from a movie playback. On the command dial, press down to start a movie playback like I said before.
Now start with how to take a playback movie-
-
- Press down to play or pause or resume playback.
-
- While the playback is paused, press left or right or turning the command dial allows you to playback frame by frame.
-
- In additionally, pressing the MENU/OK button saves the displayed image (frame) as an image file and you are done.
- When the playback is finished, the movie thumbnail displayed previously appears.
Do the same thing again to take your favorite shot from Your Instax Movie shooting. By doing that, you can make your every shot more memorable.
To learn about one of the special feature- Frame Grab and how to use it, Read more.
How To Use FRAME GRAB ? – Special Feature
Now you know the basic of the instax sq20 camera. So let’s get into one of the new and advance feature named Frame Grab. So first go to the movie mode for doing this. Grab your camera and shoot your video for 15 seconds. The camera has special feature that can take very minimal shot with video.
If you don’t know how to shoot a movie, just read this article again to learn it.
Shoot a video up to 15 seconds long, use the dial on the back of the camera to select the frame that captures the moment best and print the photo.
Here you can see that the awesome feedback of frame grab. The picture composition quality is awesome. I love this new feature of instax sq20. You can grab any moment as you want and print the best picture. You can even make 3 type of nice frame before print it. Let’s talk about that.
3 Filter on Movie or Motion mode: In addition to the “sequence” that allows you to add an afterimage to the photo, two types of filters are provided exclusively for movies. Expression method which the movie shooting function made possible further widens the width of the image.
movie filter effect on instax sq20
You can use only these 3 type of filter for movie. There are ton of filter comes with instax sq20. Read more to learn this special feature.
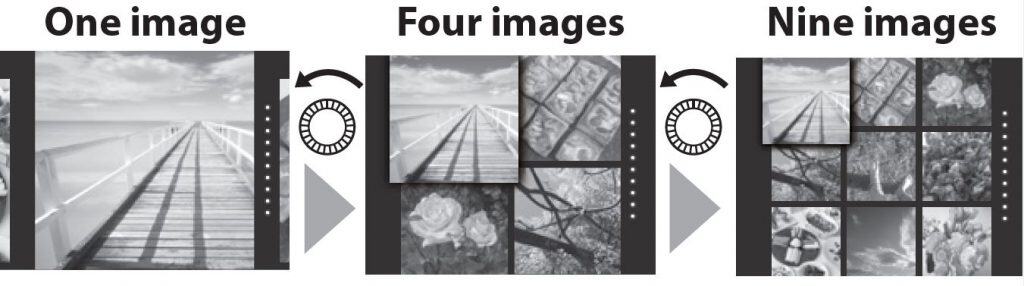
How To Change the number of images on Instax sq20 monitor ?
If you want multiple images on one frame, then you can do it with instax sq20 using command dial. There are three option to print in one frame – One Image, Four images and Nine images.
Just turn the command dial counterclockwise changes the number of images (one, four, or nine).
Follow this 3 step to do that—-
-
- Turning the command dial clockwise changes the number of images (four or one).
- Pressing the MENU/OK button or (Back) button cancels the multiple image display.
- You can print an image while four or nine images are displayed.
How to change the number of images on instax sq20 monitor
Change the number of images For Movie- Go to the movie mode. When the movie thumbnail is displayed, turning the command dial counterclockwise changes the number of images (one, four, or nine).

How to change the number of images on instax sq20 monitor
After doing that, follow the same 3 step and you can see the result on the monitor before final result.
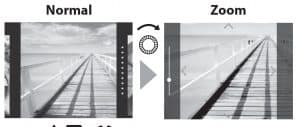
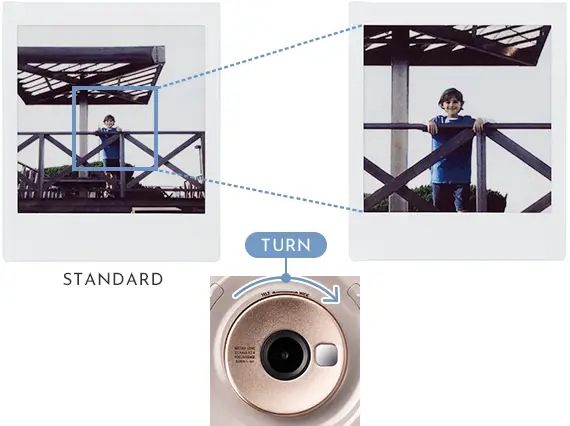
How To Zoom in on Image instax sq20 ?
There are lot of uses of command dial or selector. Zooming in is the important one. After taking a shot, you can see the different angle of the picture by zooming in. By doing that, you can use zoom in as a crop tool on instax sq20.
You can zoom in on an image on the monitor by turning the command dial clockwise. But you need to be careful because if you do counterclockwise, it will change the number of images rather zooming in.
So to do that follow this steps-
-
- Use up, down, left and right buttons to move the view area to get perfect composition as you want.
-
- Pressing the MENU/OK button or (Back) button cancels zooming.
- You can print an image while it is zoomed in.
zooming in on image Instax sq20
You can zoom in on the image on the monitor or change the number of images displayed at a time. The SQ20 is the first camera in the instax series to include a zoom function. The digital zoom enables you to zoom in up to 4x and adjust the view angle however you want.
zooming in on image instax sq20
How To PRINT from A picture or movie on Instax sq20 ?
After taking a picture shot or a movie, you are on the way to print it LIVE. There are two way to print with instax sq20 – one is from the picture and other is movie. Let’s talk about both way and process step by step to print a film or picture.
PRINT DEVELOPMENT TIME- The development time is approximately 90 seconds. It will take around two minutes depending on the ambient temperature. Don’t touch the film surface while developing the film, otherwise; the film output might destroy slightly.
First step to get on the mode- For picture slide the power switch to still picture mode and for the movie slide it to movie mode. This is important step to get forward to picture or movie mode. Now let’s start printing process of Instax sq20 Camera.
printing an image from picture or movie on sq20
From PICTURE or PHOTO – Press the playback button to get all the picture you have taken with your instax camera. After that you can see all the picture on the monitor to preview.

printing an image from picture on sq20
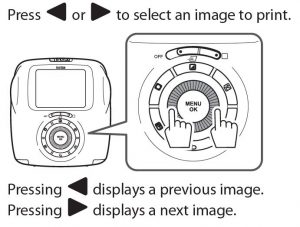
Now you need to select an image to print. To select your printing image, press left or right command dial. Pressing left take you to previous image and pressing right will take you to the next image to print.
printing an image from picture on sq20
You can add image effect as necessary as you want. There are lot of amazing effect to filter image. You just use them on your picture and print it. I am going to discuss it more on the next.
Now press the (print) button. Then press the MENU/OK button to start printing. If you want to cancel printing immediately, press the Back button.

printing an image from picture on sq20
When the film has been ejected (the camera stops making a sound), grab the edges of the film, then take it out.
printing an image from picture on sq20
Now you are done printing a film from picture or photo using still picture mode. The film will take 1 or 2 minute to develop properly.
FROM A MOVIE FILE – After going on the movie mode by slide the power switch to middle which is first step, you are now ready for further step.
You will see your recent videos on the monitor. Now just press command dial left or right to select a movie to play back. You will see when you press left, the monitor will display a previous thumbnail. In addition, if you press right the monitor will display a next thumbnail.
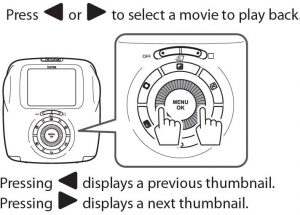
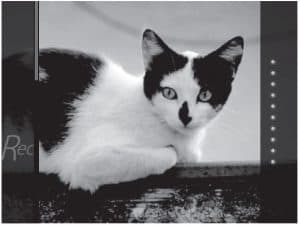
image captured from a movie file on Instax sq20
Now follow the picture to do the further step to take a picture from a movie file. Press down to pause or play or resume the video. You can do apply any effect before saving as a picture file while pause video.
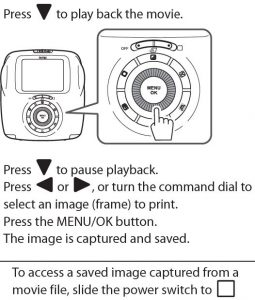
image captured from a movie file on Instax sq20
And by press left and right of the command dial, you can select an image frame to print. By doing that, you can print any kind of moment of the video and that is awesome.
To save the picture press MENU/OK button and the image will be captured and saved.
HOW TO VIEW SAVE PICTURE FROM A MOVIE FILE ? – The answer is simple, To access a saved image captured from a movie file, slide the power switch to (still picture) and follow the printing steps of the picture discussed above.
How To know how many film left in your instax sq20 camera ?
Now let’s talk about another important feature of the instax sq20 camera that is film remaining indication. What it is going to do is that it will help you to know the existing number of film. It will happen everytime that you would want to know how many film left in the camera before printing.
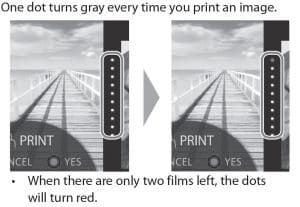
It’s very easy. You will find it to Dots on the right of the monitor indicates the number of remaining films. Every time you take a print of photo, then immediately one dot turns gray.
how to know how many film left on instax sq20
So that’s mean you will notify every time when you take out a print of film. One dot turns gray every time you print an image.
Remember one more important tips is that when there are only TWO FILMS left, the dots will turn red. That’s mean the camera indicates that you need to ready to put another film pack after finishing more 2 print of films.
For still picture, you can print an image that is zoomed in or print four or nine images on one film. Use the command dial to change to the multiple image display or you can even change it to different kind of effect before printing it.
Suppose you want to print zoom in film or different number of film like four or nine for movie playback. Then you need to do it on still picture mode. Do whatever you want to do on movie playback. After take different kind of action and make it save. The picture will save automatically on the still picture mode. Then move to still picture mode by sliding the power switch to the full right. Now you are ready to take any print from there.
PRINT DEVELOPMENT TIME- The development time is approximately 90 seconds. It will take around two minutes depending on the ambient temperature. Don’t touch the film surface while developing the film, otherwise; the film output might destroy slightly.
How to Insert a Memory Card on Instax sq20 ?
As I said before Instax square sq20 has the capacity around 50 still image to save, you need a memory card to take unlimited shot as you want. So let’s see how to put a memory card to your instax square sq20 camera.
- On the side of the camera, you will see there is a card slot cover. Just open the card slot cover just like the picture below and take further action.
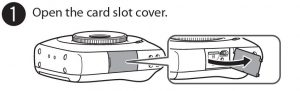
inserting a memory card on instax sq20
- Now take the memory in your hand card to put in your camera. See which part of the card have to need to go first. After that slide in the memory card. Just be careful the memory card clicks into place at the back of the slot.

inserting a memory card on instax sq20
- Now you’re done with putting in the memory card on instax sq20 camera and close the card slot cover. By doing this step, you are now finished of inserting memory card on instax square sq20 camera.
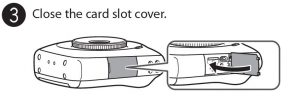
inserting a memory card on instax sq20
Remove the memory card from instax q20 – To remove the memory card, Open the card slot again. Press it in and release it slowly. The card can be removed by hand.
When you remove the memory card, press it with your finger and release the card gently; otherwise the card could come out of the slot too quickly.
Why do you need memory card in Instax sq20 ?
In the case of taking photo, the limited number of photos are not enough especially if it is a Digital camera. We need more space to take photos and videos to specify which one to print LIVE. This camera can save approximately 50 still images in the internal memory. However, using a memory card enables you to save more images.
Only the 50 images is not enough for a internal memory space on sq20. If you take a video shot, then you can save less pictures on the Instax sq20 camera. So my suggestion is that The memory card is mandatory for your Instax square sq20 Instant camera.
How to print images from another memory card taken with another camera ?
You can print images taken with another camera by inserting a memory card containing the images. However, they should meet the conditions below.
- Copy images to print to the root directory instead of copying them to a folder.
- The file name should consist of four capital letters (A to Z) followed by four numeric characters; otherwise you picture mightn’t read or print through instax sq20 camera.
So by changing the picture path and name of the photo, you would do easily use another memory card to print it.
Memory card using Tips on computer-
- Format memory cards before first use, and be sure to reformat all memory cards after using them in a computer or other device.
- Folders are created automatically if you use a memory card formatted with the camera. Do not change the folder/file name or delete a folder using a computer; otherwise, you cannot use the memory card.
- Use the camera to delete image files.
- Edit an image file after copying or moving it to a hard disk. Avoid editing an original image file.
How to Copy Images to the computer on instax sq20 ?
This is little tricky to copy images to the other device like computer. But if you follow the steps, then it’s easy to do that. It’s almost similar to mobile device. But for this instax sq20 camera, just need to be aware to copy images on the computer.
If you want to transfer the images from instax sq20 to computer, then just start it now. Remember, You cannot copy an image file from the computer to the camera.
Step one- start the computer. Then turn the camera off before connecting the camera to the computer using supplied USB cable.
copying images or movie to the computer instax sq20
Always Make sure the orientation is correct and the connectors are fully inserted. Connect the camera directly to the computer. Do not use a USB hub or keyboard.
Step two- Now turn the camera on. Select (still picture) or (movie) according to the file type to copy.
Step three- When the computer recognizes the camera, select the camera on the menu and start copying the images.
Step four- Disconnect the camera from the computer. After you have finished copying the images, turn the camera off, and then disconnect the USB cable from the computer.
Tips before copying images to the Computer-
- Do not cause the battery to run out while copying the images; otherwise, the images may be damaged.
- Do not turn the camera off or disconnect the USB cable from the computer; otherwise, the images may be damaged or lost.
- When you change the memory card, make sure the camera is disconnected from the computer.
- Do not disconnect the camera from the computer or unplug the USB cable soon after the “Copying” message goes off. The camera may access to the computer for a while even after the message goes off when you copy a large file.
- You cannot copy an image file from the computer to the camera.
Although the steps is easy but you need to careful to copy images steps. By following the steps, you can do almost perfect job.
How To Use Shooting Menu on Instax sq20 ?
Now let’s start with the basic Introduction of shooting Menu and how to use them on instax square sq20. You would love all the setting here on this camera because there are many features to to modify your picture. First, start with what are they and how to use them ?
To change the shooting menu, you need to follow this steps-
- Press the MENU/OK button the shooting screen. When you do that the menu screen will appears.

- To change the settings, you need to select the setting item to change. Choose whatever mode or settings you want. Select a shooting mode according to the purpose or situation.
- Press the MENU/OK button. Now the change has been applied.
- Press the (Back) button. The LCD monitor returns to the shooting screen.
Note: You can also use a shutter button to which you assign the shooting mode switch function on SHUTTER BUTTON SETTINGS. Press the button repeatedly to choose a shooting mode. This is only applicable on still picture mode only.
Now start with the features intro- As I said, there are lots of feature on this camera. Let’s talk about some basic information of these feature and settings.
FLASH- Starting with flash, this feature is awesome unlike the other Instax camera. You will find three different types of flash with different purpose. These are AUTO FLASH, FORCED FLASH AND SUPPRESSED FLASH. I have discussed with these three different flash details on this article. This is only applicable on still picture mode only.
SELF TIMER- Self Timer mode is now getting is more popularity now. Self timer mode is very important when you want to take a group picture. It could be any event like reunion, school party, birthday party, wedding or anything. I have discussed it in more details of use in this article. Just keep reading to get more. This is only applicable on still picture mode only.
AF ILLUMINATOR – This is now the most important feature to any camera. When you want to take picture of very shiny subjects such as mirrors or car bodies or fast moving subjects or reflective object, dark object or subjects like hair, smoke or flame, same colored background and many complicated situation, this feature is the solution for this. I have also discussed in details on this very helpful mode broadly in this article. This is only applicable on still picture mode only.
If you select ON, the AF-assist illuminator lights up while focusing to assist auto focus when it is dark.
EXPOSURE – Adjust the brightness of the image when you shoot a too bright, too dark, or high-contrast subject. The compensation value is valid even when you copy the image file to a computer or other devices. Read the article to know variety use of EXPOSURE .
FRAMING GUIDE – You can add different kind of frame to the picture. This feature can be use both the still picture mode and movie. If you select ON, the guide lines (vertical/horizontal) appear on the monitor. You will find option: ON/OFF.
AUTO PRINT – Sometimes, you want a instant print immediately after taking your shot. Then you need this AUTO PRINT feature or mode to use. There are possible EVENTS like wedding or party and you don’t have time to edit it before printing it. That’s is why this feature is very important using like instax sq6 analog camera.
So, How to shoot autoprint using instax sq20 ? the answer is If you select ON, the camera starts to print an image soon after the photo is taken and saved. There is a option: ON/OFF in the instax sq20 to switch on or off autoprint. This is only applicable on still picture mode only.
How To Use Playback Menu on Instax sq20 ?
Now let’s start with another basic Introduction which is playback Menu and how to use them on instax square sq20. You would love all the setting here on this camera because there are many features to to modify your picture. First, start with what are they and how to use them ?
To change the Playback menu, you need to follow this steps-
- Press the MENU/OK button the shooting screen. When you do that the menu screen will appears.
- To change the settings, you need to select the setting item to change. Choose whatever mode or settings you want. Select a shooting mode according to the purpose or situation.
- Press the MENU/OK button. Now the change has been applied.
- Press the (Back) button. The LCD monitor returns to the shooting screen.
Now start with the features intro- As I said, there are lots of feature on this camera. Let’s talk about some basic information of these feature and settings of instax square sq20.
PRINT- Starting with the print item. After pressing the MENU/OK button on the playback screen, you can select the playback menu to go forward options. If you select the print option of the sq20 camera and press it, the printing process will start.
PRINT HISTORY- This is another amazing feature added to the instax sq20 instant camera. You can see up to 50 images on the instax sq20 that you have previously printed. Just Select an image, then press the (Print) button to start printing. Pressing the MENU/OK button allows you to delete an image in the print history one by one in case of Instax sq20 Camera.
ERASE- As I said before you can delete and image in the print history one by one. But if you want to delete all image not only one by one but also all at one time, then you can use this ERASE option of instax sq20 camera. When you want to delete it, the delete feature will came two option: FRAME/ALL FRAMES. Just choose what you want and take action.
IMAGE ROTATE- The next option is image rotation. You can rotate an image by 90 degrees. Just use the command dial for the operation. It will only work on still picture mode only.
COPY- Another important settings is COPY. You can copy the images from the camera’s memory to a memory card and vice versa.
Follow the procedure to do that:
- Press the MENU/OK button.
- Select the destination, then press the MENU/OK button.
- Select FRAME or ALL FRAMES, then press the MENU/ OK button.Copying starts if you select ALL FRAMES.Proceed to step 4 if you select FRAME.
- Select an image to copy, then press the MENU/OK button.
AUTOROTATE PB- Like the smart phone settings, Instax sq20 has the autorotate PB. If you select ON, an image rotates on the playback screen. You can select it just using the option: ON/OFF. Autototation option will work only on still picture mode of the instax sq20 camera.
How To Use Setup Menu on Instax sq20 ?
Now let’s start with the basic Introduction which is setup Menu and how to use them on instax square sq20. It’s the basic and necessary stuff of the camera internal settings but very important option learn. First, start with what are they and how to use them ?
To change the Setup menu, you need to follow this steps-
- Press the MENU/OK button the shooting screen. When you do that the menu screen will appears.
- To change the settings, you need to select the setting item to change. Choose whatever mode or settings you want. Select a shooting mode according to the purpose or situation.
- Press the MENU/OK button. Now the change has been applied.
- Press the (Back) button. The LCD monitor returns to the shooting screen.
DATE/TIME- Selecting Setup Menu, let’s start from date/time. You all know about this settings. If you want set date and time on instax sq20 instant camera, then this feature is awesome for you. You can specify date and time using this function.
DATE STAMP- If you want to know how to print with date and time, then this feature is awesome for you. Suppose you don’t want to write date or time on print by your hand. Then you can select this option to print exact time stamp with picture on isntax sq20. If you select ON, the date of recording is printed on the lower right of the picture. The settings on DATE/TIME affect the order of year/month/day.
LANG.- You can select your prefered language on the Instax sq20 camera.
OPERATION VOL- You can control or Adjust the volume of the operation, shutter, or startup Sound. You can limit them by Option: OFF/1/2/3. Select OFF to disable sounds.
SHUTTER BUTTON SETTINGS- Assign the function for the left/right shutter button. You can specify or change the shutter button option according to left and right handed person for instax square sq20.
AUTO POWER OFF- Although the camera has auto power off default, you can specify the auto power settings on instax sq20 camera. Select the length of time before the camera turns off automatically if no operations are performed. You can specify time by the option: 5 MIN/ 2 MIN/ OFF.
RESET- This is the very important feature of the instax Sq20 camera. When you changed a lot of settings of the sq20 camera and forgot what did you do, then you can get back to the default or fresh settings by using reset option.
Although you can find reset button on the left of the camera beside USB and SD Card settings, you can also Reset all settings to default values on this RESET options.
You might wonder how to reset the instax sq20 camera to default or how to change the settings to default, then this is the best option to do that. The date and time specified on DATE/TIME are not reset.
FORMAT- By using format on instax sq20, this function will Initialize camera’s memory or a memory card inserted in the card slot. All saved images will be deleted.
FIRMWARE UPGRADE- Update the firmware. Save the firmware on a memory card in advance, insert it in the card slot, and then follow the instructions on the monitor. Download the latest firmware from https://instax.com.
How To Use AE or AF lock on Instax square sq20 ?
AF ILLUMINATOR – This is now the most important feature to any camera. When you want to take picture of very shiny subjects such as mirrors or car bodies or fast moving subjects or reflective object, dark object or subjects like hair, smoke or flame, same colored background and many complicated situation, this feature is the solution for this. If you select ON, the AF-assist illuminator lights up while focusing to assist auto focus when it is dark.
You might have seen AE or AF feature on the instax sq20, and you many have wondered what they actually do. Please read this part very carefully if it is your first time before using this feature. These two “lock” are rarely used by many people, especially beginner Hybrid Digital Instax sq20 photographers because they simply don’t know what they do. However, all two can be incredibly useful after learning them !
At First you should know the explanation of the AE and AF lock; AE lock- Auto Exposure lock and AF lock- Auto Focus lock. Now at least you can guess what I am talking about. It is very handy feature most non-expert people ignored. You will even find this AE,AF lock on DSLR and iphone also but most people don’t know how to use it. Let’s talk about it now in details.
What is AE lock ? – AE simply stands for automatic exposure or you can say automatic exposure control. This feature allows users to lock their exposure settings. AE-lock is a way to lock in the exposure with which you’re shooting. AE-lock can be extremely useful in almost many situations.
AE-lock can help you to be certain each of your photo has the same exposure as you want. It’s best for difficult lighting situations. After setting up the proper exposure in the image, using AE-lock allows you to force the camera to continue using the same exposure, rather than trying to be decided each time by the camera itself.
What is AF lock ? – AF stands for autofocus. AF-lock works with the focus system of the instax square sq20 camera, locking in the focus system. It’s almost the same use as like as DSLR and iphone feature of the camera.
This feature is very helpful if you want to focus on a subject that is on one side of an image. You can lock the focus immediately on the subject, and then re-compose the image without taking your finger off the shutter button.
Halfway AF-lock is the most popular one. You can activated AF-lock pressing the shutter button halfway. Most of Expert photographers often use this technique with all types of cameras.
3 step to use the AF/AE Lock- When you take a still picture, use “AF/AE lock” to lock focus/exposure by pressing the shutter button halfway. AF/AE lock is useful when you take a picture with off-center subjects.
- Position the subject to focus on the center, then press the shutter button halfway. Pressing the shutter button halfway activates AF/ AE lock.
- Decide the composition with the shutter button pressed halfway.
- Press the shutter button all of the way down to take the picture.
Why AF/AE lock is extremely Important ?
As the camera may be unable to focus on the subjects listed below, I recommend you use AF/AE lock.
- Very shiny subjects such as mirrors or car bodies.
- Fast moving subjects
- Subjects photographed through a window or other reflective object.
- Dark subjects and subjects that absorb rather than reflect light, such as hair or fur.
- Insubstantial subjects, such as smoke or flame
- Subjects that show little contrast with the background (e.g. subjects that are the same color as the background)
- Subjects positioned in front of or behind a high contrast object that is also in the focus frame (e.g. a subject photographed against a backdrop of highly contrasting elements)
- The camera may be unable to focus using the AFassist illuminator in some cases.
- When you are close to the subject, the AF-assist illuminator may not be as effective as you expect.
- Avoid shining the AF-assist illuminator directly into your subject’s eyes.
How to Use the Self Timer on Instax sq20 ?
For group photo, you need self timer on every camera. That’s way this camera has come with Self-Timer feature also. So Use the self timer to include a photographer in a group photo or to reduce blur when the shutter button is pressed.
Self timer guide on instax sq20- It’s very simple to use self timer on instax sq20 camera. Just follow these steps to make it happen.
Step one- Press the MENU/OK button on the shooting screen. The shooting menu will appears on the Screen or the Monitor.
Selfie timer Guide instax sq20
Step Two- Select SELF-TIMER, then press the MENU/OK button.
Step Three- Select 10 SEC or 2 SEC, then press the MENU/OK button. You will get two different timer to use that is awesome.
Step Four- Press the shutter button fully.
When you select 10 SEC:- When you press the shutter button, the AF-assist illuminator/Self timer lamp lights up, and then it flashes 3 seconds before shooting.
When you select 2 SEC:- When you press the shutter button, the AF-assist illuminator/Self timer lamp flashes.
If you want to cancel the self timer after pressing it, you can do that just by pressing (Back) button.
How To Use the Flash on instax sq20 ?
You don’t get the light properly anywhere according to your will anytime. It might possible that you want to take photo on night or evening or party and even in the room. So for this kind of situation, you always need proper composition for your picture. Now you know the important of the flash for your picture. Let’s start of how to use flash on instax sq20 instant camera.
Step One- Press the MENU/OK button on the shooting screen. The shooting menu will appears on the Screen or the Monitor.
how to use flash on instax sq20
Step Two- Select FLASH, then press the MENU/OK button. The Flash menu will be found on the Monitor.
Step Two- Select the flash setting, then press the MENU/OK button. See “Flash settings” for details on each flash setting.
■ Flash settings – You will find various flash setting to shoot picture. Select one of the settings below.
-
- AUTO FLASH- The flash fires automatically when the camera recognizes it is dark. Recommended in most situations.
-
- FORCED FLASH- The flash always fires regardless of the brightness of the subject. Use this setting for backlit subjects.
- SUPPRESSED FLASH- The flash does not fire even when the subject is poorly lit. Recommended for when using a flash is prohibited. I recommend using a stable surface to steady the camera when it’s dark.
Here you can see an example of photo using flash on some home stuff. It’s look fine to me using the flash option.

Flash Guide on Instax sq20
Since the flash has more advance feature on Instax square sq20 instant camera, You can play with it in different light and situation. After taking couple of photo using these flash settings, you will be expert in many light situation. It’s a good sign to be expert photographer.
How To Take a Selfie on Instax sq20 ?
Now, let’s talk about the most amazing part of any camera is the selfie mode. As selfie has its own popularity than other mode, the Instax square sq20 has come with the individual selfie function or mode. In Instax sq20, you can take your own self portrait or selfie using selfie mirror. So let’s talk about the handy use of selfie of this camera.
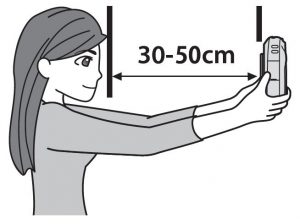
First, Hold the camera securely keeping 30 cm to 50 cm between you and the edge of the lens. Hold the camera securely especially in a dark place, to prevent blurring. Then, confirm, the composition by seeing yourself on the selfie-portrait mirror, then take a photo.
So, whenever you try to take a selfie shot, you need to have the camera within 30 to 50 centimeters to be in focus.
If you take a picture using this little mirror, then you can see the image fully processed in them back magically.zooming in on image instax sq20
Second, you must take a self portrait using the self portrait mirror. Just apply proper setting as you want and take a shot.
How to take selfie on Instax sq20
Selfie Tips Instax sq20 – When you take a photo, don’t look at eh flash. An afterglow might harm your picture output. Always remember that when the flash is charging, the shutter button will not release. So wait for a couple second to fully charge the camera.
Here you can see the selfie example of Instax square sq20 instant camera. You can take amazing and nice selfie using sq20. I love this because you can watch it and edit it before printing it.

This is the one of the cool selfie collection of Instax square sq20.
How To select Shooting mode ?
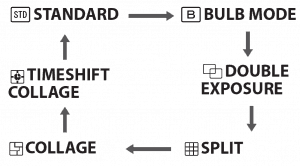
Now let’s jump into the advance feature of the Instax square sq20 camera. Different kind of amazing Shooting mode made this sq20 camera more fun lover. In the mode section on sq20, you will get 6 shooting mode-
- STANDARD
- BULB MODE
- DOUBLE EXPOSURE
- SPLIT
- COLLAGE
- TIMESHIFT
Now let’s start with the basic Introduction of shooting mode on instax square sq20. It is very simple and easy to use because there are many features to to modify your picture that you are going to love. First, start with what are they and how to use them ?
To change the shooting Mode, you need to follow this steps-
- Press the MENU/OK button the shooting screen. When you do that the menu screen will appears.
- To change the settings, you need to select the setting item to change. Choose whatever mode or settings you want. Select a shooting mode according to the purpose or situation.
- Press the MENU/OK button. Now the change has been applied. When you use another shutter button to select a shooting mode, the mode switches every time you press the shutter button. Here is the sequence changes one by one.

6 types of shooting mode on instax sq20
- Press the (Back) button. The LCD monitor returns to the shooting screen.
- STANDARD- Select for normal photography. The flash fires automatically when the camera recognizes it is dark. You can select a setting so that the flash does not fire.
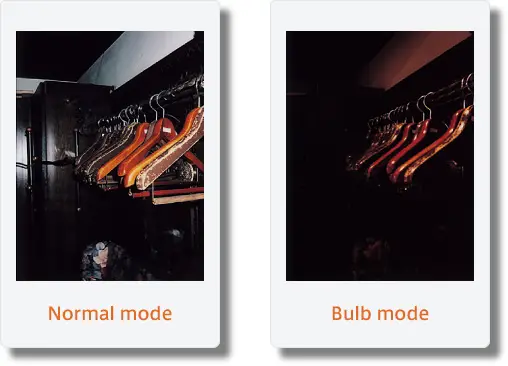
- BULB MODE- The shutter is kept open while the shutter button is pressed. This should be used when shooting a night view. Use a stable surface to steady the camera. Adjust the time to hold the shutter button according to the brightness.
- DOUBLE EXPOSURE MODE- Press the shutter twice to combine two images into one picture. After you shoot the first subject, shoot the second. Read more to get details.
- SPLIT- Multiple images can be captured on one image. Select four segmentation options: vertically halved, horizontally divided in three, divided in quarters and divided in nine. Read more to get details.
- COLLAGE- You can create a collage style image where one image is divided up at random or you can take photos for each segment. Read more to get details.
- TIMESHIFT- Four images can be taken with a time difference. Press the shutter button to shoot when four images appear on the monitor. The time difference between frames can be adjusted within 0.2 to 2.0 seconds. Read more to get details.
How to take Double Exposure shot on Instax sq20 ?
How to- For the Intax sq20 camera, first select DOUBLE EXPOSURE for shooting mode, press the MENU/OK button, and then follow the procedure below.
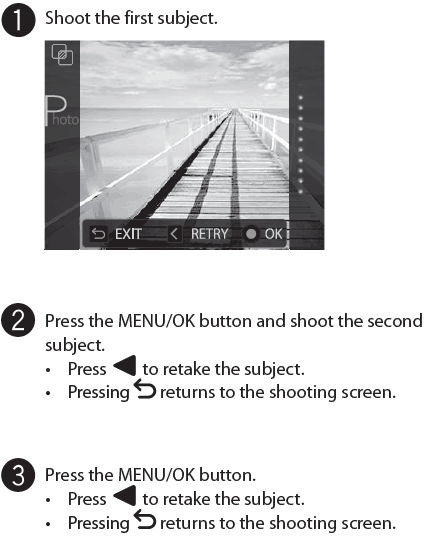
To capture double exposure photo, take the first shot. Then take the second shot that’s it.
Basic Idea- This is very simple; the first shot you take is going to be your main photo and the second shot will be the shadow. So keep in mind for basic double exposure-
- First shot is the main photo or Background
- Second shot is going to be shadow
Actually the first image that you take is going to use as blurry or background with little opacity. The second shot is going to appear in front of the first picture. This mode sometimes call overlapping or superimpose shots.
Here you can see a picture of a hand and flower combination. This picture has been taken with double exposure mode. First shot was the hand so that the hand will be the background and the second shot was for the flower with sunlight. So the flower get little bit shadow and its look really gorgeous.

Double Exposure 2 Instax sq20
Another example here….

Double Exposure 1 Instax sq20
You can use your creativity to get very gorgeous and different output.
Silhouette Double Exposure- A silhouette is a bright background and a dark object. That’s it. You can select any subject for it. Similar to the digital camera, you can take silhouette photo with sq6.
To shoot Silhouette, the first shot is going to be dark object or anything against bright light like sky. Then you need to fill the shadow with any kind of pattern whatever you like.
- First shot is going to be shadow against bright light.
- Second shot is going to be pattern that will fill the shadow.
You can do practicing with silhouette- just need to do your first shot as a silhouette which could be either against a whole wall or you have got bright background or white sky. The sky should be against the camera.

Double exposure Silhouette – Instax sq20
Here in the picture, you can see that the first shot is the silhouette shot which is taken against bright light and Second shot is the brick which filled the dark or silhouette image. Now you understand that it’s very easy.
Half Image Double Exposure shot- One of the most coolest way to do double exposure is by exposing only half of the film at once in your first shot and the other half in the second shot.
So if you want to take on off the half face or body in your first shot and rest of the half face or body from the second shot. You can do it with double exposure also. You can even take two picture in one at a time.

Double Exposure half image instax sq20
Sideways Double Exposure – You can take halfway picture too. You can hold the camera in different way. You can even turn it upside down or whatever way you want. You can use your creativity to get different and crazy funny shot.
How To Use Bulb Mode on Instax sq20 ?
If you want to take exact photo as like as vibe, then this is the perfect mode for you. You can take photo of anything as like as you can see with your blind eye with this bulb mode. So select bulb mode to get start with it.

Bulb Mode shooting Instax sq20
Bulb mode is advance feature that allows a photographer to hold the shutter for as long as the shutter is depressed. You can enable the shutter to be kept open for an extended time till 10 seconds. You can take shot within any time.
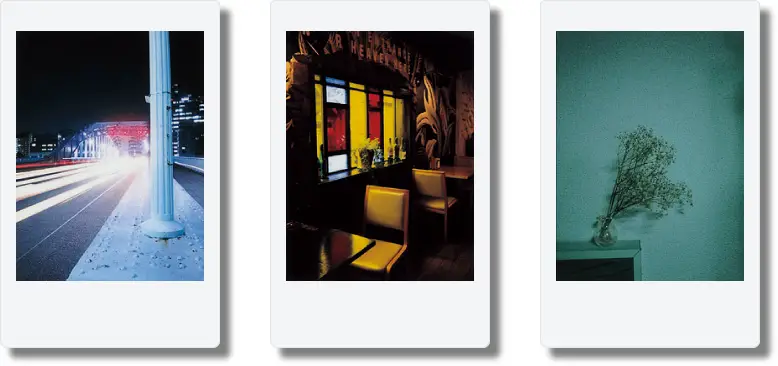
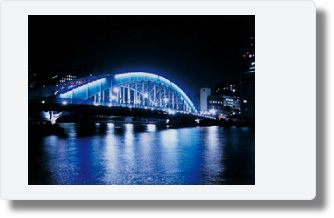
The purpose of bulb mode is that you can shot beautiful night view or painting photos as well as Fascinating photos of colorful lights.
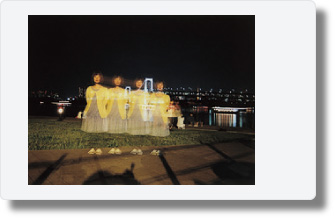
When you keep hold or press the shutter button, The sq20 camera will start capturing by grabbing the color using the light till the shutter is held. So that’s why you can paint with light or can make any pattern with the bulb mode.

Bulb Mode Instax sq20
Here on the picture you can see- the left side of the photo absorb all the street light. And right side of the picture girl playing with light. You can do a lot of more fun with the bulb mode.
What type of picture can you take using bulb mode-
Long exposure- The night view of the street with light. You can get best picture holding the camera till 10 seconds.

Bulb Mode 2 Instax sq20 Hamburg, Germany
Interior Room– If you want to take photo of interior room with best light and compose, then you can use bulb mode.
Different shutter speed- You can use different shutter speed to check the different quality picture.
To Prevent bright spot- You can avoid red light or any sort of bright light using the bulb mode. Bright light is the common problem especially on digital camera. During the fun moment like party, people might not aware of light or any effect. Bulb mode can help to get perfect composer.
You can avoid blurry photo with disgusting bright spot on the photo. The complicated compose like glass, bright watch or any reflection object can get perfect shot with bulb mode.
Some Great example from mini 90 bulb mode–

Instax mini 90 Trick with a penlight
Tips for Bulb Mode-
- Use tripod to get best picture result or use a placed that are stable surface.To take awesome photo like the street, sky, hotel, cafe, club, use Bulb mode. Then you can get the perfect lighting effect.
- You can get the same nature using the bulb mode that is call depict. Bulb mode can get you the natural color tone of your subject or object. Using the bulb mode, you will capture the moment of light as you can see within your eyes.
How To Use Split Mode on Instax sq20 ?
Using Split mode, Multiple images can be captured on one images. You can Select four segmentation options: vertically halved, horizontally divided in three, divided in quarters and divided in nine.
If you want to print multiple image on one print, you can split them and print it on one film.
Select SPLIT for SHOOTING MODE, press the MENU/OK button, and then follow the procedure below.
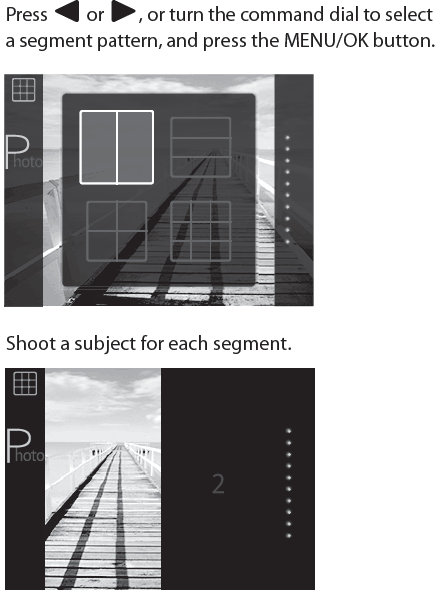
If you stop shooting before completed, press Back, confirm the message on the monitor, and then press the MENU/OK button. The monitor returns to the shooting screen.
Here is the the perfect example of split mode that you can apply.
split 1 instax sq20

split mode instax sq20
You can split the picture however and whatever you want.
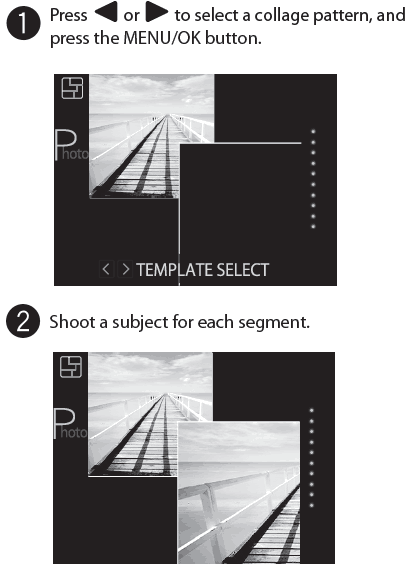
How To Use Collage Mode on Instax Sq20 ?
On the collage photo, you can select frame size as much as you want. This is more fun for printing photos. You can choose every segment for a subject.
You can create a collage style image where one image is divided up at random or you can take photos for each segment.
Select COLLAGE for SHOOTING MODE, press the MENU/OK button, and then follow the procedure below.
Collage photo Mode on Instax sq20
If you stop shooting before completed, press Back, confirm the message on the monitor, and then press the MENU/OK button. The monitor returns to the screen to select a collage pattern.
Here is the perfect example of Collage photo.
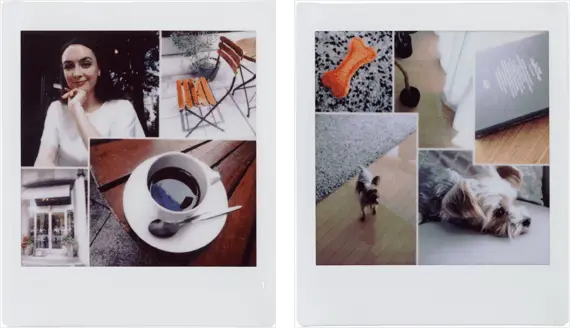
Collage mode Instax Sq20
Like the pictures above, you can divide the segment as different frame style.
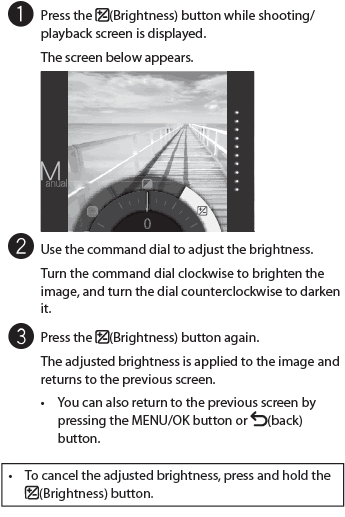
How To Use Brightness Adjustment On Instax sq20 ?
Brightness is one of the very essential feature of any camera. That’s why you must find brightness control function on any camera including this one. Instax Sq20 has Brightness adjustment feature which is very handy to capture image. You can see and edit live the brightness settings of picture.
To use it properly follow the instruction…
Brightness adjustment on instax sq20
Brightness adjustment with 19 levels. Allowing you to easily adjust brightness levels of your images and prints.

Brightness adjustment on instax sq20 example

Brightness adjustment control on Instax sq20
Notes on image effects:
- Each adjusted value or effect remains after you take a picture. However, it will be disabled when you view the image on a device (e.g. computer) other than this camera (except for filters “Retro”, “ Film Frame”, and “Sequence”).
- You can apply multiple effects to one image.
- Press and hold the (Back) button to cancel all adjusted values or effects.
- Depending on the subject or camera settings, images may (in some cases) be grainy or vary in brightness and hue.
How To Use Vignette Effect on Instax Sq20 ?
Vignette is another amazing feature to Adjust the brightness of four corners on the image. Follow the steps below to adjust the brightness more smoothly….
vignette adjustment on instax sq20
Vignette Control: Vignette, the peropheral light can be adjusted between 19 levels. This allows you to place your line of view in the center of the photo, making it ideal for portraits and still lifes.
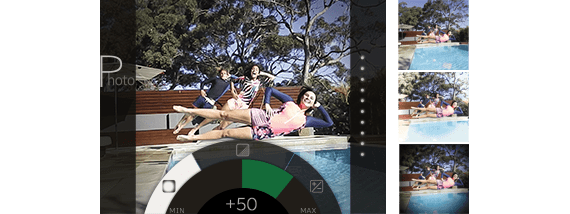
vignette adjustment on instax sq20 Example

vignette adjustment on instax sq20 Example 2
Notes on image effects:
- Each adjusted value or effect remains after you take a picture. However, it will be disabled when you view the image on a device (e.g. computer) other than this camera (except for filters “Retro”, “ Film Frame”, and “Sequence”).
- You can apply multiple effects to one image.
- Press and hold the (Back) button to cancel all adjusted values or effects.
- Depending on the subject or camera settings, images may (in some cases) be grainy or vary in brightness and hue.
How to use Time Shift Collage ? Special Feature
This is the another special feature of Instax sq20 Camera. You can take picture of the every moment if you want. By using this feature, you can take four images with a time difference at one time.

Time shift collage feature Instax sq20

Time shift collage feature Instax sq20
Here is the sample video instruction of how to use the Time Shift Collage.
How to use Special Filter “SEQUENCE” on Instax sq20 ? Special Feature
You can control the speed or motion of the movie or picture by using this special feature. If you want to capture the slow or speed motion of the subject, then this is the best feature for you. There are tons of filter you will get on the instax sq20. I will discuss them step by step.
See the awesome result of SEQUENCE Filters…

special filter Sequence on instax sq20

special filter Sequence on instax sq20
Here is the video sample of Sequence filter —
How to use Instax sq20 Special Filters Options ?
There are tons of filter you may use to get more funny and awesome results. These filters has the special contrast for different kind of better output.
This camera has special filter for Still picture mode, motion or movie mode, Part color, Vignette and Brightness. I am still excited for doing more fun using the filter of Instax square sq20. Let’s start with some explanation. But Before learn how to use it if you are a beginner.
You can select the image effects menu directly by pressing a button on the rear to adjust the image effect while the shooting/playback screen is displayed.

how to use filter on instax sq20
Variety Use of Filters:- You can use Tons of filters effect using this sq20 Camera. Here is some example of filters taken with this camera.

Filter 1 instax sq20
If you want some explanation one of each filters, I can give you this. Just learn a little bit more about the filters so that you can use it properly.

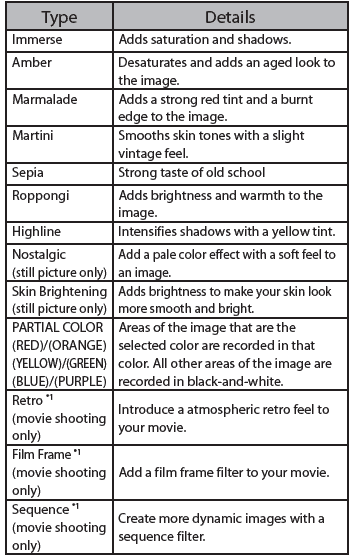
Filters Types and Details of Instax sq20
Note:- *1 After the filter effect is applied to the movie, “Normal” is displayed as the applied filter on the LCD monitor. In addition, you cannot cancel the applied filter effect or apply another filter for movie shooting after shooting a movie.
Filters for Motion Mode:- You can use the special filter using for motion mode. Here is the example of Filters that used on Motion Mode.
Filter for Motion Mode on Instax sq20
Partial Color Effect:- Partial color(Red,Orange,Yellow,Green,Blue,Purple)We convent other colors to monochrome,leaving only one color selected from 6 colors.
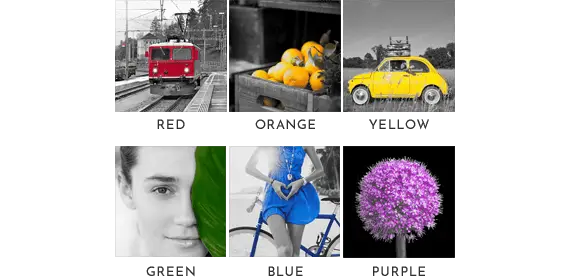
Partial color effect instax sq20
Vignette:- You already know how to use Vignette on Instax sq20 Camera.Vignette, the peropheral light can be adjusted between 19 levels. This allows you to place your line of view in the center of the photo, making it ideal for portraits and still lifes.
vignette adjustment on instax sq20 Example 2
Brightness Control:- I have also discussed about Brightness Control of Instax sq20 Camera. Brightness adjustment with 19 levels.Allowing you to easily adjust brightness levels of your images and prints.
Brightness adjustment on instax sq20 example 2
Nostalgic and Skin Brightening:- You can change the image into Nostalgic and skin of the subject using this Instax sq20 camera. Two types of still-image dedicated filters such as “Quick snap-like” that reproduces the texture as shot by film camera, and “Skin Brightening” which makes it look beautiful are newly added. You can use these effect only on still picture mode.

Nostalgic and Skin Brightening Instax sq20
So, That’s it for Instax sq20 Camera. I will keep updating the if I get anything new of this Camera.
I have research on the internet and found the reliable source to buy this Sq20 Camera. Here is my recommended source to buy Instax sq20 camera.
| Colors | Visit Details On Amazon |
|---|---|
| beige | |
| matte black | |
| Note | [ Don't forget to buy Instax square film along with the Instax sq6 Camera ] |
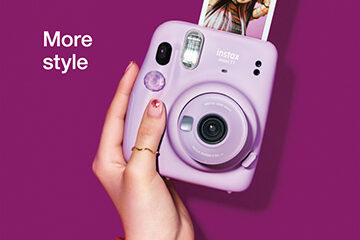
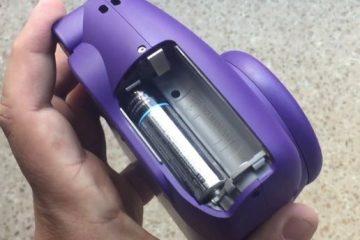
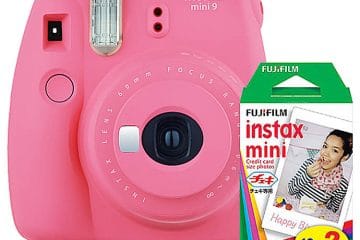
0 Comments