What Details are you going to get in Wide 300 Manual and settings ?
Hi, I am from the Instax World. Today we’re going to actually take a look at the only wide format till now Fujifilm instant camera the Instax wide 300. This camera is Fugees latest instant camera that uses the Instax wide film not the mini film. So this film is double the size of the Instax Mini film.
If you’re looking for a camera that uses a much gives you a much larger print, this might be a camera to take a look at. we would look at the contents and get you started for the first time with this camera depending on the country that you purchase this from. The package may differ as well as the content in regards to if the package includes film or not. So you want to check that out.
If you have bought the wide 300 camera recently and you want to know the basic instruction or manual of wide 300 camera, then start from here. Here I have discussed the all basic Guide step by step for your perfect use. You will find here about from the basic Parts details, strap, batteries, lens, selfie mirror, loading and unloading film, flash, L&D to all about wide 300 camera.
Parts Details – Instax Wide 300
Ok, lets start with the basic part of the wide 300 camera. It’s not necessary if you don’t want to learn about the camera. But it would help you perform better for taking shot. When you have the knowledge about your camera, you can use it as a professional way. Just know a little bit more. So let’s get going…
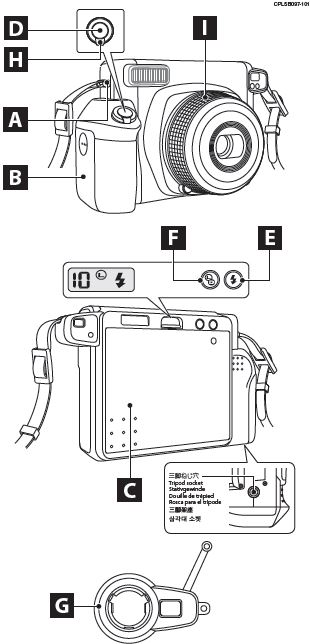
parts name wide 300
- Start with Strap shoulder. Here you have to tie your strap. I have discussed of using the shoulder strap in this article.
- This is the battery section where you have put your Double A batteries. You need four batteries to put in.
- Back Cover of the camera where you have to put the film.
- It is the button for taking picture. The D is to take the shot of your film.
- After staring the camera if you want to use force flash for your picture, then you need to put this flash button for doing this.
- The L&D is for brightness adjustment for your photo. You can use L for getting more light for your picture. On the other hand use D for getting low light into your picture.
- This is the attach lens. What you can do with this is that you can take selfie or closer shot using this.
- This is the power button for turning on or off the camera whenever you want. The camera will automatically turn off if you don’t use for five minutes though.
- The Dial will help you to get your perfect distance for your shot. So use dial for getting the perfect distance.
The Package – What you get after buing Wide 300
So opening up the box, of course, we’re going to have several contents. Here you will get the owner’s manual both I guess here in English and in French and also various different languages as you can see. It’s a little bit of a diagram on the camera how to set things up and of course in this article I am going to show you how to get this camera up and running right away.
let’s pull up the camera which is the bulk of the contents and of course it’s in a bubble wrap package here and again you’ll put just the bubble back aside for now and as you can see this is the Instax wide 300. It is quite large compared to the Instax Mini camera and of course that’s because it’s all about the size of the film. The film itself uses Instax wide film and it’s double the size basically in terms of width compared to an instax mini film camera.
Attaching the strap – Wide 300
Inside the box have Camera strap and of course the strap can be attached on to the camera. Either side of the camera. It’s quite simple just like any other strap you would actually end up. looping the strap through and attaching that loop of course inside.
- First attach for one side. Start loop in from the top down.
- Do the same thing with the outer part of the strap in the belt
- Then do it for the other side. Now you are done
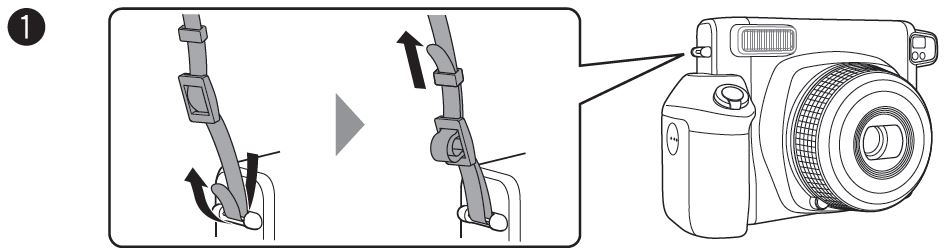
attatching the strap 1 wide 300
attatching the strap 2 wide 300
Inserting & Removing Batteries – Wide 300
In the box, of course, has a set of double A batteries. you have a total for double-a batteries. It’s one-time use alkaline batteries. So the camera once it depletes the battery which is generally about you know a hundred 100 film exposures. And you noticed it the light on the back indicating the flash recharge taking a little bit longer. so we’re going to install those batteries in a second.
so let’s see if we can insert the batteries into the camera. Because this is double-A batteries, they’re one-time use. So if you want to get rechargeable batteries, pick up a good set of nickel metal hydride batteries.
Instructions – Use four size AA 1.5 V alkaline batteries. Make sure all the batteries must be new and be the same type and size. And also make sure insert the batteries before you load the film pack.
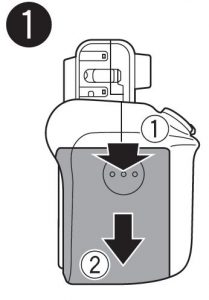
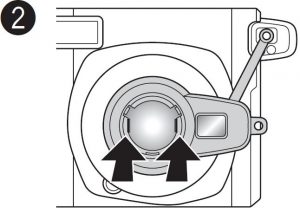
inserting batteries 1 wide 300
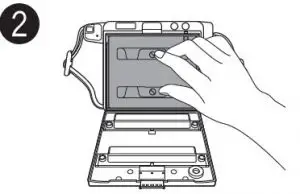
First press the battery lid with your thumb and slide it downwards.
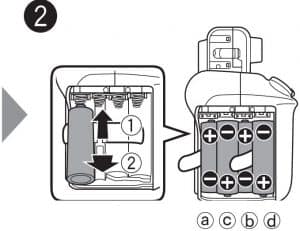
inserting batteries 2 wide 300
Insert batteries in this order : a, b, c, d. Tilt them toward the spring, then push them in.
inserting batteries 3 wide 300
Close the batteries lid. That’s it.
In case of removing batteries, just use the order: a.b.c.d. and you are done.
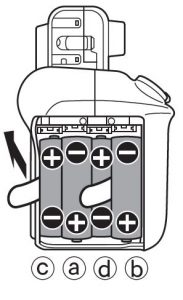
Removing Batteries wide 300
Close-Up Lens – Wide 300
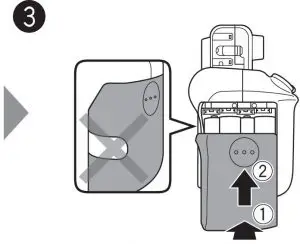
we also have inside the contents a close-up lens attachment. The way it, of course, works is that it changes the attaches right to the frontier. It just clips on and as you can see you have a little piece with little target point in the front and it’s really an alignment to the viewfinder. As you look through it you can use this as a new focus point because of course when you attach this close-up lens onto it, the focus distance changes.
attachment lens 1 wide 300
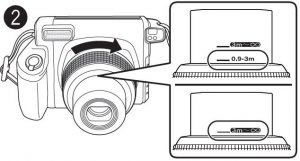
Set the photographic distance to short-distance ( 0.9 m – 3 m ).
attachment lens 2 wide 300
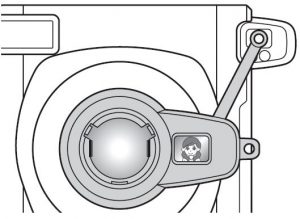
Attach the lens but before you do that Switch on the camera before you attach/detach the close up lens. Otherwise the lens cover may not work correctly. Alight the little circle with viewfinder.
Close up shot wide 300
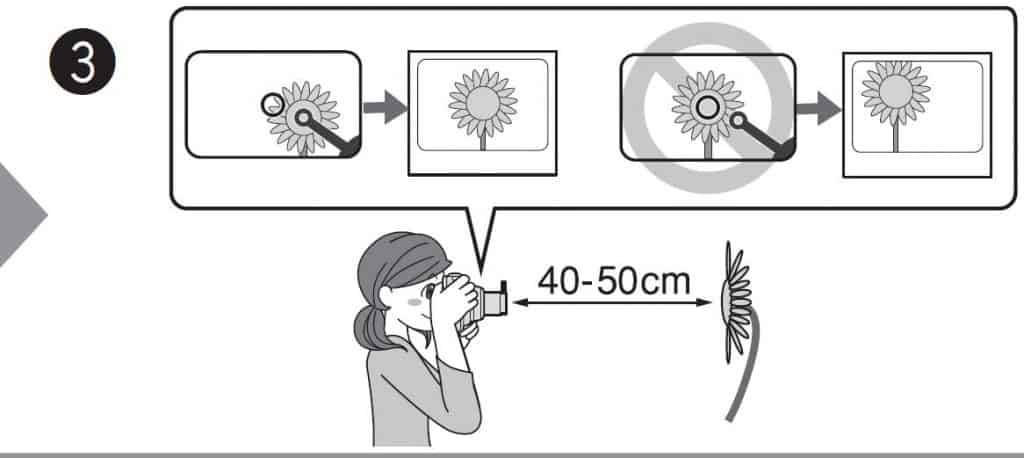
Focus the target spot of the close up lens on the object. Use 40 to 50 cm distance to take perfect shot. Always remember when you take more close shot target the object with close up lens align with viewfinder.
Viewfinder – wide 300
When you look through the viewfinder of course you’ll see that there is a circle right in the middle. So you want to make sure that when you are composing the scene. If the subject very close, you’re going to have a pair lock because what you’re framing through this glass is not the same as what’s being captured on the lens.
Parallax or Close Up shot – wide 300
So as you go further and further back that issue becomes less and less apparent so if you do a lot of close-up shots just make sure that you you deal with the parallax correction.
Because what you see through there not necessary is being captured through the lens itself. That’s why you have close up lens. when you attach the close-up lens you have this extra circular piece that helps you position the the focus point for the camera so that you don’t have a misalignment when it comes to taking that shot.

attachment lens wide 300
When you attach the close up lens, insert it straight into the camera so that the tabs are to the left and right.
click here to read 4 tricks You should know of using close-up-lens.
Selfie-mirror & Selfie – Wide 300
Top of lens attachment you also have a little mirror which is a self-mirror as you would see. It helps you frame your shot that you’re definitely centered into it if you’re going to do some selfies with the Instax wide camera.
selfie 1 wide 300
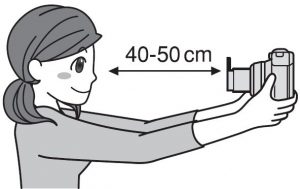
Take the selfie using the attach lens. Use the 40 to 50 cm distance to get perfect selfie shot. You can check composition while shooting self-portraits using the self-portrait mirror.So that just clips the close up lens right into the front of the lens. First shot let’s just do a selfie. Okay so you are going to set it up to do a close-up and then just take a little selfie yourself. so you set it your face onto that little mirror the film will come up.
selfie 2 wide 300
When you have done the close up shot & selfie shot, Turn the close up lens gently to detach it.
Film – Wide 300
pick up a set of film. It’s sealed in a foil cover and of course it’s obviously to prevent light from coming in. because this is film once it exposed to light, it’s going to damage the film.
now let’s see if we’re going to insert the film onto the camera as well. Open up this package the very first time, it is sealed as you will see. it does have a protective cover.
Loading the film
Here is the instruction of loading film.

Loading film pack wide 300
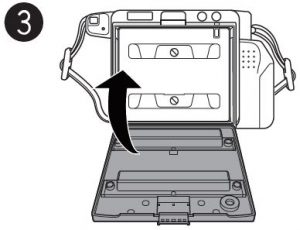
- Open up the back cover.
- Pick up the film & match the yellow dot
- Close the back cover
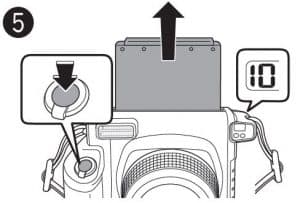
Unloading the film
After finishing taking shot of 10, you then need to unload the film. So it easy to do. Do the same thing but little different.

Unloading film pack 1 wide 300
Unloading film pack 2 wide 300
- Open the back cover
- Grab the film and take it out
Cay you take the film with you airport ?
I know some of you have some concerns about going through the airports. If you do have that concern, I would recommend if you do have instant film or any type of film. Take it with you to your hand checked with security and saying that I’ve been to many airports and taking my Instax film without any major issues at all with any x-rays getting into the exposure of that.
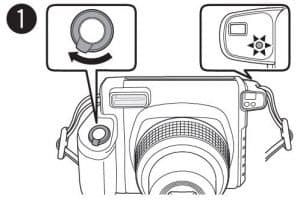
What happen after turning the power on ???
Turning on the camera, just twist it to the right and it powers on the camera. When it first powers up, you can see there’s a low light on the back that just indicates the charge recycle time for the built-in flash. so when the light goes off of course the camera is ready to go now.

Turn on the Power – wide 300
At first, it indicates on the LCD that there are no exposures left because there’s that protective cover on the front of that on the film cartridge itself. So you should take the first shot and that’s going to eject the protective cover. After taking the first shot, as you will see right there your protective cover. You can put that aside. Now the film is ready to go.
First shot – Wide 300
Tacking First shot with wide 300
The shutter does not release when the finder LED is lit. So be ready to take shot after LED lit is off.
tacking picture 1 wide 300
tacking picture 2 wide 300
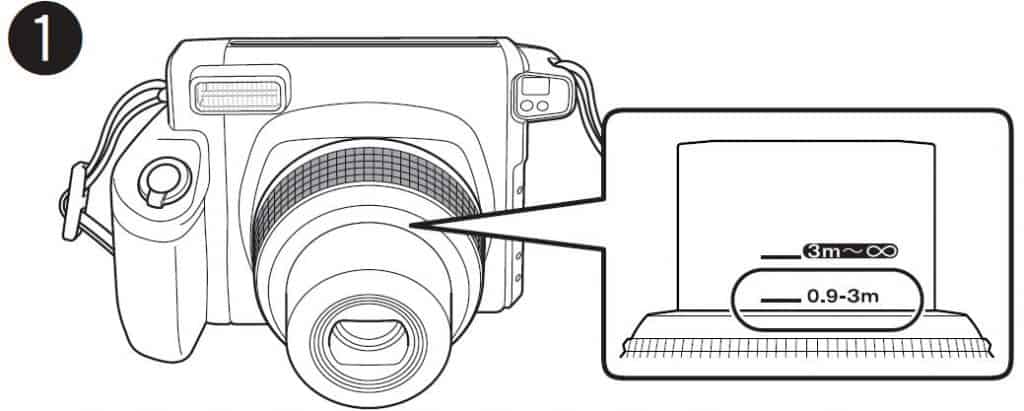
Make sure you adjust the distance using dial.
You can Use Dial with 3 distance with Wide 300
This is basically your focus distance. So turning the dial sets it to basically three meters to infinity. and turning it to the right again changes it to a close-up of three meters and more closer of course much closer than that.And then of course attaching close up lens piece onto the front allows you to do of course close-up shots.
tacking picture 3 wide 300
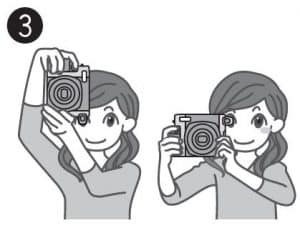
Use vertical or horizontal to take your shot. You can hold the camera like the picture.

tacking picture 4 wide 300
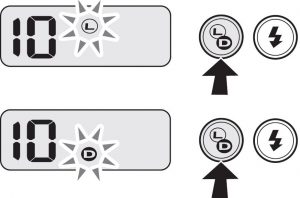
Whenever you take a shot, you can see the number of film left in the camera.
Lighten & Darken – Wide 300
You got ten exposures. On the back You will see L&D that stands for light and dark. Pushing it go between the different modes. So that’s really three different options. When you don’t have anything displayed on the back that means that it’s on no more exposure. if you want to make the picture lighter, have it indicated as L to make the picture much brighter.
L&D wide 300
If you want the picture to be darker, you would push the button again and show that it’s D. So D stands for dark and it’s going to make a dark exposure of the scene. That’s done through cause the built-in aperture that it’s going to close it down a little bit to let less light get into the lens and onto the film.
Want more details of Lighten & Darken ? Click here to get tips and tricks using L&D for best shot.
Using Flash Mode – Wide 300
You got the flash button on the right that toggles between the different modes. You got force flash and then you basically have auto flash when you don’t see a flash indicated on it. As you can see, you have the optical viewfinder and then you have this little LED light that again indicates that the flash is ready to shoot.

Fill in Flash – Wide 300
On the front of the camera of course you got the opposite side of the optical viewfinder, you got some sensors here to determine basically the amount of light that’s coming in and so it determines what shutter speeds the camera should operate on. Again this is because it’s an automatic camera the exposure is going to be done automatically for you.
FILM REVIEW
There are lot of questions about film like-
Can I take the film at airport ? Can I cut the film or Can I use Expired film ? etc. I have written a full review of all film- mini, square and wide. You can read my review and choose whatever you want and this is also my recommendation for buying. CLICK HERE TO REVEAL THE FILM HISTORY, THEN BUY.
CAMERA REVIEW
There are lot of features in Instax Camera. Every camera has their own unique quality and settings. But what suits you best and what feature do you like most or do you like mini , square or wide format. There are lot of confusion might come to before buying the camera.
After buying the Instax camera, you always look for another feature that might not have that particular camera. Then you regret for that.
So I have researched all of the Instax camera and discussed all the camera individually so that you can understand better which one is better for you to buy.
So buy the camera after learning a bit more about Instax Camera. CLICK HERE…..TO READ CAMERA REVIEW.
Click here………. to get TOP tips and tricks of Instax wide 300.
Click here………How to Overcome AutoFlash Issue of Instax Wide 300
Click here……..to get tips and tricks using L&D for best shot.
click here…….. to read 4 tricks of using close-up-lens
Click here…….Want to use Instax Wide 300 Self-timer ? the Secret Method.
click here to read all techniques of taking selfie with wide 300


2 Comments
Steven · May 31, 2019 at 12:07 pm
Hello.
Thank you for your nice Guide, it’s really helpful.
I hope you can help me with one thing.
All my photos i take have always from top to down scratches; is this normal
or does the camera have a production failure?
There must be something in the way which scratch the photos; it’s not really that bad,
but if you look closely in the light, it has these scratches; i’m such a perfectionist. 😀
Thank you.
Steve
admin · December 2, 2019 at 3:32 am
Please read this complete article. I think it might help.
https://instaxworld.com/15-best-instax-films-you-must-try-and-guide-to-use-them/