Hi Guys, Do you have the Instax mini 9 and you are looking for online manual solution. Here in this post I am going to talk about all of Instax mini 9 manual with some tips and tricks that you should know for better shooting. If you want to save your instant film from ruining it then you are at the right place.
Why you should follow the manual ? The film of mini camera little more costly. So it would be best for you. By saving money you will sure be happy with your photo shooting. Because the one shot only output one film for your one shot. You can not reuse the film for the next shot. So it is the best way to save your money by learning a little bit manual or setting. Believe me It would not take so many time to expert in it. Just read the blog and your are ready to shot.
You can also learn more about film history, best price and guide to use them by clicking the link. Click here…… 15 best instax films you must try and Guide to use them.
Another most important matter is to know manual is that if you follow the manual, you will hardly face problem with your instant camera. Sincerity comes with solution.
Parts Name
I am going to start with the parts name of Instax mini 9 camera. It’s not necessary if you don’t want to. But you should know it for your better performance. Because when you know your camera better way, you can use it in your way.
Instax mini 9 Manual
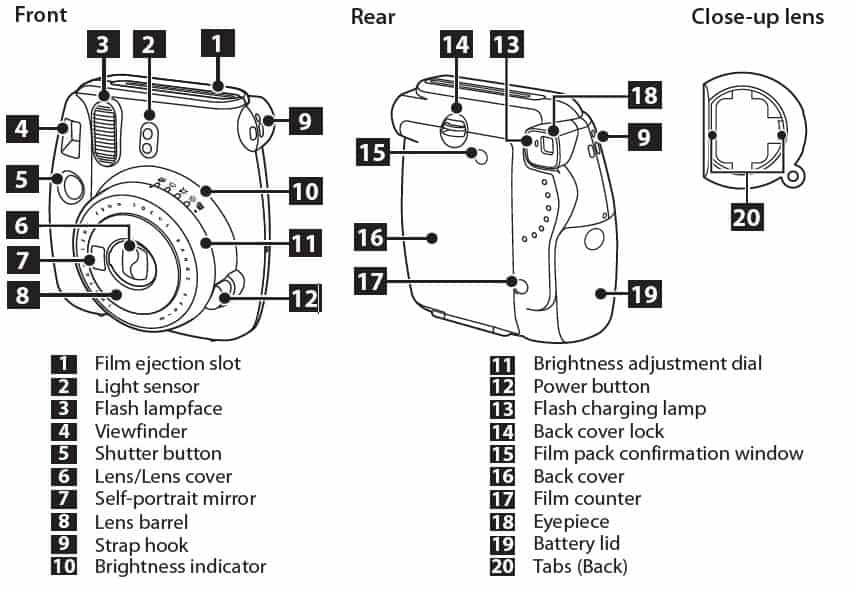
Front- After buying the camera just don’t excite about for shooting. Just look through it and on the front part you will see there are Light sensor, flash lamp face, Shutter Button, Lens, Lens-cover, Self-portrait mirror and Brightness indicator.
- Film election slot is the place where your film will comes out after you press the shutter button. And of course you should have film loaded in the camera.
- Light sensor is the most important part of the camera. Because the Light meter will consume light or reading amount of light that comes into the camera. When you taking your shot do not cover this up otherwise everything is going to mess up.
- Beside the light sensor you can see Flash light. It will generate light for your shot so that your subject will light up for better shot and you will get very good picture. You should know that the Flash lampface is auto that’s mean it will always going to blow light for your every shot.
- You will find viewfinder after the Flash button. What it is going to do is that it will help to see your subject to get full picture. Make sure you subject is in the center of the frame.
- Shutter button do the main part. By pressing this, the camera will eject one film at a time. So be careful of pressing this cause if you press this, the one film must eject with your picture that you shot.
- Want to take selfie ? then it is the amazing feature comes with mini 9 camera. You just put on the Close-up lens on the lens and get your selfie. Also if you want to take closer picture then it is the best option.
- Self-portrait mirror helps to get best shot by watching yourself. You can see through mirror so that you as like as you want.
- Iens barrel is not important.
- When you buy the camera, you will get wrist strap for hanging or carrying the camera. You gotta use strap hook to make it.
- Now this is most important part of mini 9. Why ? Because if you don’t educate yourself a little bit about it, you are going to ruin so many film and shot. It is very easy to use just read my other post. You will know the easy way of how to use the Brightness indicator and why it important part of the mini 9 camera.
- By turning the Brightness adjustment dial dot with matching the indicator, You will become the better shooter without any skill.
- You know that what you need to do with the power button.
- Flash charging lamp charge the flash to get flash for your shot. Don’t try to take photo while the flash charging lamp blinks for a while. After the blinking is off, then you are ready to go for another picture.
- In case of loading or unloading the film, You have to use the back cover lock to do the action so that you do not break the camera.
- On the back cover you will see there is a little window that let you tell whether or not film in there. If you see the yellow light that’s mean there is film in the camera otherwise there is no film.
- I don’t know what is this.
- Film counter will inform you how many film left in the camera to shoot. Instax mini 9 has 10 film capacity.
- You know what is the eyepiece is.
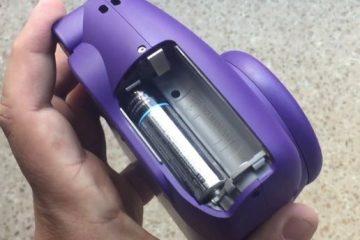
- On the right side of mini 9, you will find out Battery lid for putting batteries in.
- The close-up lens has tabs is for setting with the lens. I will talk about it a little bit detail on this post.
How to load Instax Mini 9 Batteries ?
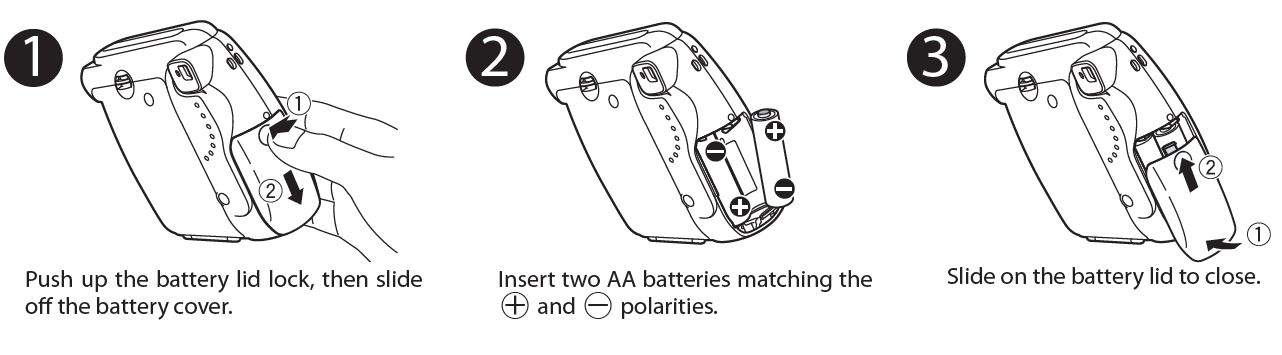
When you buy instax mini 9, you will get get batteries to load into your camera in the Box. Just take the batteries and put it in OR if your batteries life is gone after using the camera, then you should buy new alkaline batteries of the same brand only(AA only). Actually you must not use other brand for mini 9 camera.
How to load batteries- First, push up the battery lid lock, then slide off the battery cover. By doing this you are ready to put the batteries in. Second, Insert two AA batteries matching the + and – sign polarities. Third, After inserting the batteries properly, Slide on the battery lid to close. That’s it and you are finished with the battery part as well as enjoy to shoot.
Inserting batteries
Battery life- This is the common questions comes when you use the camera. By using alkaline batteries you can shot about 100 pictures roughly with the new batteries. That’s mean You can use 10 packs of Instax mini film with the new batteries. Do not put the batteries in cold because it can reduce the battery performance. If you do then make sure you warm up the batteries to room temperature before using this camera. Use the supplied batteries for validation.
How to Load INSTAX mini 9 Film Pack ?
Now you know the introduction of the camera. What you need to do is just follow through the instruction as in the picture showing.
Loading film Pack 1-2-3 mini 9
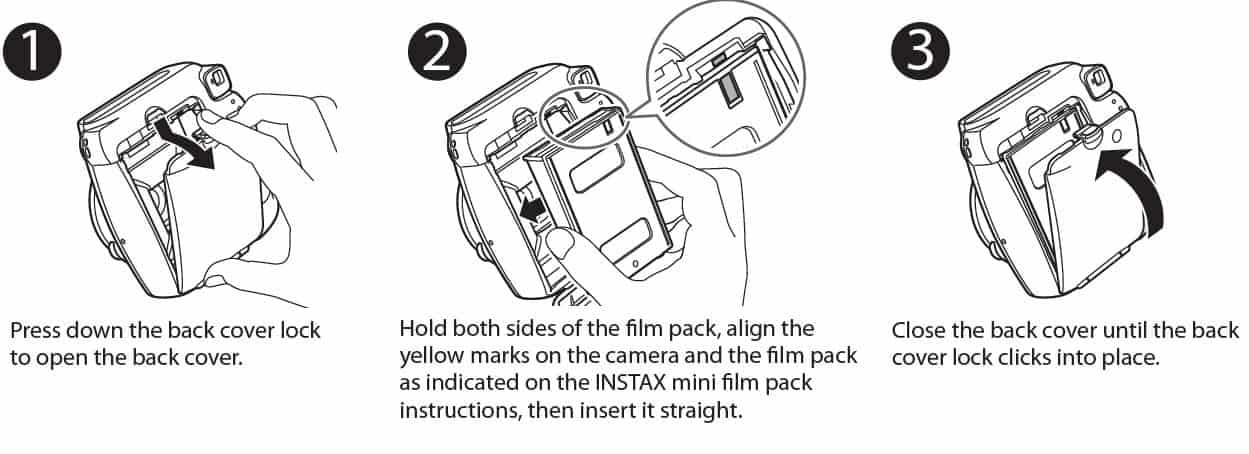
- On the back you will see there have the back cover lock on the camera. Just press it down the back cover lock for opening the back cover. So now you are ready to load the film.
- In picture two, you can see clearly how to hold the film pack not to ruin the film. You must hold the film pack on edge of it and put it in. So Hold both sides of the film pack, alight the yellow marks on the camera and the film pack as indicated on the INSTAX mini film pack instruction like the picture, then insert it straight.
- Then close the back cover until the back cover lock clicks into the place. If you have finished it then go for the camera on section.

Loading film Pack 4-5-6 mini 9
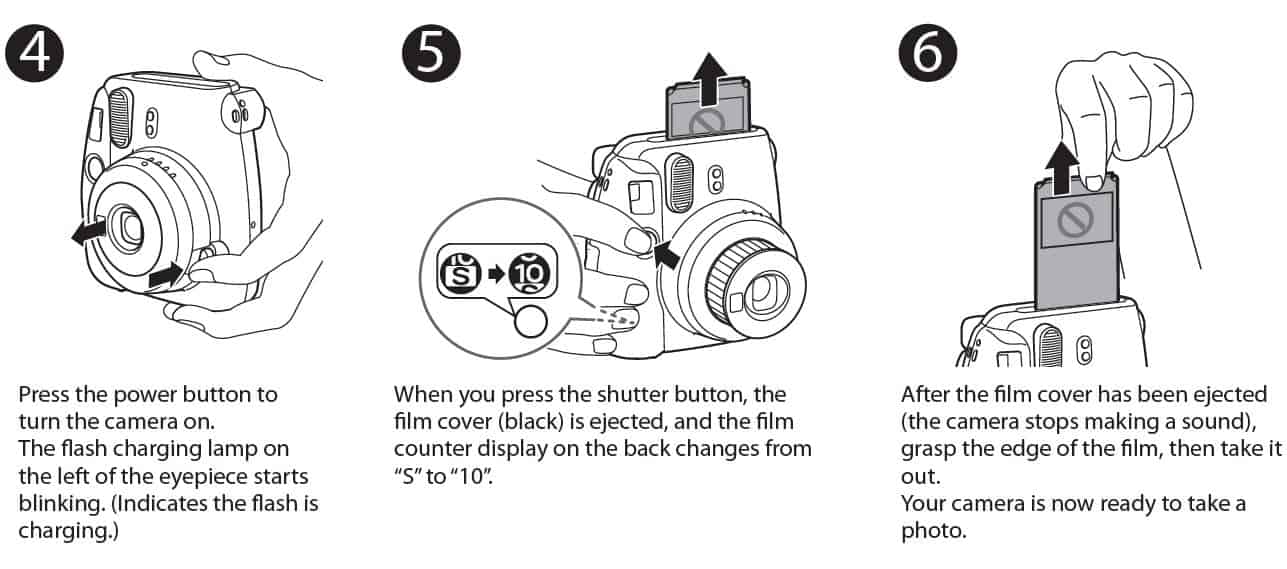
- After having finished loading film pack, press the power button to turn the camera on. Here you can see that the flash charging lamp on the left of the eyepiece starts blinking. What it is going to tell you that the flash is charging to ready to take shot.
- You are not ready yet to start filming because there is a black film cover in the film pack that should eject first so that you can start to take the real shot. Just press the shutter button, the film cover (black) is ejected, and the film counter display on the back changes from “S” to “10”. Now You are on the way.
- When the film cover has been ejected , the camera stops making a sound, grasp the edge of the film, then take out. Finally your camera is ready to take a photo for you. You will get 10 shot then now. After finishing the film, The film counter will tell you although do the same process again.
How to Take Picture using instax mini 9 ?
While taking photos be careful of some settings. Don’s cover the flash, learn some trick of brightness adjustment dial and hold the camera properly so that you can get better picture output.
Taking picture 1-2
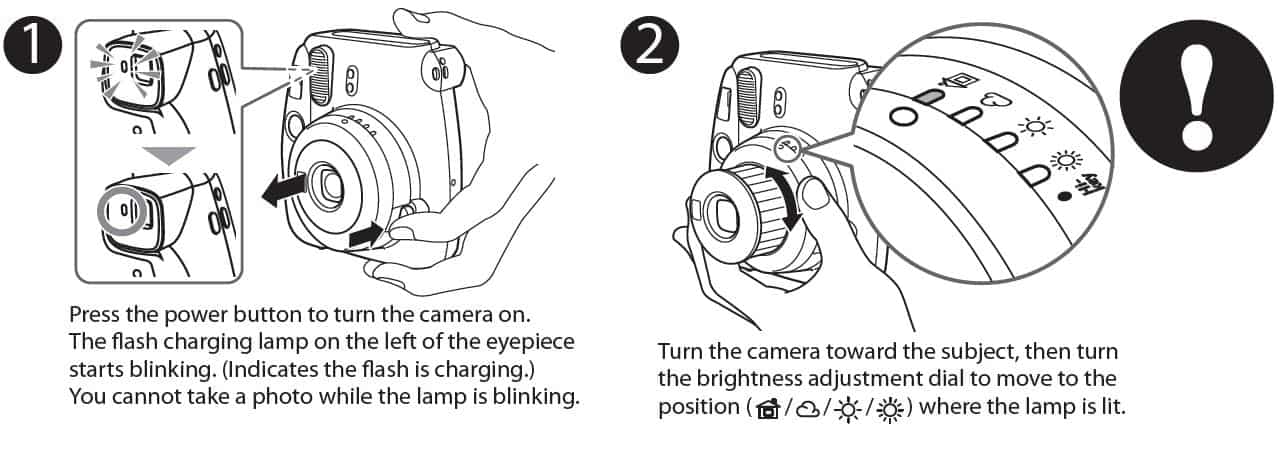
- Now press the power Button to turn the camera on. The flash charging lamp on the left of the eyepiece will starts blinking which indicates the flash is charging. Do not take the photo shot while charging lamp blinking. It is telling that flash need charge to flash to the subject.
- Then turn the camera toward the subject. Always remember, When you take any photo, use the brightness adjustment dial to move to the position where the lamp is lit. There is a dot on the dial. You just need to match it to the lamp lit. This is great part of this camera is that the camera determine the light automatically in according to light. You must need light while taking photos.
- Hold the the camera as you like for Vertical image or Horizontal image. Confirm the final image, then press the shutter button.

3. Taking picture
Helpful Instax Mini 9 tips
- For horizontal image, hold the camera with the flash lamp face at the top.
- Do not take pictures where flash photography is forbidden.
- Be careful so that your fingers or the strap do not cover the light sensor, flash lamp face, flash, lens, or film ejection slot.
- Do not grasp the lens barrel when positioning the camera; otherwise, the finished print may not look as expected.
- Look into the viewfinder so that the “O” mark appears in the center.
- Be careful not to touch the lens surface when you press the shutter button.
- Keep a distance from the subject of at least 0.6 m. The flash has an effective range of between 0.6 m and 2.7 m.
- The subject will be out of focus using the regular lens if the distance is less than 0.6 m. Use the close-up lens for short-distance photography. Using it enables you to photograph the subject between 35 cm and 50 cm.
- In short-distance photography (including photography using the provided close-up lens), the center of the subject in the viewfinder will be on the upper right on the actual print.

Taking picture 4-5-6
- Film counter will help you to know how many film are there in your camera lefts. If there are film in the camera, the number will show in the film counter and after taking a photo, the number will decrease starting from 10 to 0. If the film pack shows the 0, then that is mean you have used the whole film pack and need to buy new one.
- On the picture 5, you can see the film has ejected and you need to take it out by grasping or holding the edge of the film. Don’t shake the Instax film. You can shake the photo if it is Polaroid.
- After taking the photo if you want the camera off, then push the lens barrel to do it. You can do it manually by doing that. When you need to start then again press the power button to start the camera on.
How to Unload INSTAX mini 9 film pack ?
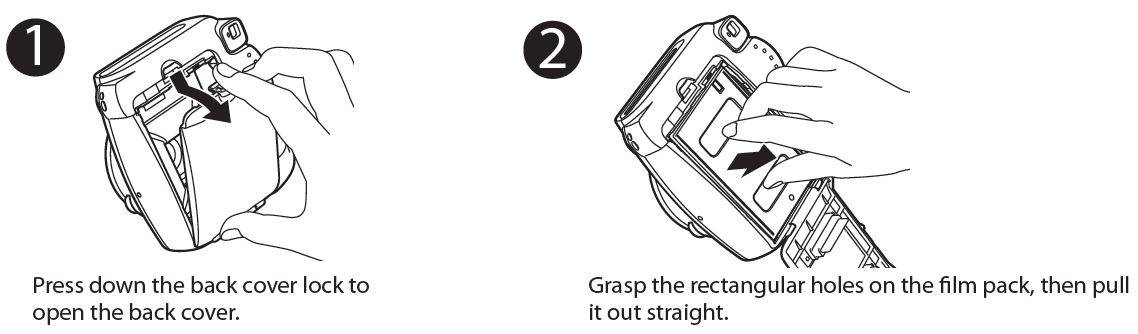
When “0” is displayed on the film counter, unload the film pack following the procedure below and as indicated on the INSTAX mini film pack instruction. Just press down the back cover lock and open the back cover. Grasp the rectangular holes on the fim pack and put it out straight.
Unloading film Pack mini 9
How to Use Instax mini 9 Close-Up Lens ?
Close-up lens has come for more greater shot.The close-up lens helps you to get closer shot for you in case you want to take short distance photo. Taking selfie is more easy with close up lens. You have self mirror by watching yourself on mirror while taking selfie of you. Just follow through instruction…
Using the Close-up lens
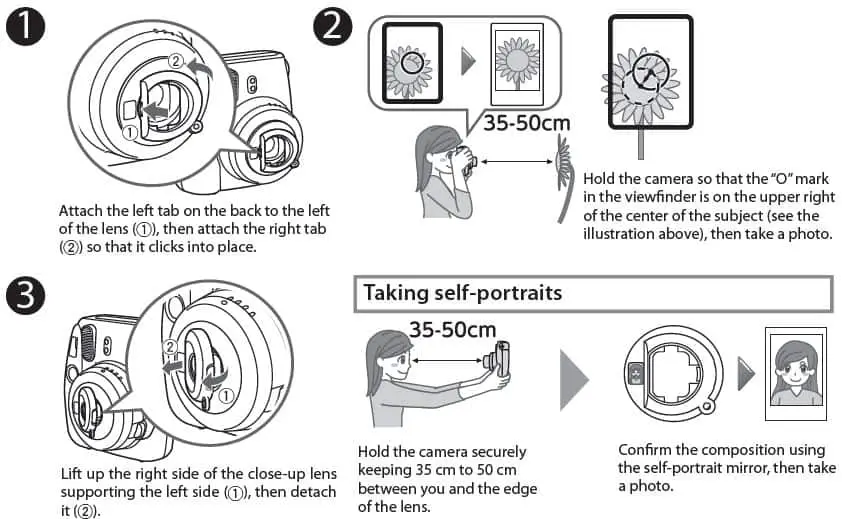
- First, attat the left tab on the back to the left of the lens, then attach the right tab so that it clicks into the place.
- Now according to the picture-2 taking photos will look like that flower. You will get more closer shot by using close-up lens. The “O” sign represented as viewfinder will help you to get center for the picture.
- If you want to detach the close-up lens then lift up the right side of the close-up lens supporting the left side. Then detach the Close-up lens. When you take a selfie just hold the camera securely keeping 35 cm to 50cm between you and the edge of lens. It would be perfect for taking best portrait. Remember you can see you on the self-portrait mirror while taking photo.
Remember-
- You can photograph objects close-up, and can photograph yourself using the self-portrait mirror.
- Do not look through the close-up lens at the sun or other strong light. Blindness or vision problems could result.
- Do not leave the close-up lens in places exposed to strong sunlight. Personal injury or fire could result if the lens should accidentally concentrate the sunbeams on an object or a person.
- Switch off the camera before you attach/detach the close-up lens.
- Never turn the close-up lens when you attach/detach it; otherwise, the tabs on the back may be broken.
How to use Hi-Key for Taking a good Picture ?
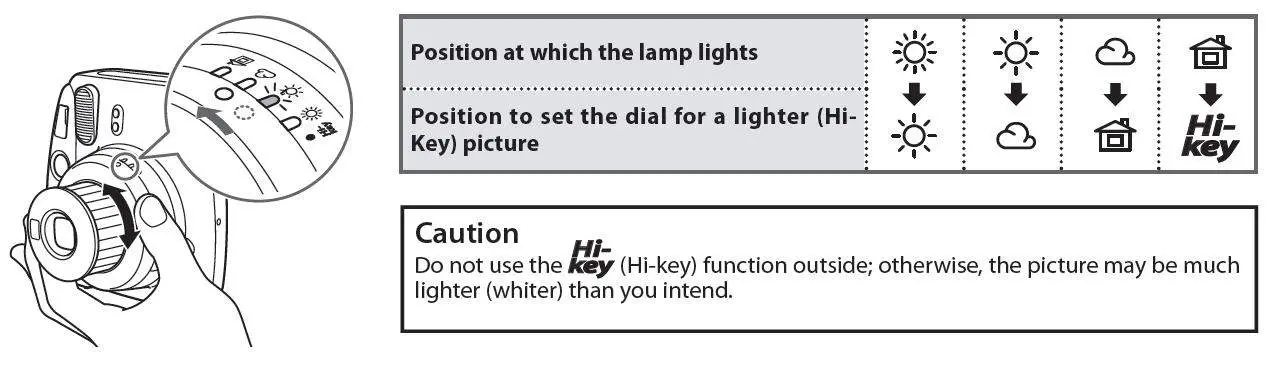
This camera automatically determines an appropriate brightness for taking any given picture, and informs you by lighting the corresponding lamp. To take a lighter (Hi-key) picture, set the position of the brightness adjustment dial to the position of the mode darker than the mode for which the lamp on the dial lights.
Taking lighter (Hi-Key) Picture
Hi-Key is the most interesting feature of Instax mini 9 camera. If you want awesome result by using this feature, then I have another post written about taking Best photo with the mini 9. You can go there to get more fun.
FILM REVIEW
There are lot of questions about film like-
Can I take the film at airport ? Can I cut the film or Can I use Expired film ? etc. I have written a full review of all film- mini, square and wide. You can read my review and choose whatever you want and this is also my recommendation for buying. CLICK HERE TO REVEAL THE FILM HISTORY, THEN BUY.
Instax CAMERA REVIEW
There are lot of features in Instax Camera. Every camera has their own unique quality and settings. But what suits you best and what feature do you like most or do you like mini , square or wide format. There are lot of confusion might come to before buying the camera.
After buying the Instax camera, you always look for another feature that might not have that particular camera. Then you regret for that.
So I have researched all of the Instax camera and discussed all the camera individually so that you can understand better which one is better for you to buy.
So buy the camera after learning a bit more about Instax Camera. CLICK HERE…..TO READ CAMERA REVIEW.
Click here………… Top tips and Tricks Instax mini 9 for Best Shot.
click here……….. to read 8 Steps to be Expert in mini 9 like professional photographer.
click here……….. How much does a Mini 9 Cost ?
Click here……….Can Instax mini 9 do double exposure ?
Click here…… 15 best instax films you must try and Guide to use them.
click here……….. to Know the Major Difference Between mini 9 vs 8


5 Comments
Jackie Lee · September 28, 2019 at 1:44 pm
My pictures are akways very pale and under exposed but i don’t know why, can you help?
admin · September 29, 2019 at 5:29 am
Please read this complete article. I think it might help.
https://instaxworld.com/15-best-instax-films-you-must-try-and-guide-to-use-them/
Regards
Agnes · October 27, 2019 at 1:14 am
The shutter button is stuck. It won’t take a picture. And it doesn’t make the clicking sound. Do you have any advice?
admin · December 2, 2019 at 3:23 am
May be this is internal problem. You can ask this question to ifixit.com . They have very good support system.
admin · December 2, 2019 at 3:27 am
Please read this complete article. I think it might help.
https://instaxworld.com/15-best-instax-films-you-must-try-and-guide-to-use-them/