How to take your first double exposure shot ?
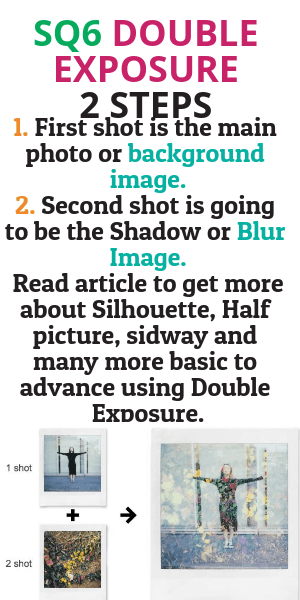
The very simple and basic idea is that the first shot you take is going to be your main photo. The second shot will be the Shadow. You need to have it in mind always. Then you can get right Double Exposure shot with Instax Square Sq6. That is mean everything in the second shot is a shadow where you are going to see whatever you take shot.
- First shot is the main photo
- Second shot is going to be the Shadow
The Basic Idea of Double Exposure Mode – Instax Sq6
Basically the first image use as blurry or background with little opacity so that the first shot look nice and second shot or image use as a main photo appearing at front. In instax square Sq6, Double Exposure Mode is a new feature used as analog style. Just Superimpose or overlap two different shots to create a single creative photo. Release the shutter once for one scene and again for another scene to create one single picture in one Square film.
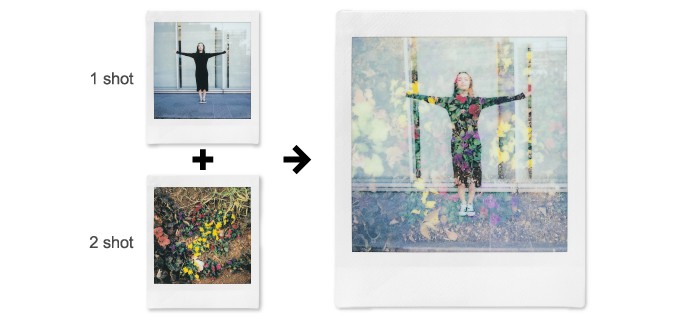
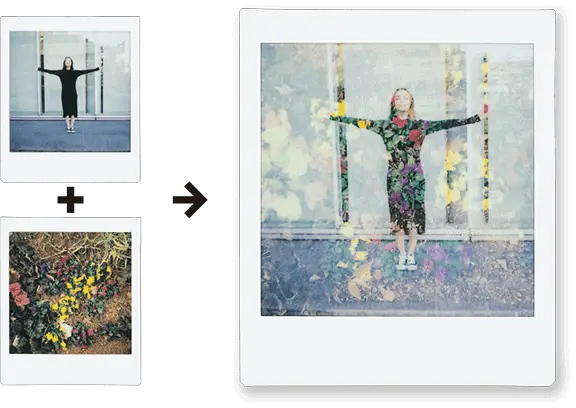
Here is the example from fujifilm of a girl and flower, the very first shot is for the girl and the second shot is taken of flower. What happened is that the second shot has little blurred so that the girl focus as a main photo. This is amazing output of Double Exposure Mode.
Double Exposure Sq6
The simple shot has done crazy output using double exposure mode. Since it formats square, it’s look more astounding. I have a ton of example of double exposure shots with sq6. Keep reading this post so that you can find out more variety use of double exposure shots.
When you wish simple double exposure – one as a background and another as a main photo, then you can do it very easy way. What you have to do is that take one shot to use for main photo for little opacity and another is for blurry or shadow image.
How to Use Double Exposure Mode???

Double Exposure Mode
So it’s going to allow you to take two pictures. so when you press the shutter button, it won’t eject the film. it will let you shoot out of the picture. It is the funnest mode of all the feature.
How to capture Double Exposure Photo ?
In short take the first shot. After taking the first shot take the second one. that’s it. Remember the first one will be the background with little opacity and the second one will appear at front. That’s really easy.
so that can give you a lot to play. So when you take the first picture, you can see the picture is not coming out and low LED will be blinking on top. so You need to take the second picture. then you see it will ejects the picture and you can see magically appearing in the back.
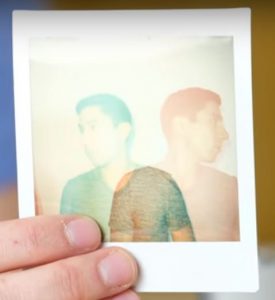
In the below here are two photo that combine with awesome one. First, the girl was taken after that the ground with flower was taken shot. Then the output was the right side of the images. Double Exposure is really nice feature ever t
Double Exposure images – Instax SQ6
2 subjects are photographed in one picture. When you shoot the first subject, the LED on will flash.
After that, shoot the second.
How to take a Silhouette Double Exposure – Instax sq6
A silhouette is basically a bright background and a dark subject. The subject could be anything. Like digital camera you can take silhouette photo with sq6. If you want to do that the first shot will be going be dark shadow. It is the shadow where your second shot is going to show up.
You can get so cool photo practicing silhouette. You just need to do is to take first shot as a silhouette. It could be either against a whole wall or you have got bright background or white sky. The sky should be against the camera.
Step one
So, let’s start with the first shot. Make the shot number one is silhouette. You do it on a person or an object whatever you want. Like we were talking about the first photo will be dark image or shadow. And this the the image where your second shot is going to show up.
Step Two
Then be ready for your second shot. Find a pattern or a texture or a color that’s gonna fill in those shadows of your first shot. That’s all you need to do. It’s that easy and the results with the instant film are quite unpredictable according to your shot experience or style.
Okey Take a second shot. Remember the shadows are the place where that second photo is going to show up. That is mean when you highlights of some of first shot, the second shot is going to fill as much as possible.
It’s look so amazing when you get the silhouette output. Here is the Silhouette double exposure shot with sq6. This picture is collected from instant camera blog.
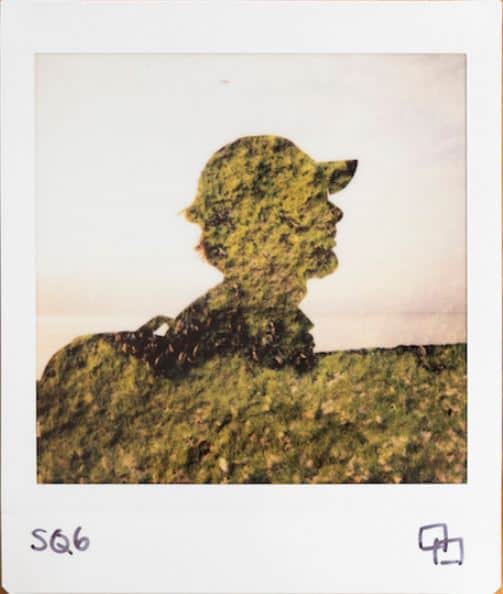
Double exposure silhouette Instax Sq6
Difference between square sq6 vs sq10 !!!
When you take shot with sq6, you will really get better photo than sq10. I found that the pixel quality of picture is much more better of sq6. I am going to show you the difference between two picture of same photo taken with sq6 and sq10.
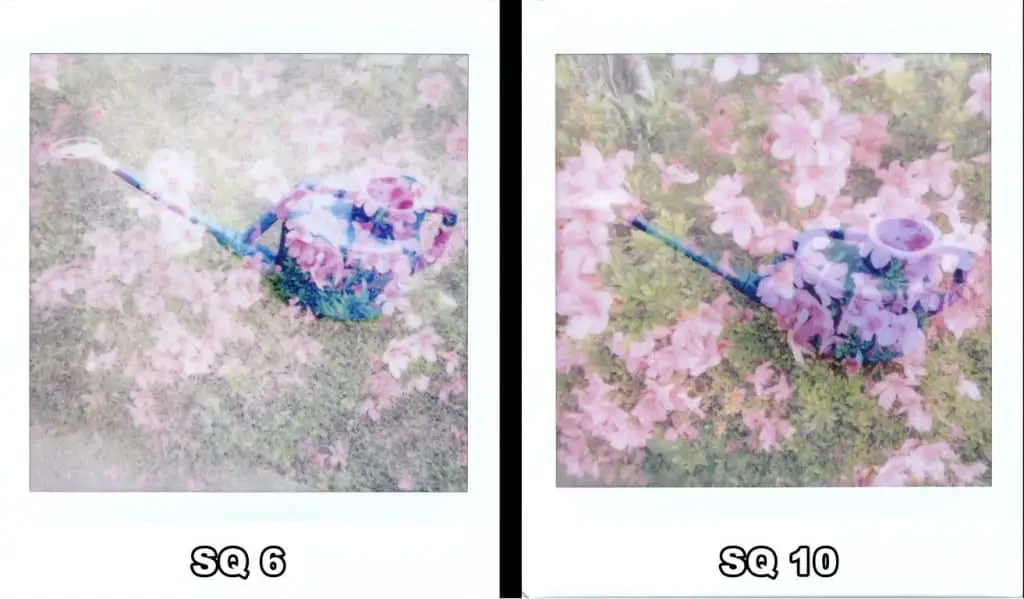
difference between sq6 vs sq10
Here on the photo, you can already imagine the different of the quality. What It is done is that first took the water jar photo on the road and then take the second shot of the flower garden. According to the sq6, what is going to happen is that the first photo get the background as like as the picture. And the second photo is the shadow or blurred or gets little opacity.
The overall output is great. The main difference is only the quality nothing else. I think the Square sq6 has updated the pixel feature for better quality.
How to use 3 flash color filters for Double Exposure
This is special feature of Instax square sq6. You already know about the 3 flash color filters of sq6 if you bought the square sq6 camera. It has three flash color filters gels that is Orange, Purple and Green. You will get amazing output when you use flash filters gel with Double Exposure Mode.
What you need to do ??? Just use the gels whatever color you want to use before taking shot for double exposure. You can also use two different filter with different output in one print or film. Say, you want orange for first picture and green for second picture for double exposure. Just use Orange for first shot and use Green for second shot.
double exposure color Flash sq6
Here you can see and example shot using flash shot. The picture is overlap with two different flash gels.
Tips for half image – Instax sq6
One of the most cool way to do double exposure is by exposing only half of the film at once in your first shot and then you expose the other half of the film in the other exposure. It’s is also very fun and easy.
So, say I want to take one half face on first shot and the second half face for second shot. One will be left and another will be right side of the film. The combination of two photo will look cool. So this is really fun way to do it.
You can even take shot one half of the frame of boys shot and then the other half girls shot just for fun.
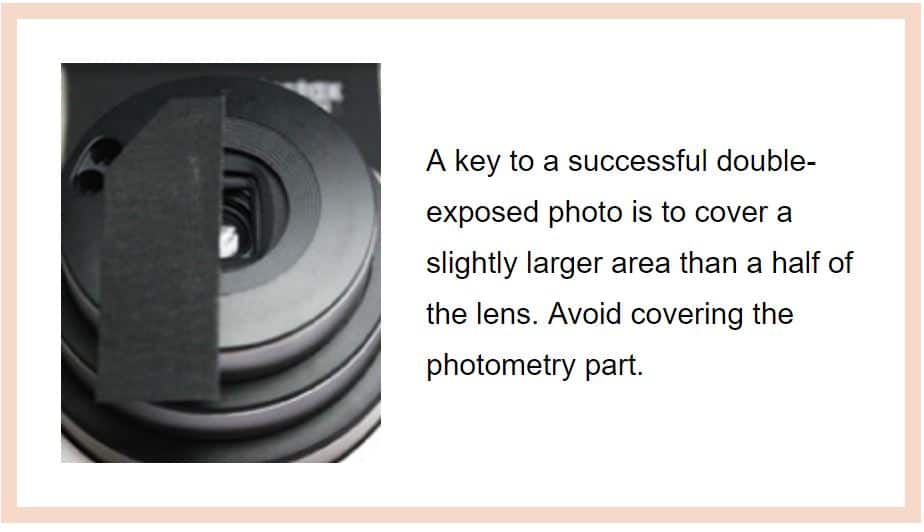
Tips for half image while taking shot with double exposure
- Take a piece of black tape. Cover up half of the frame for your first shot. If you want to do something like that with Instax sq6, you should follow this tips. That will really help you to get best shot with double exposure.
-
- Then carefully move that tape on the other half of the frame. Be ready for second shot. Then take the shot.

Covering the Lens sq6
- Then carefully move that tape on the other half of the frame. Be ready for second shot. Then take the shot.
-
- Okey the important tips before we go one thing to remember is that when you are exposing the same piece of film twice, it’s getting basically twice as much light as it normally would.
-
- Another tip when you are starting out with double exposure and multiple exposure photography is that use common sense while using tape. It could look chaotic if they combine together. So use common sense to better shot.
- Alright, I hope you enjoyed that little explanation of taking half shot using double exposure. Don’t forget to read tips and tricks for sq6 which I have discussed with another post.
Tips for taking sideways picture – Double Exposure
There are no specific restriction to take the second shot as like as the first shot. Don’t think you need to hold camera one way. You can do turn it sideways. You can even turn it upside down or whatever the crazy stuff you want to do. That is the exact point here is to try to be creative.
It could happen that you want to keep the first shot one side. Then you think suddenly that you should take for other side for better crazy looking. Just line up it with the second shot.
It’s tricky and keep in mind that you might a bunch of mistakes to figure out the best position. Here is the thing. When you do a couple of shot, then you will learn your own technique to get really cool stuff.
With all the fun part of process, you can do reflection shot. You can do it with similar idea. Just do up right and then do the double exposure with upside down. As an example…
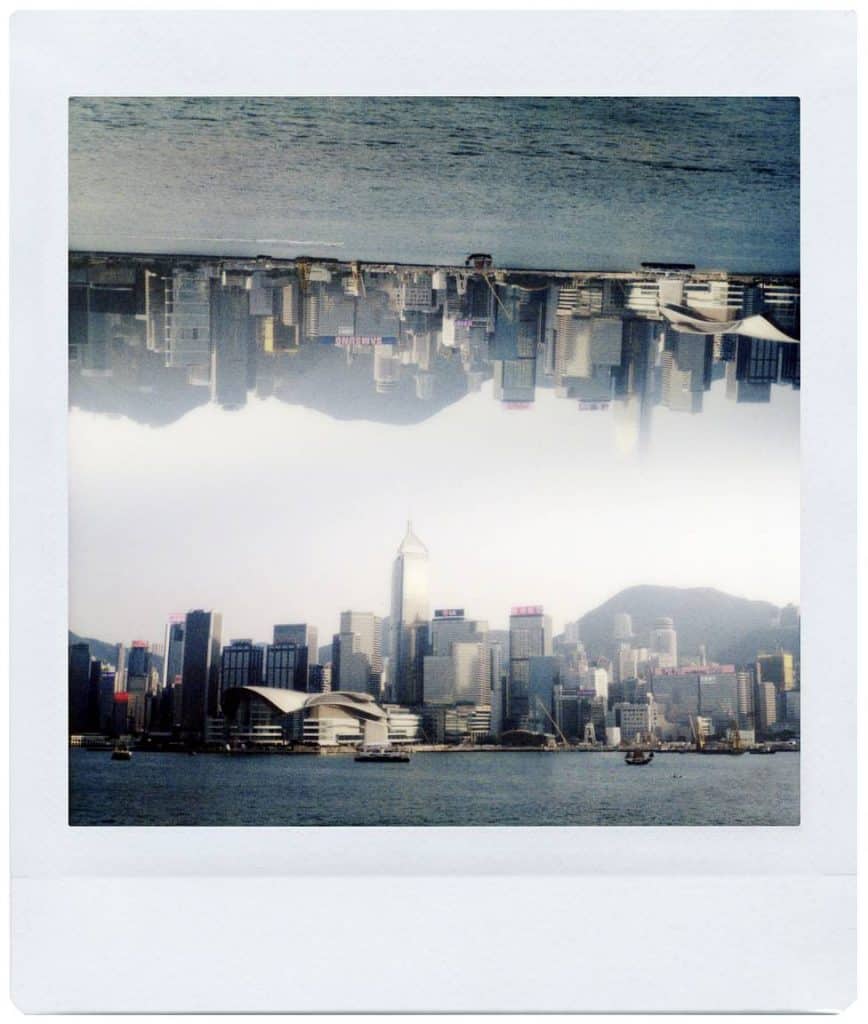
double exposure Sideway sq6
You could take shots where you can combine two different contrasting ideas like some nice clouds with city light or urban architecture or you can do a shot where it’s two photos of the same object. Capture same shot in different ways. Therefore, you get kind of layering top of each other.
How Double Exposure works ?
Since I am sharing some tips with you on how to shoot awesome double exposure shots with your instant sq6 camera. Now let’s talk about how double exposure works.
You take a shot and the film comes out. That is the basic of normal shot. In case of double exposure the does not do the same thing.
First and foremost, you need to know is the basic idea of double exposure that I have discussed before. What happens is that you take a photo on a piece of film the picture do not come out. It waits for your second shot. When you do the second shot then it pop up. That is double exposure do. The film comes out unexpected and creative ways to give you some cool results.

double exposure Example sq6
Here you can see the combination a girl with sea. It’s look really amazing. You will always want to do instant photography after getting awesome results. Double Exposure do its work kind of funky way and if you don’t fully understand it, your results will kind of be lackluster.
Before you Do Double Exposure What to know ???
-
- First decide of photos. The very first one should be telescope photo for the background. You can choose whatever you want but the nature would be the best. Why ? because it will come with the whole details. You can also choose nature for second photo. Depending whatever result you want for you film.
-
- Second photo should be a face or your full picture if you take first shot of nature. What is going to happen is that you can make portrait. It’s up to you which image come first. It is depended on your choice because you should not follow all details. This post is only discussion that I am doing with little experience like yours.
-
- You must have the feature of double exposure mode of your instax or polaroid camera. When you have this let’s take action.
- Do not worry if you don’t have the double exposure feature in your instax camera. I have some trick to get double exposure shoot with another instax camera. I will discuss it for mini 90 as an example.
History of double exposure mode
The story of squirrel food has exciting start. Actually no one knows who created It or make it like selfie. So, it is also mistry that who comes with double exposure mode fast.
at first it comes with some tricks of the atmosphere and some ghostly effect, maybe inspired by some evident. but by the time it has come up now the different and lot of ideas with people mind.
when you take film camera, you or photographer we use the lens to get sharp edges. But one mistake has happened the photographer did not remove the lens cap. Then the story begins.
As early as 1890, The double exposure was only being used for technique to get a different kind of images.
by the early 20th century, avant-grade photographers were experimenting with this technique. Another great photographer who has special skill of photography effects in film making and ghostly figure used for horror movies.
then this technique Got popularity and interested by the local people also.
when PhotoShop has come, it has got more popularity by inventing of internet with Facebook, Google, Instagram, Pinterest and all kind of social media.
Now the double exposure technique is known by almost everyone who has photography skill with Photoshop or having digital camera.
the interesting part is that, the Polaroid instant camera get back to the field. and it is Got way of more popularity than the digital camera surprisingly.
instax camera amazed the company by shocking them that it is going to best choice of people. and the company are trying to fill up the customer’s fulfillment with different kind of future for instant lover.
All about Double exposure
Before we start learning about the tips and tricks of instant camera 90 Neo classic double exposure mode, it would be great about learning a bit the exposure mode.
Double exposure is a combination of two images which is taken by your instax camera where one image is overlaid By another image, put a little tricks of oppositely which is managed by the instax camera.
Ok let’s take about the instax Mini 90 Neo classic camera. one of the Best feature of this instant camera is the double exposure. Basically it is the main feature of this instant camera.
So double exposure is where you layer two images into one very easily. In the case of Digital Photography it’s not easy to do even in the photoshop is very hard.
but with the instant camera is only two step to follow. that’s all, all you need to do is be careful with some stuff.
Why ?
because the shots already exposed, that’s mean you need to rely on camera not on the Photoshop.
At first may be, it doesn’t work like the way you want. you need some practice or learn some tricks before you capture any double exposure mode.
You would really be amazed by you when you got your right shot while having captured images.
Which Camera do Double exposure ?
so let’s figure out how to make awesome results. okay, for starters, not every instant film camera can shoot double exposures.
you need to check to see if the camera you have will the Fuji film mini 90 and Instax square sq6 is the one in the Fuji film line that will do it and it will do double exposures to shots on one piece of film.
it’s just a mode that you turn on make sure to check out your manual for how exactly to do it but it’s very easy.
the Lomo instant automatic camera will shoot multiple exposures so that means you can have as many exposures on the same piece of film that you want and then as soon as you press that button again. then the film comes out. so that’s very nifty.
there are other cameras like the Lomo instant Y can do multiple exposures. if you have the instant Flexsteel 70 that can do multiple exposures as well.
so you need to know whether you can do it. But if you do have one of those cameras and you’re ready to go.
you got your manual in hand. let’s start learning how to take those cool shots.
it takes me out of my normal creative box and I just kind of have more fun with what I’m shooting.
so make sure you go out and do that. leave me a comment if you like double exposures, you have any tips you’ve taken any cool shots that you want to tell me about. I’d love to hear from.
if you love instant film and just photography in general because of we have a lot of fun here check the links for these cameras.
I’ve also done more reviews and guides to a lot of these so I can link to those too. if you want to keep learning have an awesome date. thanks so much for watching happy photographing.
FILM REVIEW
There are lot of questions about film like-
Can I take the film at airport ? Can I cut the film or Can I use Expired film ? etc. I have written a full review of all film- mini, square and wide. You can read my review and choose whatever you want and this is also my recommendation for buying. CLICK HERE TO REVEAL THE FILM HISTORY, THEN BUY.
CAMERA REVIEW
There are lot of features in Instax Camera. Every camera has their own unique quality and settings. But what suits you best and what feature do you like most or do you like mini , square or wide format. There are lot of confusion might come to before buying the camera.
After buying the Instax camera, you always look for another feature that might not have that particular camera. Then you regret for that.
So I have researched all of the Instax camera and discussed all the camera individually so that you can understand better which one is better for you to buy.
So buy the camera after learning a bit more about Instax Camera. CLICK HERE…..TO READ CAMERA REVIEW.
Click here……….Top tips & Tricks | Instax Square Sq6 shooting.
Click here……….. to get Step by step Guide of Instax Sq6 Instant Camera.
Click here…………Go to details of Macro Mode Tips And Tricks
Click here………..Go to details of How to Use Landscape Mode in Different Situation

1 Comment
antony hands · June 27, 2019 at 11:27 pm
The difference between the sq6 and sq10 and sq20 in double exposure mode is the blending method used in the digital hybrid. Traditional film is an additive process – exposure can only ever be added, not taken away. so something that is white after the first shot will contain no detail even if the next shot is black in the same area. With the hybrids fuji chose a different blending method where each exposure is set to 50% opacity and then they are overlaid. hence you can see details in the second shot even when the first has been blown out to white.