Hey, guys, I am back with another review for instant photography and today we are going to be doing one of our most requested reviews the ultimate guide to the Instax Mini 90 Neo Classic which is a classic guy of Polaroid instant film. We will talk about almost all tips and tricks, feature, accessories, photo shooting mode with how to use of this and more. If you really are interested in Instant photograpy, then you would really enjoy this review and tips.
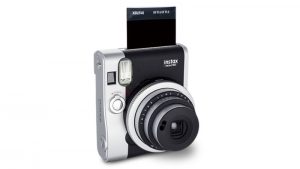
So, here’s the thing the Instax Mini 90 neo classic camera is an instant film camera. So, it creates awesome little prints. There’s no digital image. This is all you get the thing about this camera that’s really cool is this is the top of the line for the Instax mini-series of cameras and it has a ton of features. There is a lot of creative stuff you can do with this camera once you figure out how to use it.
Instax mini 90 Black
So, in this article, I’m going to be showing you what you get when you buy this camera kind of what all the features are here. Then how to take all those cool shots using all the different modes. It’s obviously going to be a blast. Fujifilm Neo Classic 90’s going to help you get the best shots out of this the camera so makes sure to attend all the way through and let’s get started.
Okay so let’s talk about what’s included when you buy the Instax Mini 90. For starters, it goes for Cheap on Amazon and makes sure to check the links in the article for where to buy it.
instant min 90 comes in two colors. This very nice brown color which I really like very classic looking and Then there’s also a black and silver option. One of the really big drawers with the mini 90 Classic is the styling. It looks really cool retro kind of looks like a classic film camera. So, it’s definitely got that going for Classic Polaroid Camera.
Instax mini 90 Accessories
Now when you buy the Neo Classic Instant Camera, you get some stuff along with it. For starters you get
- A nice neck strap. the other mini Instax many cameras come with wrist straps but this one comes with the neck a strap which is a pretty nice one. So that’s kind of cool. Just a little tip you can find out where the neck strap goes on. you also are going to need a little a thing the bobs that come along with it.
- The mini 90 also comes with a rechargeable battery which is very handy. Then you’re not wasting all those double batteries like the other instant mini cameras. Of course, there is also the battery charger as well which of course you need. So that’s nice to have.
If you Din’t buy the Mini 90 Camera yet, Grab my recommendation and reliable source here through this link.
| Colors | Visit Details On Amazon |
|---|---|
| Black | |
| Brown | |
| NOTE: | Don't forget to Buy Film Along with the Camera |
Instax mini 90 Accessories – Battery
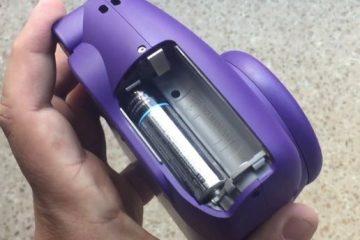
Now We are going to start getting this camera set up. I’m going to show you how to put in the battery. We’ll look at sort of the design features that are on the mini 90.
Alright so getting the battery in, turn the camera around. Now here’s one important thing that kind of stresses me out a little bit is that on the back of this camera, you have the battery compartment and the switch to load your film.
You do not really want to open film compartment especially if there’s film inside. So, make sure if you’re replacing the battery you’re being careful that you are actually opening the battery door and not the film door. so this little compartment comes off, you get your battery in and just line up the color and all this stuff it really is very easy that in there and we are ready to go.
Instax mini 90 Power Button
So, to turn on you’ve got a button on the front. And the lens pops out. You are ready to get started. So, we will look kind of around the camera. I will show you some of the interesting features of the Instax mini 90 Neo Classic.
So, for fresher, there were actually two shutter buttons. One of the power buttons is for vertical shot and that is for when you’re shooting in the vertical format. If you want to shoot horizontally, you’ve got another button. So that’s really helpful.
Other Option
You have the flash on mini 90 Instax Camera. There is a little red light or a blink. When you’re doing the self-timer, don’t put your hand where you film comes out on the top. So, make sure when you’re shooting, you are not covering this up.
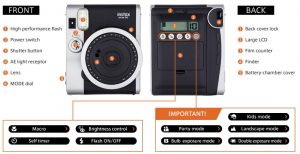
Instax mini 90 front and back
Instax mini 90 mode Dial and ViewFinder
There is a dial on mini 90 polaroid camera- the silver one and if you turn it that will change the shooting mode and we will get into more details on that later. Let’s flip it around. we’ve got our viewfinder on the back of the instant camera. As I mentioned previously. there has a release for the film door battery.
So, there are two LCD screens really on the Instax camera. One will show you your shooting details what mode you’re in how much battery life you have. And another one is going to show you how many shots of film you have remaining and that is very useful as well. so, you don’t accidentally run out.
So, one more thing there is the tripod mount on the bottom of the camera and you can put this on a tripod if you’re shooting in bulb mode where you have the shutter open for a long time or if you’re going to do like a self-timer shot. You can put on the tripod run get in the shot.
Exposure
So that is useful. Alright one final thing that I ‘m just going to point out on the front of the lens here you can see there are two little dots and that’s the light meter that is going to measure how much light is coming into the camera and that lets it set the exposure. So, when you are shooting you do not want to cover this up.
Instax mini 90 Shooting Modes Features
Alright, so those are all the details on the camera. Let’s get into those shooting modes. So

Instax mini 90 Trick with a penlight
now we are going to go through all of the different shooting modes. I’ll show you examples of the photos and give you tips on using them. This is the stuff that you’re really going to
want to pay attention to because all of these features really help you get out there and get creative with this Instax mini 90 Neo Classic Camera. So, understanding how each mode is different and how it works is super useful.
1. Instax mini 90 – Macro Modes
So, let’s get started with macro mode. I’m going to show you how to get macro mode going here. So, the camera is on and You have just to press this very nice little flower button. You can see that the flower shows up in the bottom corner and we are now ready for macro mode.
This is where you’re able to shoot close-up to your subject than you normally would. So normally the minimum focusing distance or the closest you can get to your subject with the mini 90 and 60 centimeters. With the macro mode on you can shoot between 30 to 60 centimeters. Although the ideal range is about 40 to 60.
So that’s a lot to say just you can get closer stick for about 40 to 60 centimeters. That’s

Instax mini 90 Macro mode
where you’re going to get nice sharp photos. That lets you just fill up more of the frame especially if your subject is small.
One Real cool thing about this camera this is quite different from the other mini cameras is that when you put macro mode on the viewfinder actually changes a bit.
So, with the other mini cameras, you have to use a different part of the viewfinder to try to get your composition right and it’s a little bit confusing. But the instant mini 90 Neo Classic automatically changes the viewfinder for you so that you have a better idea of what your shot is going to look like. That is really cool that’s definitely one of those premium features that you get with the Instax mini 90.
So, here’s an example of a shot that I took with the macro mode. You’re not getting like super super close but you’re definitely getting closer. You have more options when you’re shooting because of that macro mode. I love that it’s built-in that I don’t need to carry an extra lens around like with the other mini cameras.
So, I definitely find I use it more because of that. one thing is that when you’re getting closer sometimes, it’s a little bit dark you might want to use the lighten mode which we’ll get into further. But it’s just there’s a button here to get the camera to lighten up the photo. That can be useful when you’re shooting in the macro mode.
Click Here…….7 Tips and Tricks of Macro Mode You Might don’t know of it.
2. Instax mini 90 – Light dark
Actually, that is what we are going to talk about next is the lighten and darken option that Instax mini 90 Neo Classic Polaroid Camera has. So, this next button after the Macro Mode L&D; This is going to let you kind of have a bit more control over the exposure.
So, the camera is automatically going to read the light and decide what the exposure it should have. But you can take a bit more control and you can say make it a bit brighter than you would or even brighter. Those are two different options light and light plus or you can make it dark in it.
So, to do that is very simple you just press this button once you get L press it again L plus and press it a third time and you get D. One cool thing about this camera is that you can use that lighten and darken when you are in other shooting modes as well.
So, you can have the macro mode on and you can lighten it up. So, you can kind of have more control over the final image because you can kind of combine these different settings which are one thing about the mini 90. That I really like I feel like I have a lot more control over my images then a lot of the other Instant mini cameras.
Example
So, here’s an example of a shot I took with that lightened darken mode and so I was taking this portrait. It was a real backlight situation I knew the camera would probably make things too dark. So, I used light and Plus here it’s maybe even a little brighter than it needed to be. But I think it’s a better result than if I said just let the camera figure it out itself.
So, I got a cool shot out of it. So, if you do have quite a bit of experience with photography, you’re practiced in reading the light situation and having a good guess of how a camera would respond to it that lightens and darken is really going to help you override the camera and get a better result with your shots. Which I really like.
Note
Alright we’re going to move on to the next mode but just a little quick tip to get out of a mode. You just press the button again and then when there’s nothing there you know you have none of the shooting modes or adjustments on.
Click Here to Get More Details Use of Light Dark and how to use them with all mode
3. Instax mini 90 – self-timer
All right next up is the self-timer feature. That is this next button after the L&D or third button channel that looks like a clock. Press it once and you have a self-timer. I actually couldn’t find in the documentation anywhere how long that is so I timed it it’s 10 seconds. When you have that going the red light comes on like this and it wait for those 10 seconds. Then right before it’s about to take the photo it will start flashing and then it will take the photo.
An interesting thing here is if you have enough film and you press this button again. You can get two times self-timer. So, then it will take another photo after it does that first self-timer photo. So that could be useful if you don’t want to keep running back and forth.
Note
A note that you can use that self-timer mode in the other shooting modes as well again being able to use different modes together. so beneficial.
4. Instax mini 90 – flash Settings
All right next up let’s go through the flash functions so that’s this the number four button from left the little flash one. Press it once and that is going to make sure the flash fires the flash will always fire on that first one.
Press it again and you get the red-eye reduction flash which kind of does a little pre-flash to try to make sure your subjects don’t have those creepy red eyes.
Then we press it one more time and this is the flash off. This might be one of my favorite parts of the camera is that you can actually turn the flash off. You can’t do that on any of the other Instax mini cameras.
A lot of times the flash will fire when I don’t think it really needs to fire. I do not like flash photography with these cameras because not really flattering so I love being able to turn that flash off. Especially if I really don’t think it needs to be on. so that is very helpful. Make sure you play with turning the flash off. I think you’ll like the results.
5. Instax mini 90 – Shooting modes
Okay, now we are getting into the different shooting modes. and that is the last one mode button. so, when you press this button you can see everything is kind of flashing on the top there. to select the mode, you can either just keep pressing this button. and it will cycle through the mall or there’s that mode dial on the front here that I told you about before. and you can move it back and forth to select the different shooting modes.
I think I usually just use this mode button on the back because it’s there really aren’t that many you can cycle through them pretty quickly. But you might prefer this one. Because you can move back and forth. you don’t have to go all the way through. So, if you’re using the shooting modes a lot know that you have a couple different ways of selecting one.
All right so the first mode we’re going to talk about is party mode which sounds really fun and this this one on the back-LED screen with the two-people ready to party. So, what this mode is meant to do is if you’re in a situation where you kind of have like a darker background indoors. It’s going to try to expose for the background get lighter out of it. Then fire the flash for your subject and so I tried this out.
Example
So, I shot regular shot on just regular mode and then party shot on party mode as I didn’t see there really isn’t much of a discernible difference. So, I think it would be a pretty specific situation where you would see really different results out of this probably where the background is quite a lot further away from your subject. Which in those instances with the flash the background content to just look black.
So, if you are shooting and you find that the background looks really black you’re not getting any light out of it. You can try that party mode and see if it gets you a more interesting photo.
Note
One note about party mode is that I believe what it will be doing is leaving the shutter open a little longer than usual. so, you will want to hold your camera still and make sure your subject is holding pretty still. So, you don’t get blurry photos.
6. Instax mini 90 – kids mode
Okay, so the next mode that we are going to look at is called kids mode. kids’ mode is one of the kids looking to be laughing or talking as kids do. So, this is not a mode just for taking pictures of kids this is really for trying to get sharp photos of fast-moving subjects.
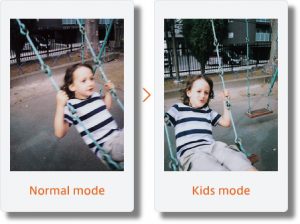
Instax mini 90 Kids Mode
So, it’s particularly for shooting when you are like indoors or if it’s quite cloudy outside where there’s low light. In a low light situation, the camera is going to try to use a slower shutter speed to let lighter in. But if your subject is moving that is going to mean that the photo turns out blurry.
So, if you’re shooting indoors or in low-light and you find that you’re shooting like a pet or a kid or even a grown-up who is moving. Those photos are turning blurry. You can use this mode to try to get a sharper image. So that is what this one is about.
If you want to avoid blurred photo, then Click Here to know
Why You are about to love this New Kids Mode
7. Instax mini 90 – landscape mode
All right the next mode lets ‘s check it out in the mountains. This is landscape mode so this is changing the focus distance of the camera. So normally it’s around 60 centimeters to 3 meters. Now if you’re shooting something that is further away, this is landscape mode that gets you right shot. So 3 meters to infinity 2 like as far away as you can.
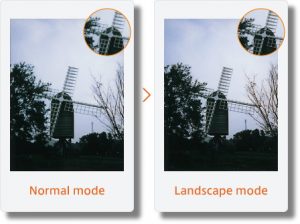
Instax mini 90 Landscape Mode
When you use this mode, especially when your subject is further away. It is going to help you get a sharper photo because it’s focusing on the right thing. That’s a really great thing about this camera. It has those different focusing ranges built-in that you can easily change. That’s going to help you get better quality photos.
Click Here to Get Details – How Landscape Mode Work with 5 TEST
8. Instax mini 90 how to – double exposure
Let’s move on here’s a fun one double exposure mode. and this is where things get really creative this is the only Instax mini camera to have double exposure mode. Basically, what it does, it lets you take two photos. But it exposes both images on the same piece of film. and the creative possibilities here really are endless.
So, the first shot I took was a picture of Rob kind of backlit. So, he’s in silhouette and then

Instax mini 90 Double Exposure Mode
the second photo shot was of some flowers. The way that very basically a double exposure tends to turn out is that anything that is a shadow in your first image that is where the second image is going to kind of be seen.
So, this is a really classic way to do a double exposure, do a silhouette and then do a photo of something like a pattern. That will fill out the silhouette. But there is so much you can do here a lot to experiment with.
Basically, once you’re in double exposure mode you take one photo and then you go take another photo and then the film pops out.

Instax mini 90 Double Exposure Mode
So, that is totally my favorite mode. it’s just a blast to try to see what you can get. and the results are always kind of a surprise so this is really fun make sure you try this out if you get the mini 90.
Click Here to Get More Details Crazy to Use of Double Exposure Mode
9. Instax mini 90 – bulb mode
One more shooting mode that’s also very fun and let’s check it out. That is this one right at the end here this is bulb mode. So, what this is going to do is it will leave the shutter open for as long as you were holding down the shutter release button for up to 10 seconds. The flash will not fire. This is just going to let you take a longer exposure.

Instax mini 90 Bulb Exposure Mode
There’s more time for light to come into the camera. So, this is really great to say if you are shooting at nighttime and you want like a picture of city lights or something. Hold that open and let all that leg come into the camera. you can get really cool results.
Note
One tip when you’re using the bulb mode is that it’s really great to have either a tripod or to rest the camera on something steady like a table or a bench. because if the camera is moving you’ll go you’ll get some like shakiness in your photo.
Another fun thing you can do with bulb mode which is what we played with was kind of light painting. you can take a flashlight or a sparkler and sort of move it around while you have the shutter open.
You can get all sorts of interesting things here if you have a subject that is really dark you can kind of use the flashlight to paint the light on them. There’s just so much you can do with it and especially in instant film where the results kind of pop out like. It’s really fun.
So, the bulb mode here another one to definitely experiment with.
Click Here to Get More Details the 10 Magic trick Using of Bulb Mode
How To Use Mini 90 step by step
- Okay now that we have talked at length about all the shooting modes let’s get it ready to shoot. I’m going to show you how to put the film in and take a photo. so that you can get out and start using the mini 90.
- So, make sure when you buy this camera that you are also picking up some Instax Mini film. Make sure it’s the mini stuff. There are other sizes of Instax film that will not work with this camera. and very often when you purchase it, it does not come with the film included.
- That is a very sad mistake to make so don’t make it get the mini film. if you buy it in bulk you save money and especially with the mini 90, you’re going to be taking a lot of different photos. So, I recommend that check the links on the Amazon for all the cheapest places to get it.
- Let’s open it up and get it into the camera. So, very often the mini film actually comes in two boxes of 10. so, there’s two in there and so this is our film be very careful with this stuff. It is delicate you don’t want to leave it in a hot car, you don’t want to leave it in a freezing cold car. it wants to be at cool room temperature and keep it dry.
- When you are opening this package be careful, you do not want to squish this stuff or you will mess it up. so, you’re just very gently opening it here and I will show you that when you open up the pack, hold it by the edges. because as you can see from these very helpful icons. you do not want to put your fingers on here, you do not want to squish there or here because of the chemicals.
- If you’re squishing them you could totally mess up your film. Before you even take the shot and that would be very very sad. So, hold it by the edges be nice and gentle. Let’s get this into the camera.
- So, we’re going to use the top switch here that pops open. This is an empty one you can just take that out. When you’re done with one and you can see there’s that little yellow dot on the camera and then you will find a little yellow dot right on the pack of film. It makes it so easy just line up the yellow dots get it in there. Close the door and then the camera is going to automatically get rid of the dark slide.
- When you take the first shot, it’s just popped up a piece of cardboard that covers up the film so that the light doesn’t get on it. So, you can just throw this away. Now you are ready to shoot and the Camera is on.
- It’s ready to go and you can see on the Back-LED screen that it says ten. That’s mean I have ten photos remaining. So, I can really have a lot of fun. So, one thing that I really like when I’m shooting with this camera is that the LCD makes it so easy for me to know what mode I’m in. So, I don’t accidentally start shooting in the wrong one. So, I’m just going to put this into regular mode and then like I was saying before you can either use the front shutter release or you can do the horizontal shot.
- But I like to shoot vertically with mini film and I’m just going to take a photo up of the eye well and then let the film come out. Then Just grab it by the little spot and be gentle with it. Definitely, don’t shake it messes it up. I have tested that there’s a post of it. If you want to check it out. So, you do want to be delicate with it.
- The mini film will develop. It will only take about 90 seconds. so, I often actually just put it in my pocket but that’s maybe not the safest way. You put it down flat and you can see it right there that it’s already coming up and that the fun of this camera is just right away.
- You get to see what you got and I love sharing these with people. Take a portrait of your friends or someone you met on the street and give them the photo and that is just a blast. So yes, that’s how you take a shot with this Instax mini 90 Neo Classic Polaroid Camera.
Instax Mini 90 With Film
As you can see the mini 90 comes with the neck strap. There are lots of different features and a few extra things you can do with it. Instax mini film Neo Classic actually comes in a ton of different varieties which is really cool.
The Instax Mini monochrome which is a black-and-white film. So, that’s fun if you’re really into black-and-white you might want to pick some of that up and play around with it.
Then the mini also has all sorts of different kind of fun ones. So, there’s like the shiny stars which has shiny stars of different colors on each one. A really fun one is the rainbow one where each frame is a different color that kind of blend together. So, when you line them all up they make a rainbow which is so cute.
There’s like Star Wars ones with dots on them. I think there were Hello Kitty ones there’s just so many different types of Instant mini film that are really fun. If you want extra fun a really cool accessory that I definitely recommend are these really sweet albums you can get them on Amazon.
I’ll have the links in the on the article and with the Title. They work for the Instax mini film and It’s just like a really fun way to keep all of your photos safe. It’s also a bit easier to kind of look at the photos in one of these cool albums versus just in a box or something. These are really cheap they come in different colors. So, definitely pick one of these up to keep all of your cool photos in one place.
Instax Mini 90 Shooting Tips
- General Tips and FactsWhen a new pack of film is inserted, the black cover ejects automatically. This also happens if you accidentally pop open the film door and close it back- it will eject the first film even if it is a good one.
- The flash will automatically fire up at all dark/dimmed situations (night, dark room/dimly lit room almost all selfies) unless manually disabled.
- When Shooting a photo on other modes (auto, landscape) except macro/kids’ mode, the camera captures the film a little more than you see in the viewfinder. That is if you frame a group photo cutting a bit from the two-corner people – it will capture those two people fully.
- The image seen through the viewfinder is inside of the red box.When you switch on the camera, if the flash blinks in the screen – the flash will be fired if you shoot a photo.
- If you manually disable flash where it would usually fire the flash (evening surroundings or dimly lit backgrounds), keep the camera stable when you shoot. After clicking the shutter, wait for a few seconds before you move. If you move as soon as the photo is clicked in this situation, the photo will appear blurred.Note:: Bludded photo because I did not wait for the ejecting sound.
- The camera can support multiple modes at once. However, only certain modes are available with another. The interesting thing is that – Monochrome film is now available. If you want to shoot a single object and want it to appear clearly in the photo, place the object in a plain background. Avoid colorful backgrounds as this might make the object appear unclear or blended.
- The “Mode ring” can be turned but only when the “mode” button is pressed in the camera (petty useless feature though). You can use empty film cartons as photo frames for your Instax photos. Computer/TV screens appear fine without any problem in the film. No need for the bulb mode to capture this. The bulb mode may overexpose the screen.
- Sky PhotosA better picture of the sky can be shot where the sun was avoided.Instax mini 90 late evening – When the sun has already gone down giving the perfect opportunity for bright pictures. Late evening – a good tip is to cover the sun with any object.It’s a good idea to use the “L” mode if the surroundings are of a dark color with evenings (rocks = black)
- Instax mini 90 Nightfall – It is better to use “L” or “LL” if it is almost nightfall.Instax mini 90 The Moon – The moon will appear as the small dot on the photo. It is not possible to capture any detail of the sky or clouds at night when the sky is pitch black. If the flash will fire on default mode since it is dark and the moon appears as a bright dot.
- The Sea/Beach Instax mini 90Best time – Morning or afternoon it is not possible to capture very small details of the bubbles and splashes. However, you can capture the details of the waves in the sea or be washing the beach.
- Water splashing – The splash is seen as a blur. Kids mode will grant a faster shutter speed but this scenario is too far to capture with that mode. A splash is barely visible.
- Macro Mode Instax mini 90Not the usual macro in smartphones. The macro is used mainly for selfies or shots in the range of around 30cm (arm’s length). The mini 90 does a good job of focusing on the flower bunch at a given distance. The mini 90 focuses on the flowers and since the flowers cover the sun, flowers are visible in the picture. The sky is overexposed.
- Sea Urchins – When the flash is fired – therefore the urchins are only seen when looked closer.
- Your Pet with Instax mini 90The mini 90 flash enhances the details that are past arm’s length. The details of your pet eyes, ears, and the glossy coat is the show. The nose will be blurred since it is too close.
- Bulb mode Instax mini 90Best for capturing lights in darkness and stationary objects with moving surroundings. Maximum – 10 seconds When shooting this mode, use a tripod or keep the camera steady. The slightest movement will cause a blur.
- Glowing ball Instax mini 90In the case of a glowing ball which will emit different colors ( red, yellow, green). The setup I use to capture the ball is that It is a possibility to use the macro with bulb mode. I normally place The camera on the ground to keep it stable. This resulted in a beautiful capture. All the colors are seen in one film.
- You can use this for any event like the new year, wedding, party, the street and bridge lights reflecting in the water. Just make sure the camera is stable.This is all about a portion of experience of Instax mini 90 Neo Classic photography. I also trying monochrome film too. I will discuss this another post on this blog.
FILM REVIEW
There are lot of questions about film like-
Can I take the film at airport ? Can I cut the film or Can I use Expired film ? etc. I have written a full review of all film- mini, square and wide. You can read my review and choose whatever you want and this is also my recommendation for buying. CLICK HERE TO REVEAL THE FILM HISTORY, THEN BUY.
CAMERA REVIEW
There are lot of features in Instax Camera. Every camera has their own unique quality and settings. But what suits you best and what feature do you like most or do you like mini , square or wide format. There are lot of confusion might come to before buying the camera.
After buying the Instax camera, you always look for another feature that might not have that particular camera. Then you regret for that.
So I have researched all of the Instax camera and discussed all the camera individually so that you can understand better which one is better for you to buy.
So buy the camera after learning a bit more about Instax Camera. CLICK HERE…..TO READ CAMERA REVIEW.
So at the End
Alright, guys so that was the ultimate guide to the Instax mini 90 neo classic. Obviously, there are a ton of things you can do with this Neo-Classic Camera. The best thing to do is to get out and start practicing with those different modes.
Remember that you can do light and darken, you can do the self-timer, you can kind of combine them. so, you really have a ton of control and as a photographer, myself feel the most comfortable using this camera amongst the Instax Polaroid. When I’m out because I know I have that kind of fine-tuned ability to get the results that I’m looking for. But still having that real sort of surprise that comes whenever you’re shooting instant film.
So, it’s that combination of the fun and the control that just definitely makes Neo Classic my favorite of the Instax Camera. Yes, I said it this one’s my favorite. So yeah in the comments below let me know if you have one of these. If you have any tips on getting great shots out of it or if you’re interested what is it about this that makes it really cool. Because obviously there is a lot to it.
If you like photography and especially instant film photography like this. I always try to do a ton of post on it- all sorts of different cameras and tips make sure to share my experience with yours and give me an opinion of your memorable knowledge. If you enjoyed this and thank you so much for reading this review about Instant mini 90 Neo Classic Camera and have an awesome day and happy photography.


1 Comment
Andrea · July 29, 2018 at 8:52 pm
Very well done! I just got my instax 90 and googled tips and this was incredibly thorough and informative! A+ job!